

Microsoft Excel supports the protection of workbooks to prevent unauthorized changes to its structure. However, managing this protection is limited to Excel Desktop, which becomes a challenge for users working with the Excel for the web, especially in organisations where both versions are used.
The workbook protection can also create challenges when executing automations with Excel, since protected workbooks cannot receive certain structural changes to its worksheets.
In this blog, you will learn how to create a solution to protect or unprotect an Excel workbook using Office Scripts, overcoming this limitation if Excel for the Web. You will also learn how to integrate this logic into Power Automate, allowing your automations to temporarily unprotect a workbook, execute any operations, and protect it again once it’s done.
You can also check the video covering this same topic on the Digital Mill YouTube Channel:
Note: There is an article covering a similar solution, where Power Automate and Office Scripts are used to unprotect worksheets in Excel.
What are Office Scripts?
Office Scripts is a feature in Excel for the web that allows you to automate repetitive tasks using TypeScript. It enables you to record actions or write custom scripts to manipulate data, format worksheets, and perform complex operations programmatically. It works similarly to VBA, but for cloud-based environments, which makes it more suitable for modern automation scenarios.
You can find ready-to-use script templates for a wide range of Excel tasks in the Office Scripts Gallery to help you to get started faster. Some of the examples presented in this blog can be also found in the Gallery:
- Protect workbook only
- Unprotect workbook only
- Unlock workbook, do something and protect workbook again
Workbook and Worksheet Protection in Microsoft Excel
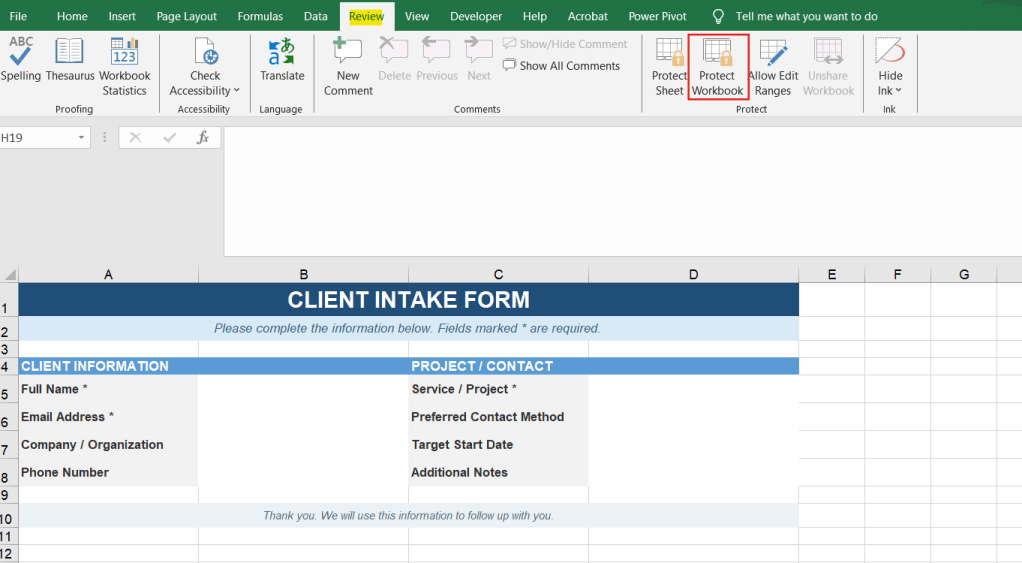
From the Excel ribbon, the workbook protection can be managed only in the Desktop version, under the Review tab:
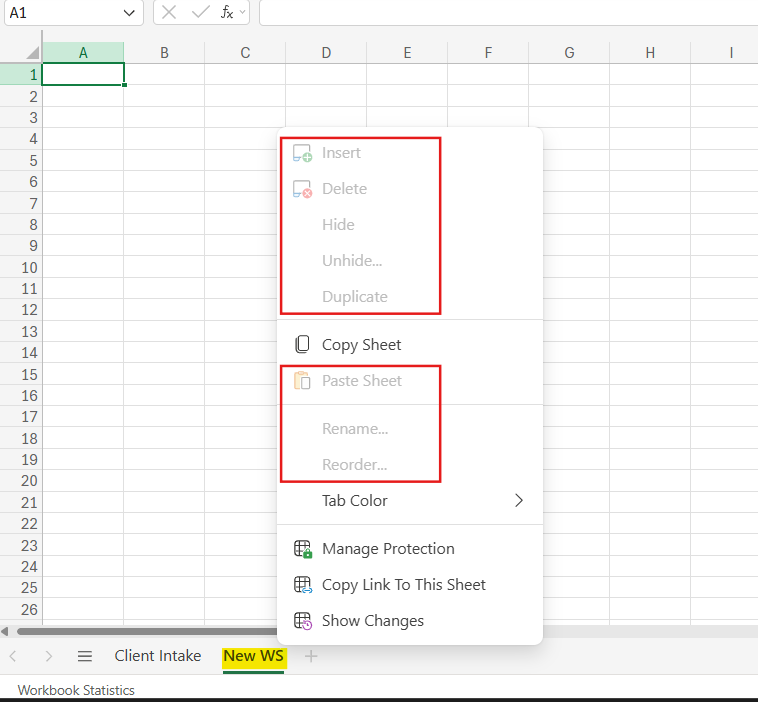
After setting up a protection to a workbook, no changes can be made to its structure, including adding, removing, renaming or hiding and unhiding worksheets:
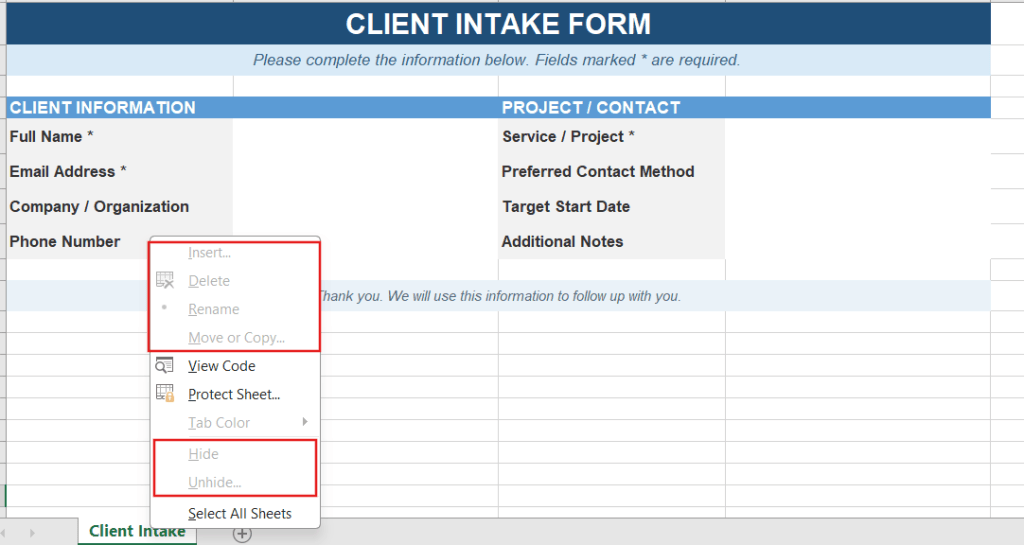
Workbook protection does not prevent users from modifying the content of the worksheets. To restrict changes to worksheet content, you need to use worksheet protection instead.
Both workbook and worksheet protection can be managed using Office Scripts. For more information about protecting and unprotecting individual worksheets with Office Scripts and Power Automate, check out this article.
Protect and unprotect Excel workbooks with Office Scripts
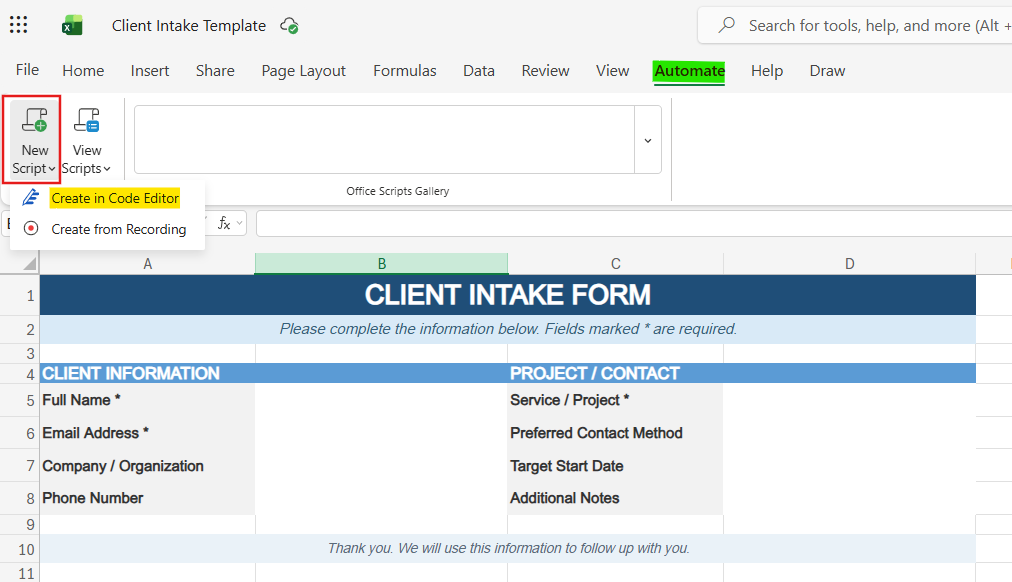
As a first step, let’s create the Office Script. From an unprotected Excel workbook, go to the Automate tab (highlighted in green), click New Script (in red) and Create in Code Editor (in yellow):
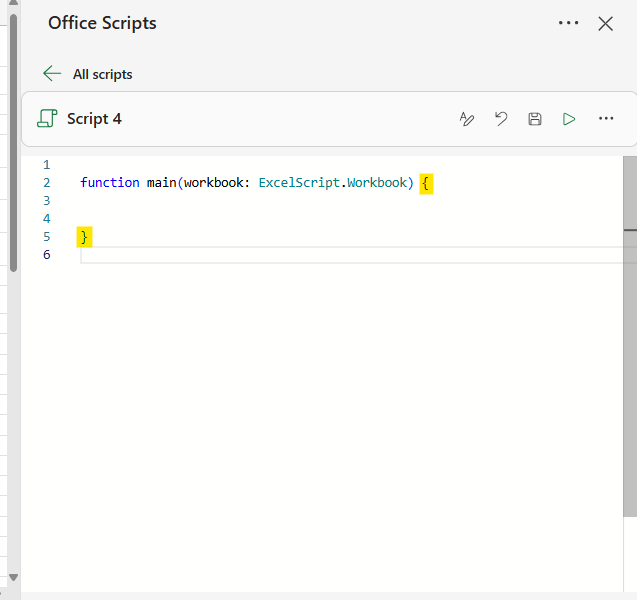
The Office Script Code Editor will appear on the right side of the screen. Remove all the code inside the main function, which is enclosed between the curly brackets (highlighted in yellow), so we can start from scratch:
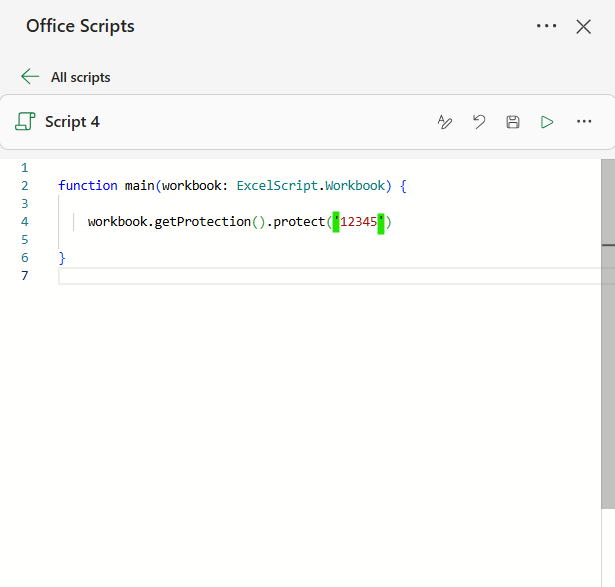
To protect a workbook with Office Scripts, we can use the workbook.getProtection().protect([password]) method. Since the workbook protection requires a password, you must define it as any value between the parentheses of .protect(). Make sure to enclose your password with single or double quotes (in green), since the protect() method expects a string data type. For this example, we’re using 12345 as the protection password:
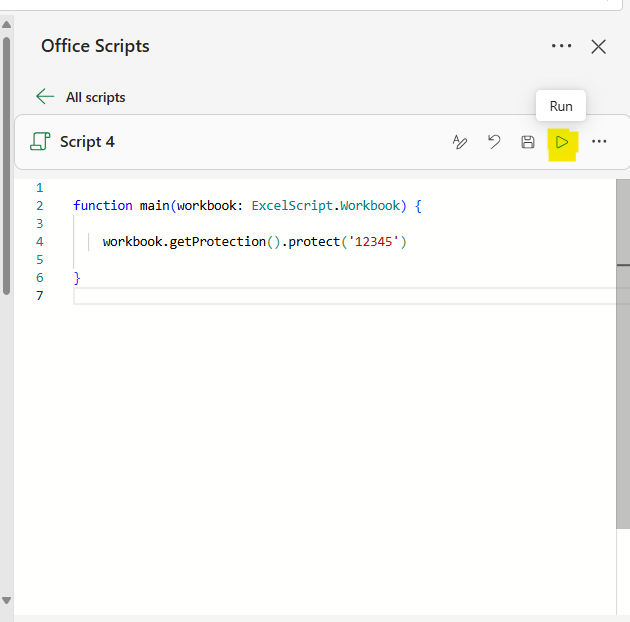
So far, the Excel workbook is unprotected. Once we click the Run button (highlighted in yellow), the script will be executed and the protection applied to the workbook, preventing changes to its structure:
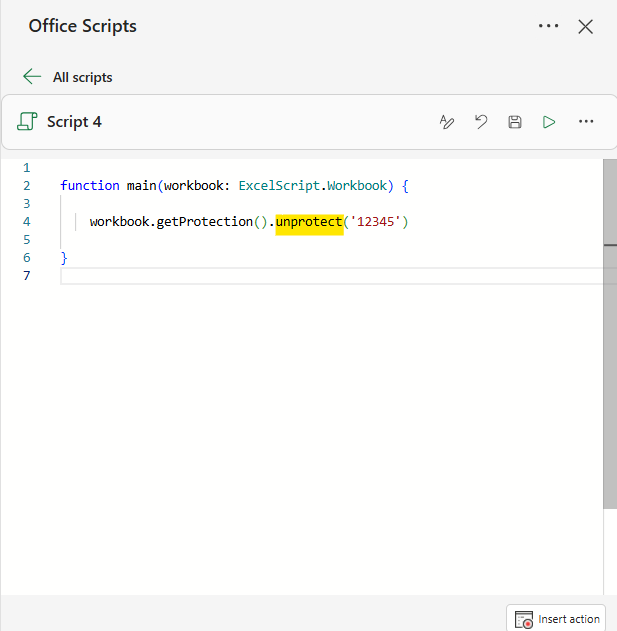
To remove the workbook protection, the line of code is very similar. Simply replace protect with unprotect and provide the same password: workbook.getProtection().unprotect([password]):
Dynamic Protection Password in Office Scripts
When creating an Office Script for managing the workbook protection, it is also possible to allow the user define the password. To do this, we need to add a parameter to the main() function.
Inside the parentheses of main(), add a comma, followed by psw:string (highlighted in yellow). This creates a parameter that will prompt the user to provide a password whenever the Script is executed. As a second step, replace the value inside the parentheses in .protect() or .unprotect() method with psw (highlighted in green):
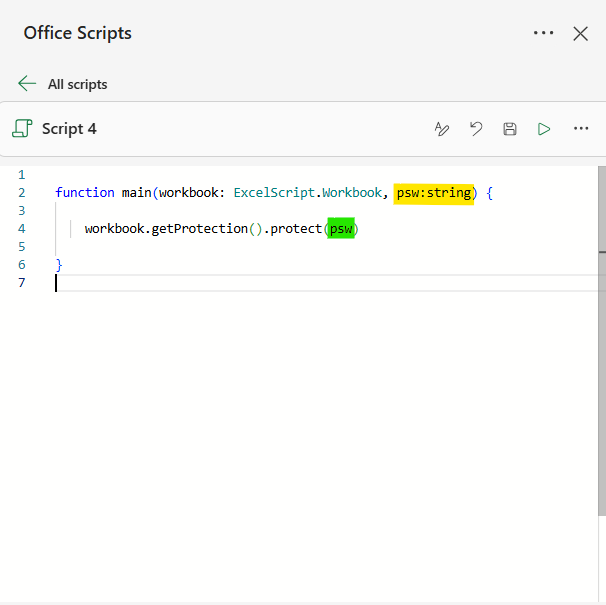
By implementing this change, we’re creating the psw parameter with a string (text) data type and using its value as input for the protection/unprotection command. You can use a different name for the psw parameter, as long as you use the same name in protect/unprotect method.
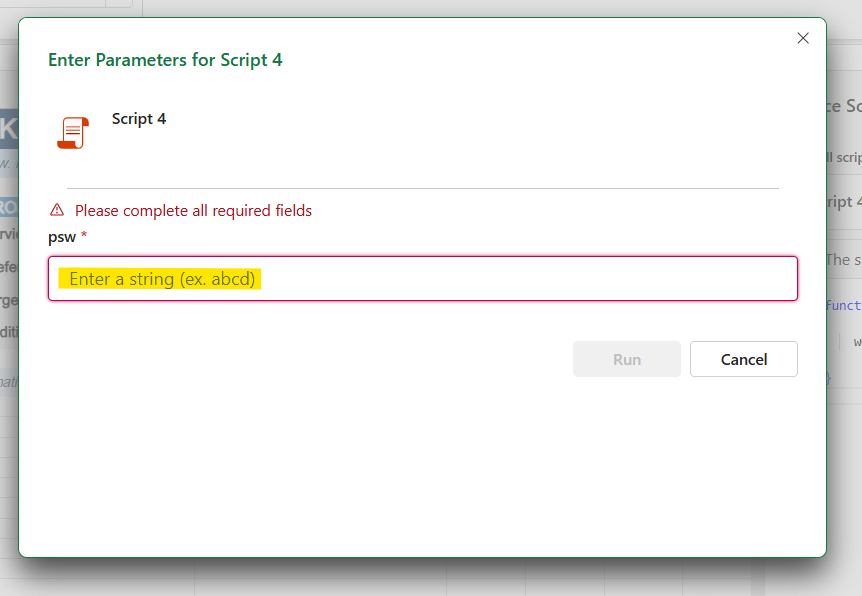
After clicking Run, Excel will now ask you for a password before executing the Office Script, and use it to protect or unprotect the workbook:
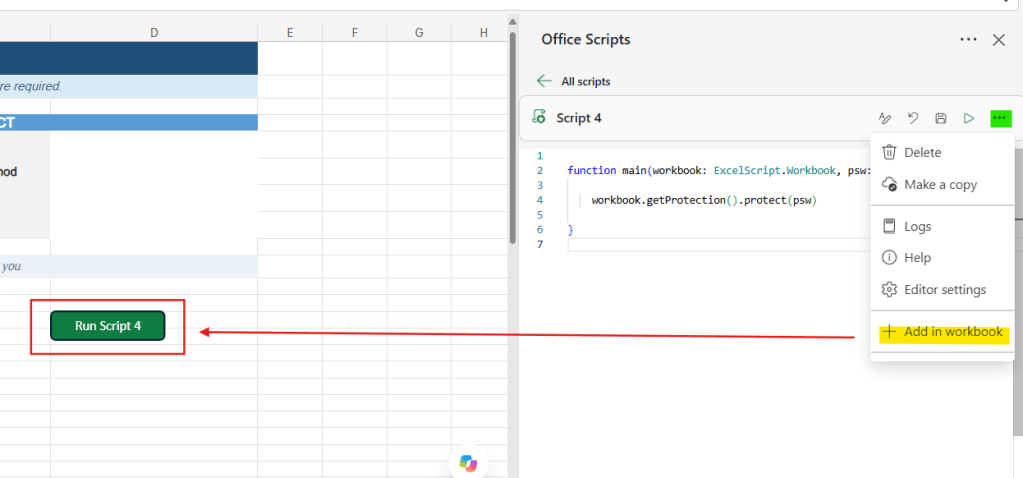
You can also add a shortcut to the script inside the workbook (highlighted in red) by clicking the Ellipsis (…) (highlighted in green) and Add in workbook (in yellow). This allows users to access the workbook protection feature directly from Excel for the Web:
Toggle Workbook Protection with Office Scripts
If the Office Script runs to protect a workbook that is already protected, an error will be raised (highlighted in blue):
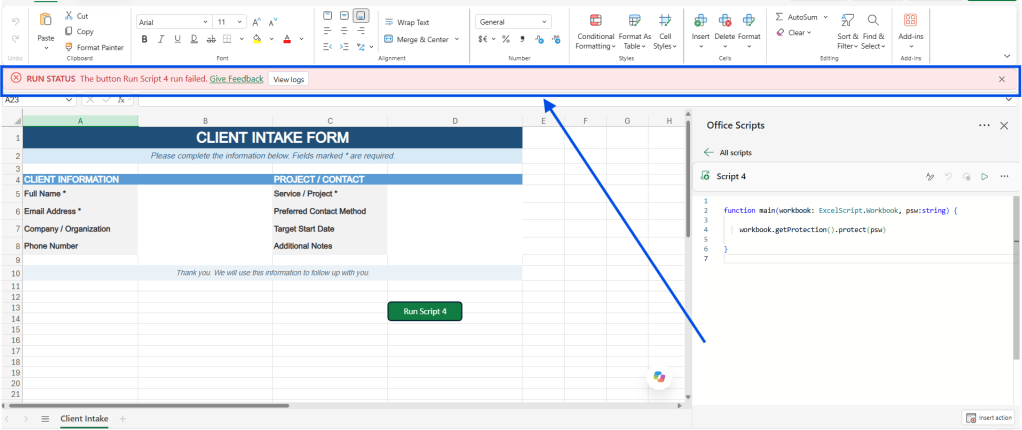
The same behavior occurs when you try to unprotect a workbook that is already unprotected. This is usually not a problem if the purpose of the Office Script is to exclusively protect or unprotect the workbook, but it can be an issue for the processes where any additional tasks need to be executed after the protection management. In this case, the error will stop the Script execution, and any subsequent lines of code will not be executed.
To avoid errors, we can identify the current status of the workbook protection (whether it’s protected or not) and use a condition to determine whether the protection or unprotection should be applied or not.
To do this, we first create a variable called is_protected to collect the current workbook protection status by adding the following line of code at the beginning of the main function: const is_protected = workbook.getProtection().getProtected() (highlighted in yellow):
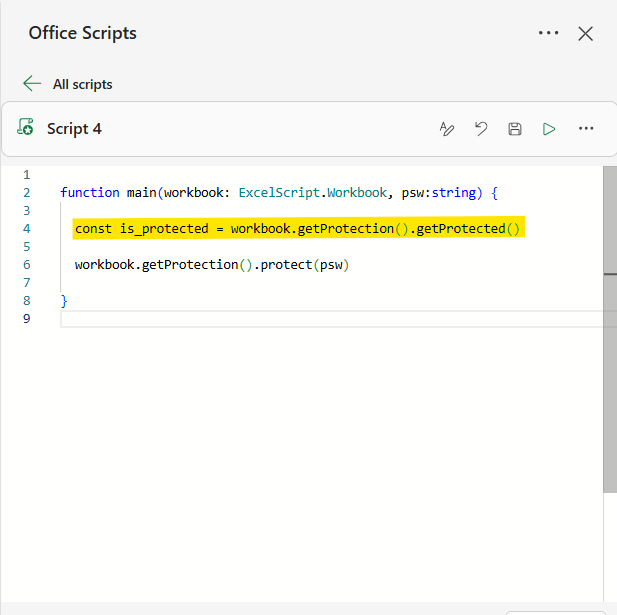
The result of this statement will be either true or false, depending on whether the workbook is currently protected.
Next, we add a condition to evaluate the value of is_protected, by using the code if(is_protected). If it’s true, the code inside the block (highlighted in red below) will be executed, and we can use it to perform any tasks that should occur when the workbook is already protected.
At the end of this block there is a return statement, which exists the main() function and stops the script execution. As a consequence, the protection statement will not be executed:
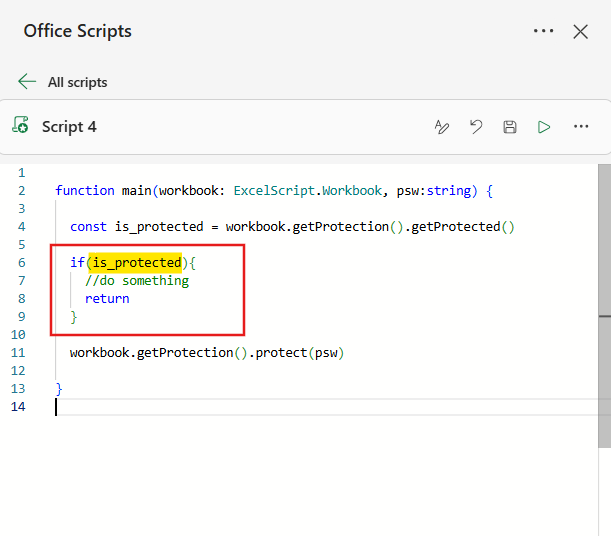
This approach is enough for handling any duplicated protections and avoiding errors. However, if we want to create a “toggle” experience, where the user can use a single Office Script to either protect or unprotect the workbook depending on its current status, we can use a logic like this:
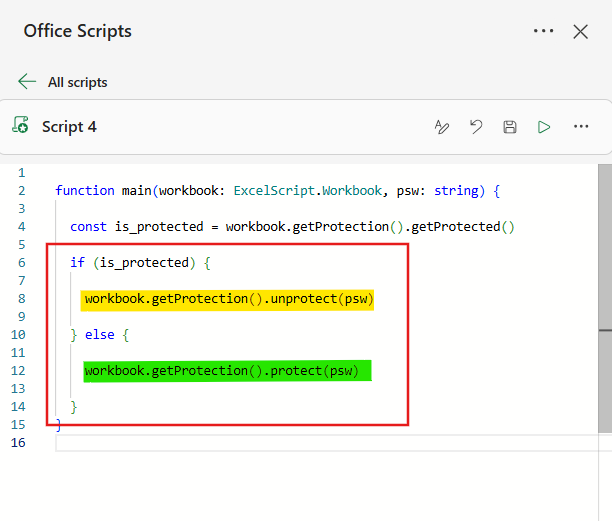
In the Office Script above, we’re testing the value of the is_protected variable. If it’s true, the workbook is currently protected, so we will unprotect it based on the password provided by the user (highlighted in yellow). If is_protected is false, the else block is executed, and the workbook will be protected using the provided password.
Full Office Script code:
function main(workbook: ExcelScript.Workbook, psw:string) { const is_protected = workbook.getProtection().getProtected() if(is_protected){ workbook.getProtection().unprotect(psw) } else { workbook.getProtection().protect(psw) }}
Run an Office Script from Power Automate
You can run Office Scripts from Power Automate, extending your automation capabilities beyond the built-in platform actions. Any of the Office Scripts variations shared above can be executed inside a Power Automate flow.
A common scenario is using a flow to make structural changes to a protected workbook, such as creating a new worksheet. As we saw, protected workbooks do not allow changes to their structure, requiring an Office Script to temporarily unprotect it, performs the operation and protects it at the end.
For this example, we will work with this Office Script, which will unlock an already protected workbook, add a new worksheet named “New WS” and protect the it again, always using the password informed in the Power Automate flow:
function main(workbook: ExcelScript.Workbook, password: string) { workbook.getProtection().unprotect(password) workbook.addWorksheet('New WS') workbook.getProtection().protect(password)}
Make sure to save the Office Script before adding it to the Power Automate flow.
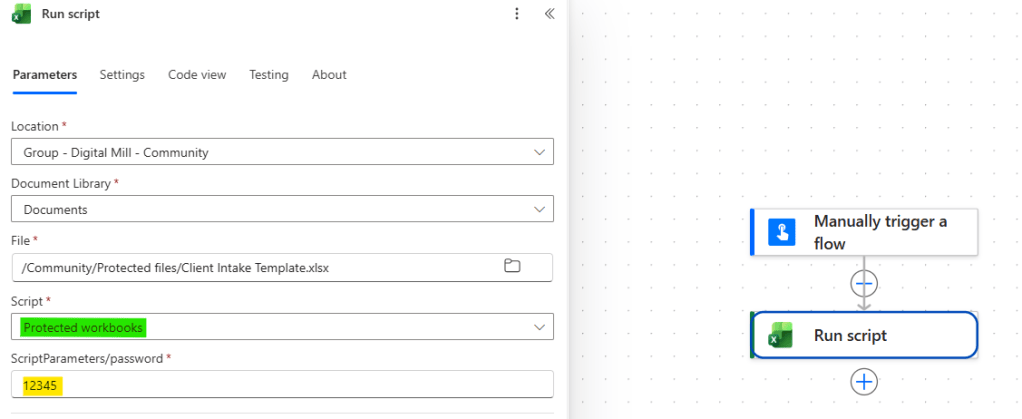
In Power Automate, add a Run script action and select the Excel file and the Office Script that should be executed. You can reuse the Script in any Excel files, without the need to repeat the creation process described in the previous sections.
After selecting the Office Script in the action (in green), Power Automate automatically displays its custom parameters, where you can identify the password defined in the Office Script (in yellow). Enter the password to be used in the protected workbook:
After saving the flow and executing it, we can find the “New WS” worksheet added to the workbook (in yellow). The protection is also reinstated, preventing users from making changes to the workbook structure (in red):
Conclusion
In this blog, we saw how to use Office Scripts to manage the workbook protection of Excel file, handle errors and dynamic inputs, and integrate it as part of Power Automate flows. Let us know what do you think about this blog in the comment section, and don’t forget to check our website, our YouTube Channel or connect on LinkedIn!

