

If you use Microsoft Excel for managing templates, you are probably familiar with worksheet protection. This feature restricts certain operations within a worksheet, preventing accidental changes that could result in data loss.
However, when integrating files with protected worksheets into automated processes, these restrictions can also prevent Power Automate from making changes to the file, such as when we need to update the validation fields used by the template, or modify cells that are normally locked.
In this blog, you will learn how to create a solution to protect and unprotect Excel worksheets using Office Scripts. You will also learn how to integrate this logic into Power Automate, allowing your automations to temporarily unprotect a worksheet, execute any operations, and protect it again once the process is finished.
You can also check the video covering this same topic on the Digital Mill YouTube Channel:
Note: There is an article covering a similar solution, where Power Automate and Office Scripts are used to unprotect workbooks in Excel.
What are Office Scripts?
Office Scripts is a feature in Excel for the web that allows you to automate repetitive tasks using TypeScript. It enables you to record actions or write custom scripts to manipulate data, format worksheets, and perform complex operations programmatically. It works similarly to VBA, but for cloud-based environments, which makes it more suitable for modern automation scenarios.
You can find ready-to-use script templates for a wide range of Excel tasks in the Office Scripts Gallery to help you to get started faster. The template presented in this blog is also available in the Gallery.
Workbook and Worksheet Protection in Microsoft Excel
There are three main types of protection that can be performed in Excel:
- The file protection, where a password is set to prevent users from opening the file
- The workbook protection, which prevents users from making changes to the workbook structure, such as inserting, removing, renaming or hiding and unhiding worksheets
- The worksheet protection, which restricts users from performing specific operations inside a particular worksheet, such as formatting cells, inserting columns, applying filters or managing PivotTables
Although the file protection cannot be managed by Office Scripts, both workbook and worksheet protection can be managed using Office Scripts. For more information about protecting and unprotecting workbooks with Office Scripts and Power Automate, check out this article.
Protect and unprotect Excel worksheets with Office Scripts
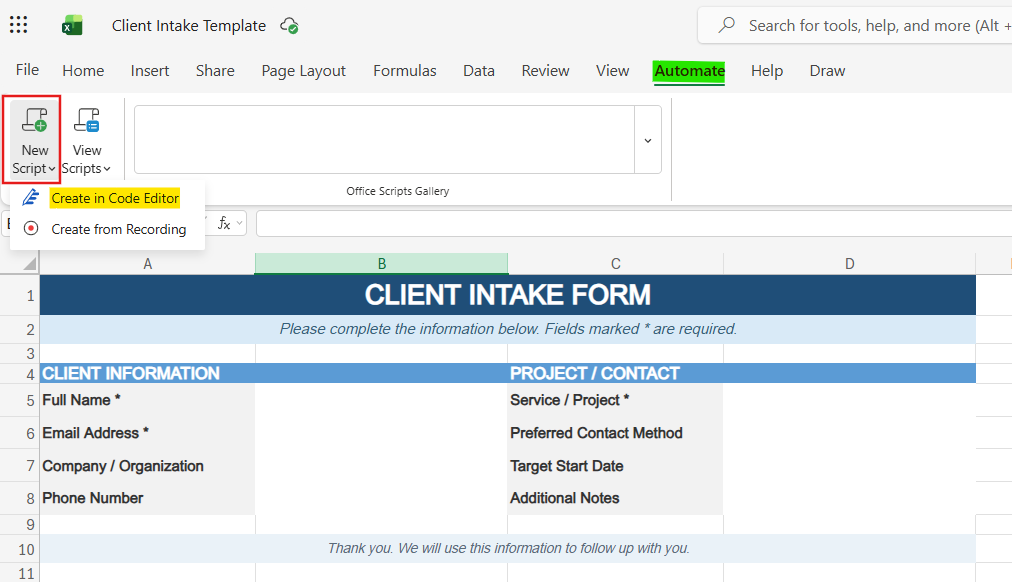
As a first step, let’s create the Office Script. Go to the Automate tab (highlighted in green), click New Script (in red) and Create in Code Editor (in yellow):
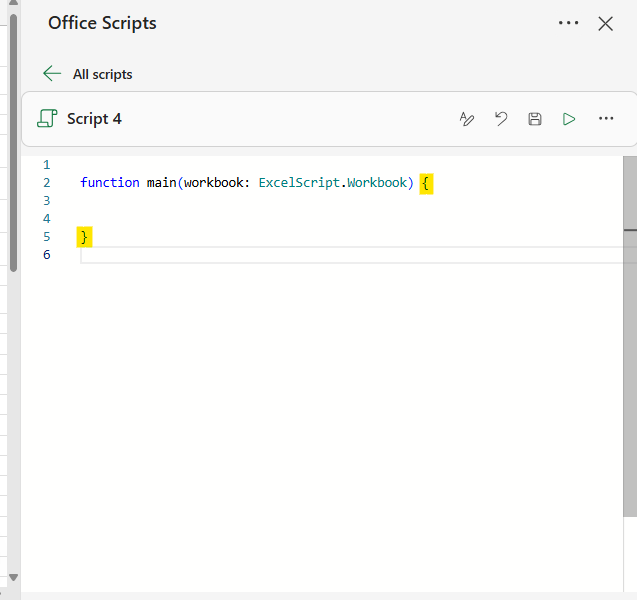
The Office Script Code Editor will appear on the right side of the screen. Remove all the code inside the main function, which is enclosed between the curly brackets (highlighted in yellow), so we can start from scratch:
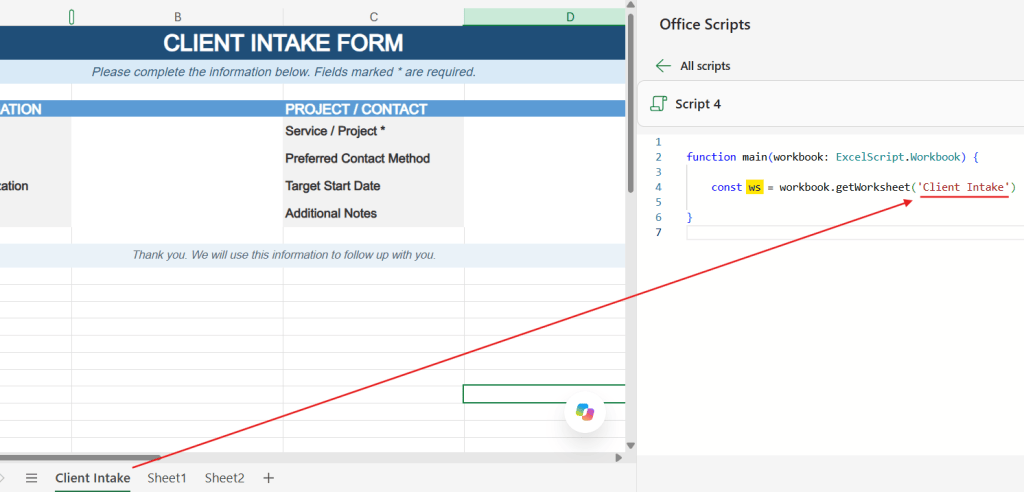
The first step is to access the worksheet object, which can be retrieved by its name or position in the workbook. For this example, we will use the code const ws = workbook.getWorksheet(‘Client Intake’) inside the main function, which references the object corresponding to the Client Intake worksheet (highlighted in red), and stores it in a variable called ws (highlighted in yellow):
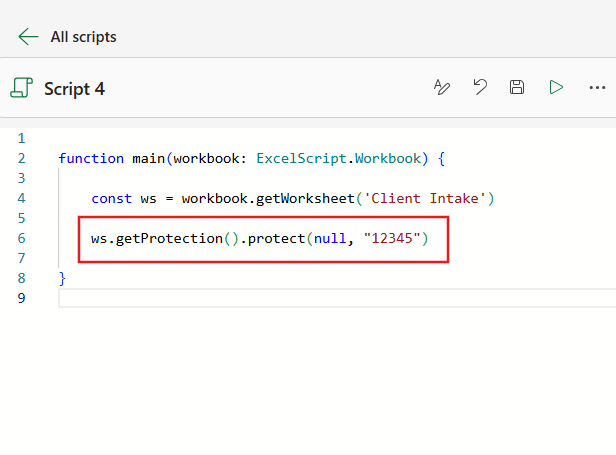
Next, we can write the ws.getProtection().protect([settings], [password]) to the code editore. The protect() method expects two optional parameters: the first defines the custom protection settings and the second specifies the protection password.
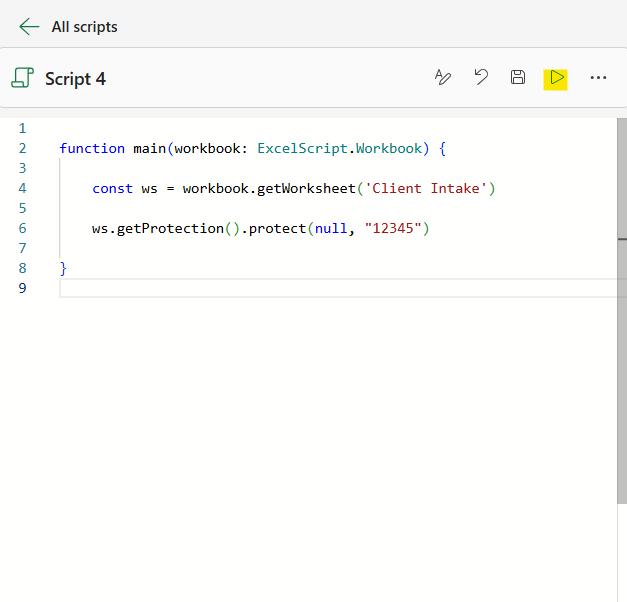
For this first example, we will not work with custom settings, so we will pass null as the first parameter and set the password to 12345. Make sure to enclose your password with single or double quotes, since the protect() method expects a string data type:
Once we click the Run button (highlighted in yellow), the script will be executed and the protection applied to the Client Intake worksheet:
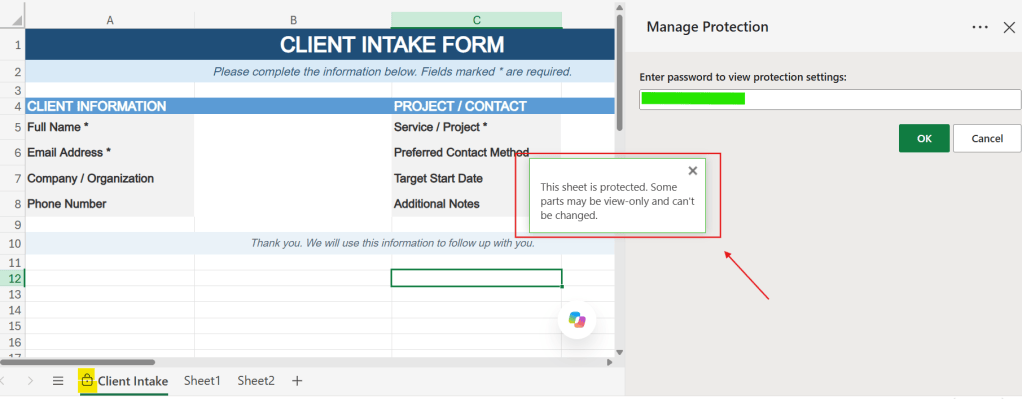
After running the Office Script, the protection is applied to the Client Intake worksheet (in yellow), preventing users from modifying its content (in red). Since we provided null as protection settings, the default settings were applied to the worksheet, allowing users to simply select cells, but not modifying it. To view or change the protection settings, we need to provide the defined protection password (in green):
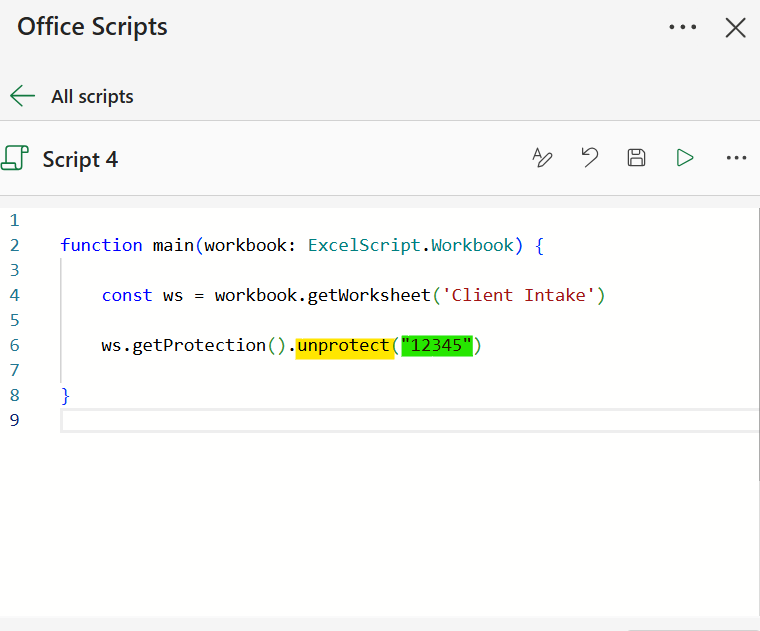
To remove the worksheet protection, we can use a very similar line of code. Instead of protect() use the unprotect() method (in yellow), using only the password its only parameter (in green):
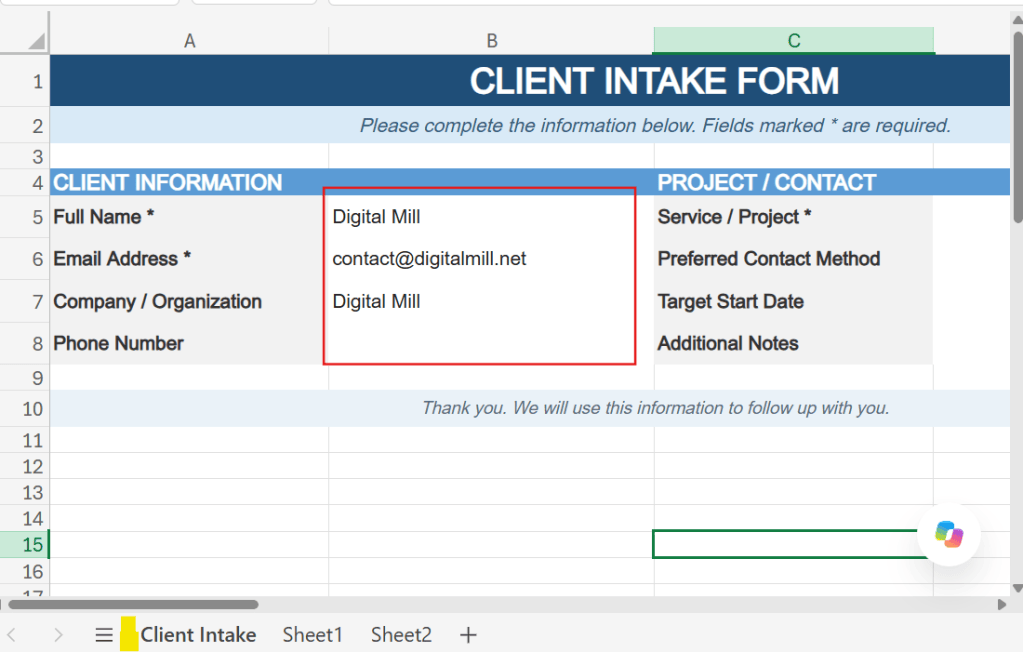
After running the Office Script, the worksheet will be unprotected and users can edit its content again:
Dynamic Protection Password in Office Scripts
When creating an Office Script for managing worksheets protection, it is also possible to allow users define the protection password dynamically. To do this, we need to add a parameter to the main() function.
Inside the parentheses of main(), add a comma followed by psw:string (highlighted in yellow). This creates a parameter that will prompt the user to provide a password whenever the Office Script is executed. As a second step, replace the value inside the parentheses in .protect() or .unprotect() method with psw (highlighted in green):
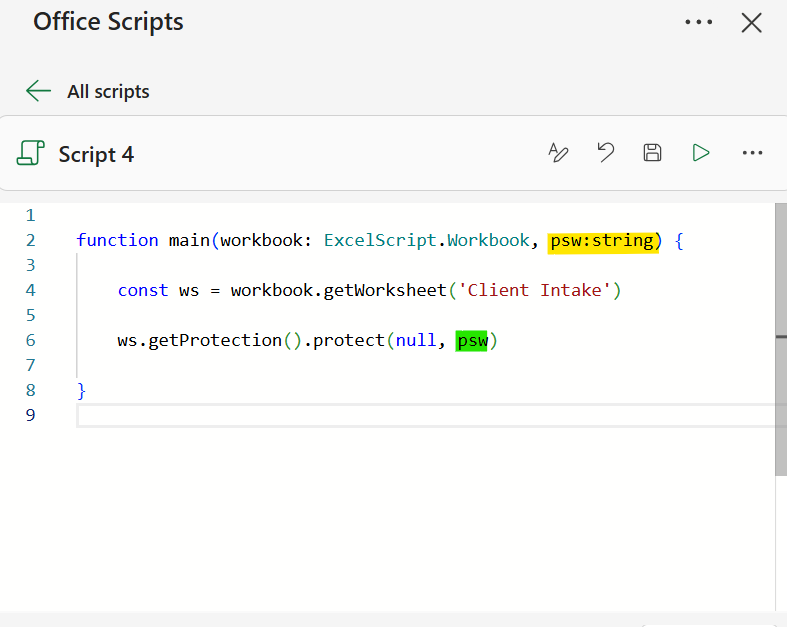
By implementing this change, we’re creating the psw parameter with a string (text) data type and using its value as the password for the protection or unprotection command. You can use a different name for the psw parameter, as long as you use the same name in the protect() or unprotect() method.
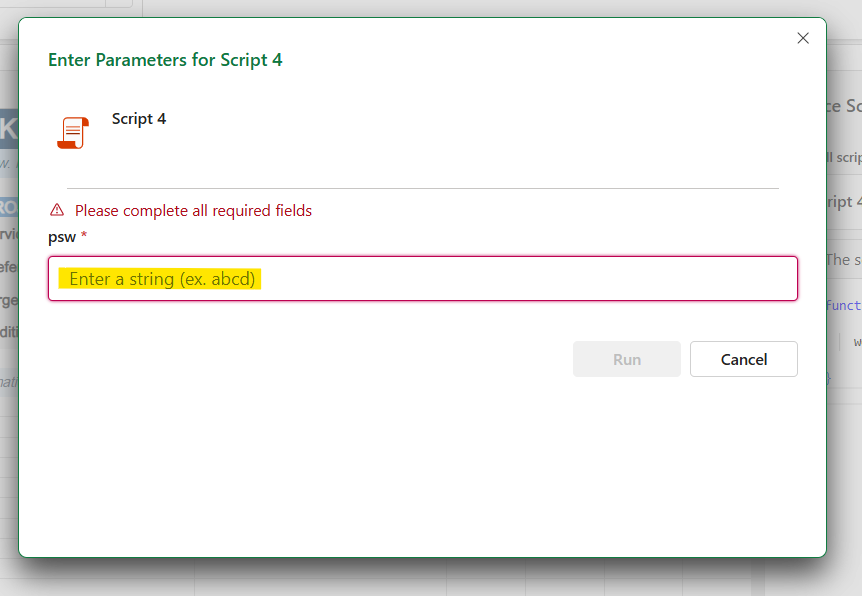
After clicking Run, Excel will now ask you for a password before executing the Office Script, and use it to protect or unprotect the worksheet:
A similar Office Script is available in the Office Scripts Gallery, and you can find it here.
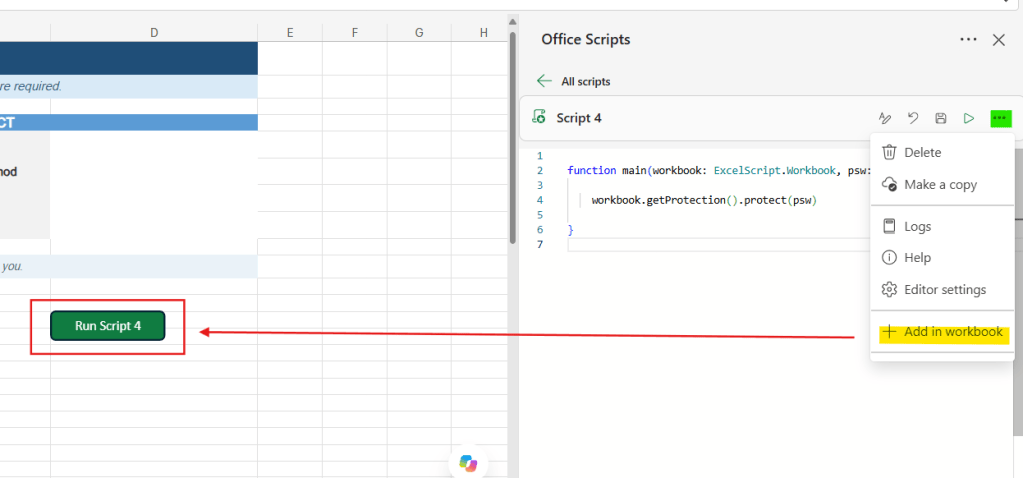
You can also add a shortcut to the script inside the worksheet (highlighted in red) by clicking the Ellipsis (…) (highlighted in green) and Add in workbook (in yellow):
Custom Settings for Worksheet Protection in Office Scripts
When protecting the worksheet with Office Scripts, we can configure custom settings to allow the users to perform specific tasks inside the worksheet. Among these settings, we can allow users to insert or delete rows and columns, apply filters, sort data, format ranges, work with PivotTables, and more.
The custom settings are formatted as a JSON object, where each setting corresponds to an individual property that usually expects a boolean value.
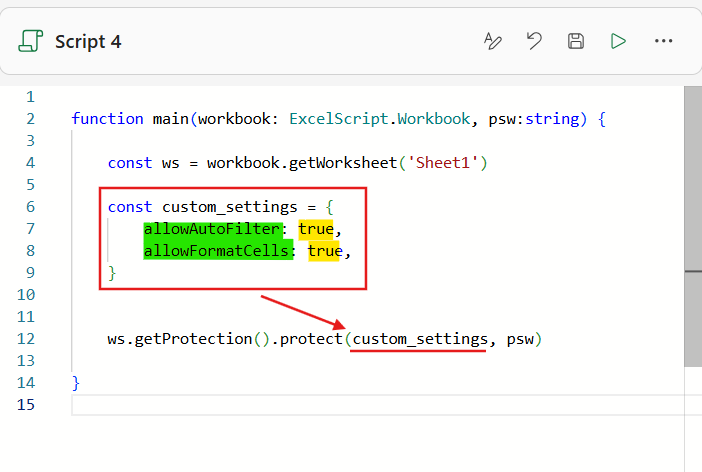
To see how the custom settings work in practice, let’s create a separated value named custom_settings to store the object containing the properties we want to configure. For this example, let’s allow the user to only format cells and apply filters, keeping all other interactions locked.
Using a JSON object format (to better understand JSON, you can refer to this article, where we explore what are objects in Power Automate), we will define only the allowAutoFilter and the allowFormatCells properties (highlighted in green below) and assign true to both of them (highlighted in yellow below).
Finally, replace the null from the protect() method by the custom_settings variable:
Entire code:
function main(workbook: ExcelScript.Workbook, psw:string) { const ws = workbook.getWorksheet('Sheet1') const custom_settings = { allowAutoFilter: true, allowFormatCells: true, } ws.getProtection().protect(custom_settings, psw)}
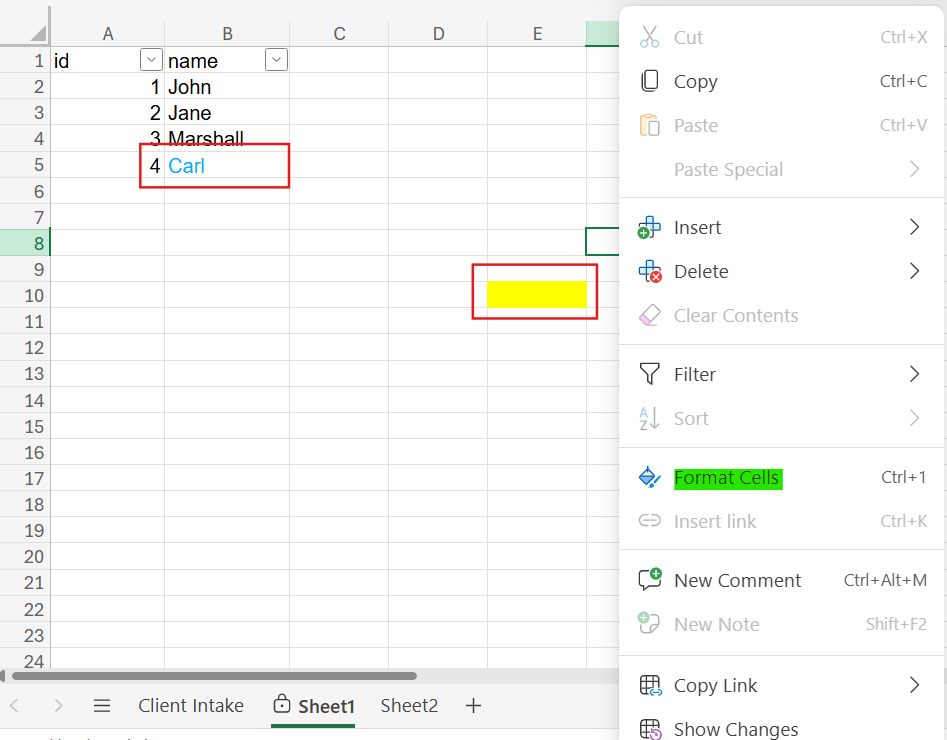
After executing the Office Script, Sheet1 will be protected and users will not be able to perform most actions on its content, like inserting or removing rows and columns, editing cell content, inserting links or cutting and pasting cells. However, because of the custom settings we set, users will still be able to format cells (highlighted in green), including apply fill colors or change the font color (highlighted in red):
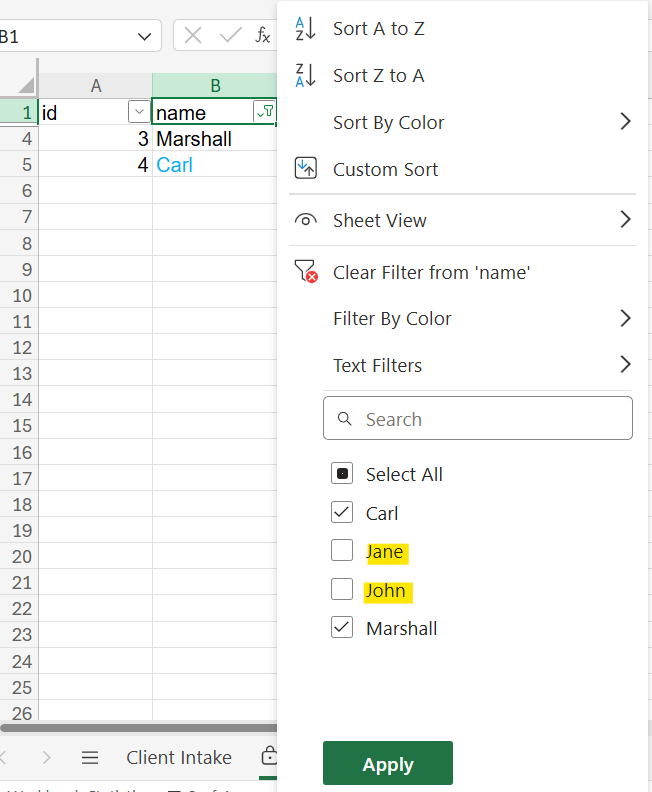
Another possibility is to control the filters applied to the worksheet:
Among the custom settings properties, the only one that currently doesn’t expect a boolean value is the selectionMode (in green), which defines which the cells can be selected. To configure this property, you must reference the custom type ExcelScript.ProtectionSelectionMode (in yellow), and specify one of its three possible values: none, normal or unlocked (in red):
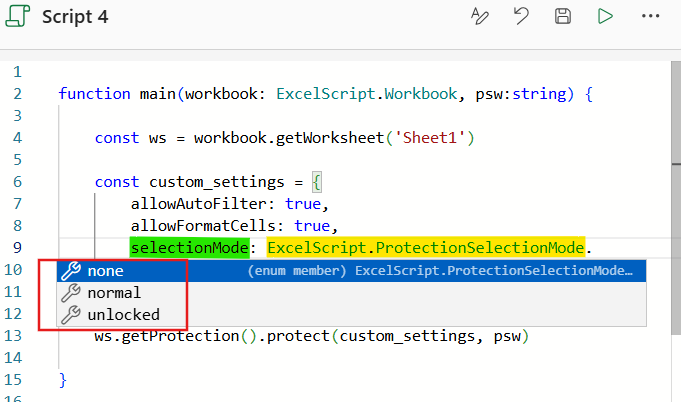
The none is the default option and prevents users from selecting any cells in the worksheet. The normal allows the selection of any cell without restrictions. The unlocked allows the selection of only the cells that are not locked. This property doesn’t control which cells can have their content modified, which is defined by the “Allow Edit Range Settings”, under the ws.getProtection() method.
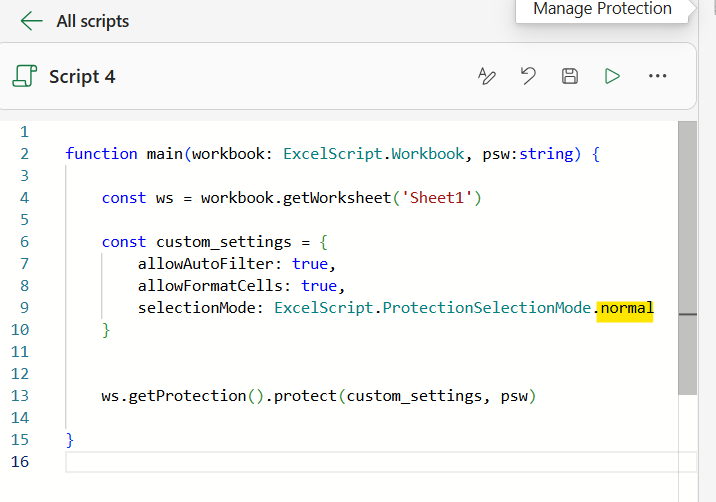
For assigning a value to the selection mode, you just need to include one of these three options after the custom type and a dot, such as in ExcelScript.ProtectionSelectionMode.normal (in yellow):
You can find a sample of a similar Office Script here. You can also find a list of all custom settings that can be configured and their respective property name in the official documentation.
Protecting multiple Worksheets in Office Scripts
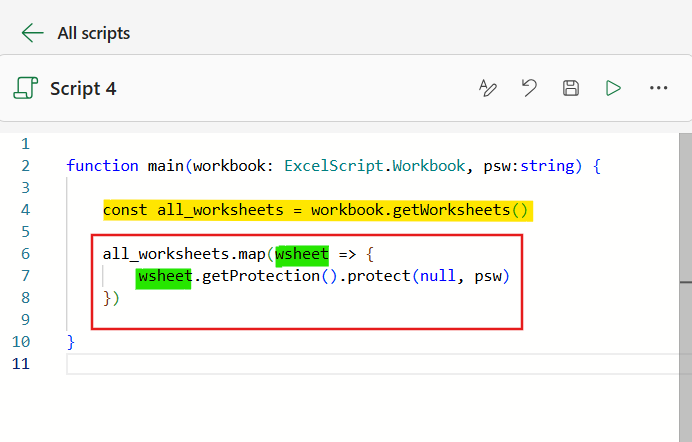
Another possibility is to manage the protection of multiple worksheets within a single Office Script. For example, with the following code, we can iterate through all worksheets in the workbook and protect each of them using a password informed by the used when running the script.
At the const all_worksheets = workbook.getWorksheets() line (highlighted in yellow), we retrieve an array containing the references to all worksheets in the workbook and storing it in the all_worksheets variable. Next, we access each worksheet of this array with the map() method and protect it (highlighted in green) with the password provided via pwd parameter:
There is a sample of a similar Office Script posted to the Office Scripts Gallery, and you can find it here.
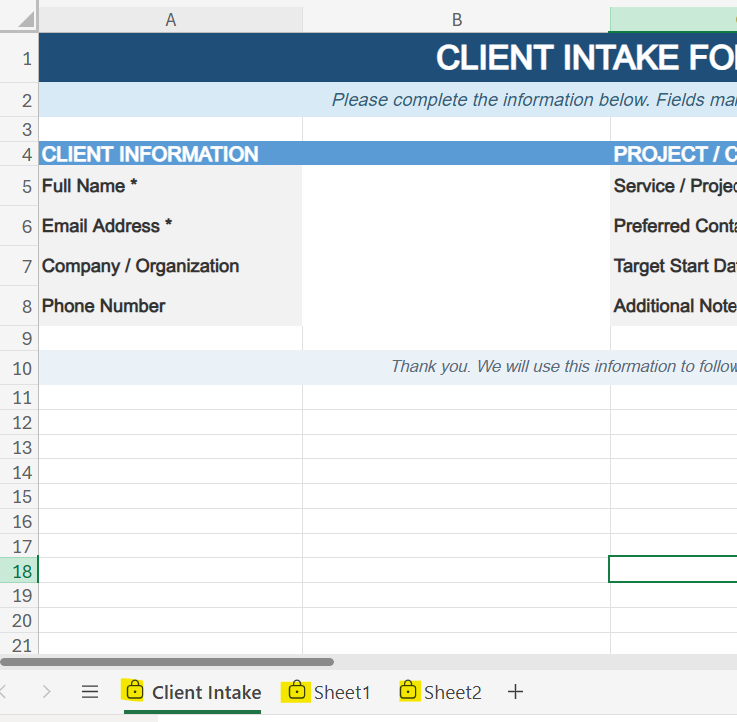
After running the flow, all worksheets will be protected, including the hidden ones:
It is also possible to apply the protection rules to only specific worksheets, and even using different passwords for each of them. In the following Office Script, we’re expecting the user to provide the worksheets_to_protect parameter (highlighted in yellow below), which is an array of objects, where each object contains two properties only: name and psw.
Inside the main() function, the script iterates through the worksheets_to_protect parameter, and for each object (highlighted in green), it retrieves the worksheet reference using name and applies the respective password as defined in psw:
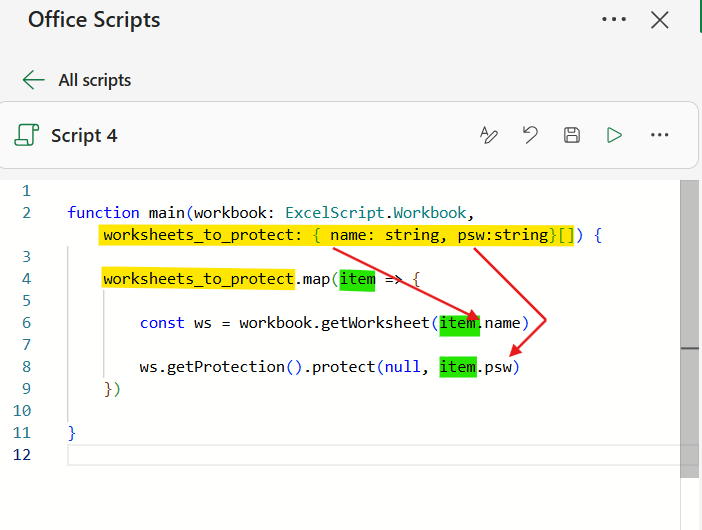
In practice, if the user provides an input such as the following, the Sheet1 will be protected using 456 as password, while Sheet2 will be protected using 123 as password. Any other worksheets at the same file will not be affected:
[{"name": "Sheet1","psw": "456"},{"name": "Sheet2","psw": "123"}]
There is a sample of this same Office Script posted to the Office Scripts Gallery, which you can find it here.
Pausing and resuming Worksheet Protection with Office Worksheets
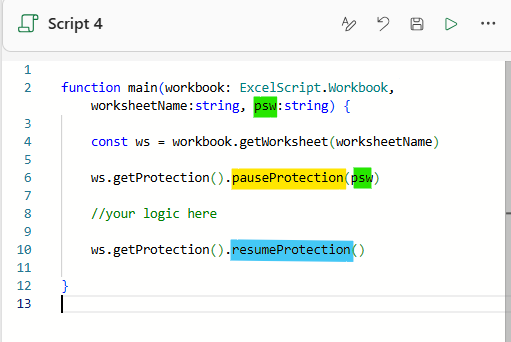
When changes need to be made to a worksheet without modifying its protection settings or password, we can leverage the pauseProtection() and resumeProtection() methods.
Use the pauseProtection() method (in yellow) informing the password (in green), and after executing the required operations on the worksheet, restore its protection with the resumeProtection() method (in blue), which doesn’t expects the password to be provided again:
There is a sample of this same Office Script posted to the Office Scripts Gallery, which you can find it here.
Run an Office Script from Power Automate
You can run Office Scripts from Power Automate, extending your automation capabilities beyond the built-in platform actions. Any of the Office Scripts variations shared above can be executed inside a Power Automate flow.
For this example, we will work with the following Office Script to unlock the Client Intake worksheet, populate some of its fields with data sent from Power Automate and relock it again, always using the password informed in the flow:
function main(workbook: ExcelScript.Workbook, ws_name:string, psw:string, full_name:string, email:string) { const ws = workbook.getWorksheet(ws_name) ws.getProtection().unprotect(psw) ws.getRange('b5').setValue(full_name) ws.getRange('b6').setValue(email) ws.getProtection().protect(null, psw)}
This follows a similar approach to the pause protection method, but it allows us to configure the worksheet protection settings again when the script is finished, if needed.
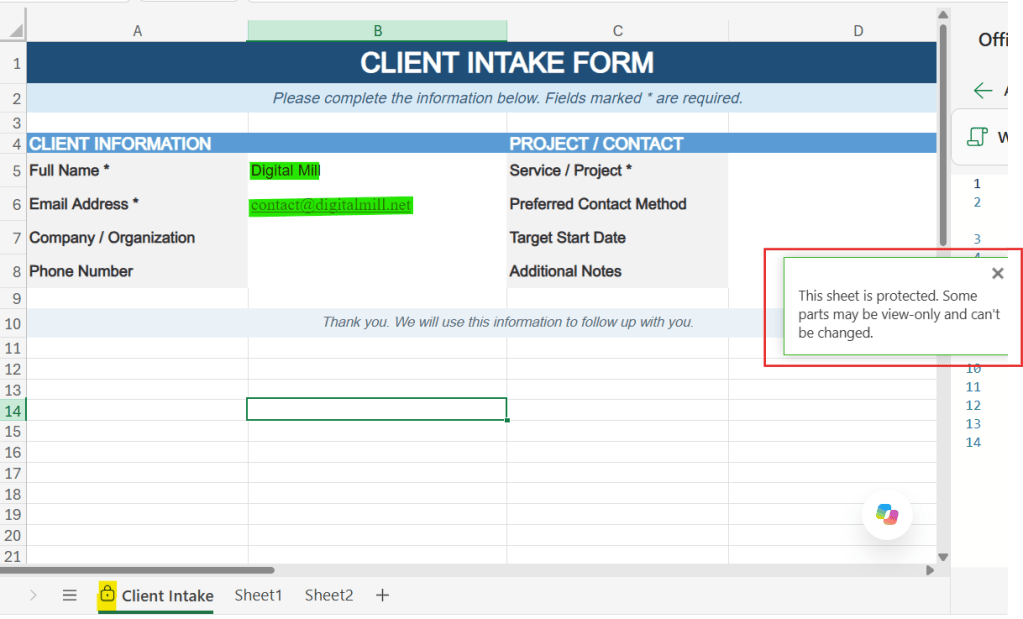
In practice, the Script expects the name of the worksheet, its password, a full name and an email address. The informed worksheet is first unlocked using the provided password. The full name is written to the cell B5 and the email address to the cell B6. Finally, the worksheet is protected again, using the same password provided by the flow.
Make sure to save the Office Script before adding it to the Power Automate flow.
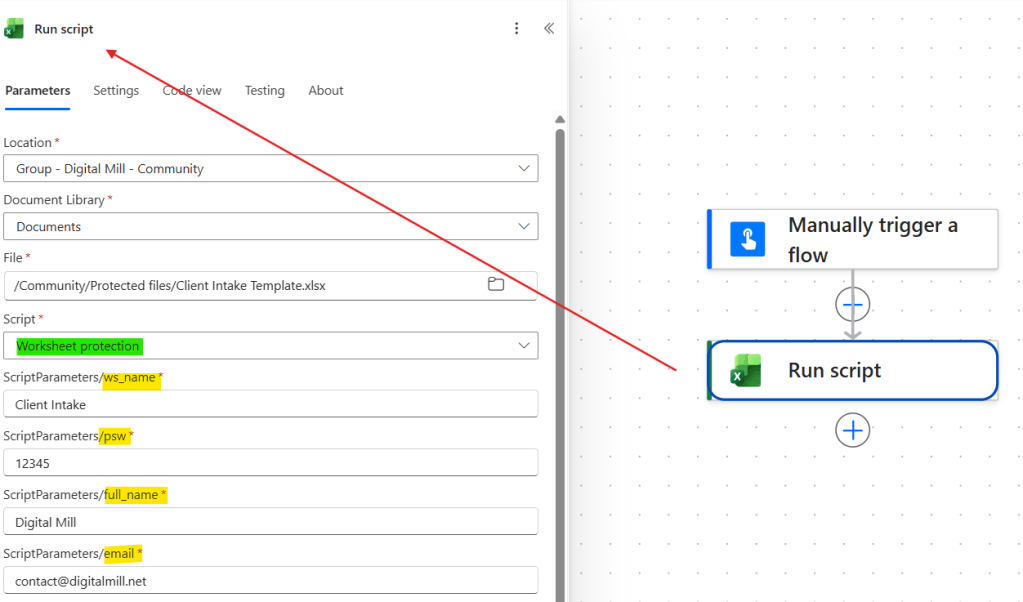
In Power Automate, add a Run script action and select the Excel file and the Office Script that should be executed. You can reuse the Script in any Excel files, without the need to repeat the creation process described in the previous sections.
After selecting the Office Script in the action (in green), Power Automate automatically displays its custom parameters, where you can find the ws_name, the psw, the full_name and the email, all defined in the Office Script (in yellow). Enter values for each input, including the protected worksheet name and its password:
After saving the flow and executing it, the data will be written to the Client Intake worksheet, in the cells defined in the Office Script (B5 for full name and B6 for email address). The worksheet is then protected again at the end of the script, preventing users from modifying its protected content:
There is a sample of a similar Office Script posted to the Office Scripts Gallery, and you can find it here.
Conclusion
In this blog, we saw how to use Office Scripts to manage the protection of worksheets inside Excel files, and integrate it as part of Power Automate flows. Let us know what do you think about this blog in the comment section, and don’t forget to check our website, our YouTube Channel or connect on LinkedIn!

