

Power Automate works great for managing data in Excel tables, including reading, updating, deleting or adding records. However, there is no built-in action for extracting information about the structure or metadata of multiple Excel tables in a same file, such as a list of their column headers.
Although it is possible to access the column headers of a single table by combining the xml() and xpath() functions (approach explored in a blog previously posted at Digital Mill website), scaling this method to multiple tables requires a heavy architecture that can be easily replaced by a single Power Automate action using Office Scripts, as demonstrated in this article.
You can also check the following video about this same topic, available in the Digital Mill YouTube Channel:
Note: There is an article covering a similar solution, where Power Automate and Office Scripts are used to retrieve the column headers from a single table.
What are Office Scripts?
Office Scripts is a feature in Excel for the web that allows you to automate repetitive tasks using TypeScript. It enables you to record actions or write custom scripts to manipulate data, format worksheets, and perform complex operations programmatically. It works similarly to VBA, but for cloud-based environments, which makes it more suitable for modern automation scenarios.
You can find ready-to-use script templates for a wide range of Excel tasks in the Office Scripts Gallery to help you to get started faster. The template presented in this blog is also available in the Gallery.
Accessing headers from all tables in Excel file with Office Scripts
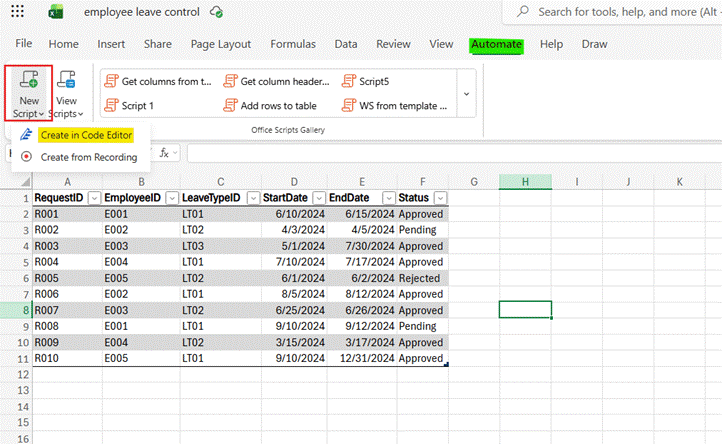
As a first step, let’s create the Office Script. From any Excel workbook, go to the Automate tab (highlighted in green), click New Script (in red) and Create in Code Editor (in yellow):
The Office Script Code Editor will appear at the right side of the screen. Remove all the code inside the main function, which is enclosed between the curly brackets (highlighted in yellow). Then, inside the parenthesis of the main function, add a comma followed by tableNames?:string[] (in red):
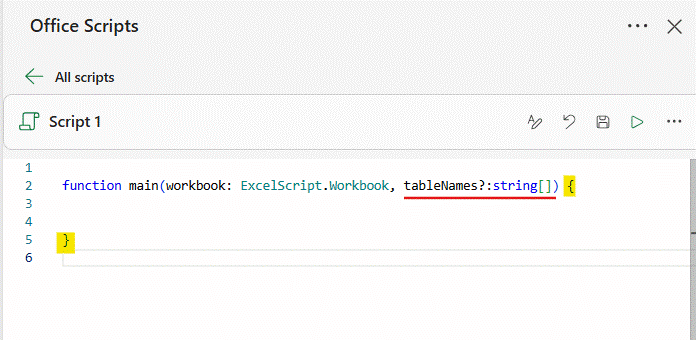
The tableNames parameter is a custom input that can receive a value from Power Automate when the script is executed. By defining its data type as string[], we indicate that the parameter expects an array of text values. Later in this process, we will use this parameter in Power Automate provide an array containing the names of the tables whose column headers should be extracted.
Another important part of this custom parameter is the question mark after tableNames. This qualifies the parameter as optional, allowing the Office Script to run even when no value is provided by Power Automate.
Next, add the code const mappedTableNames = tableNames === undefined ? workbook.getTables().map(e => e.getName()) : tableNames inside the function main (in red):
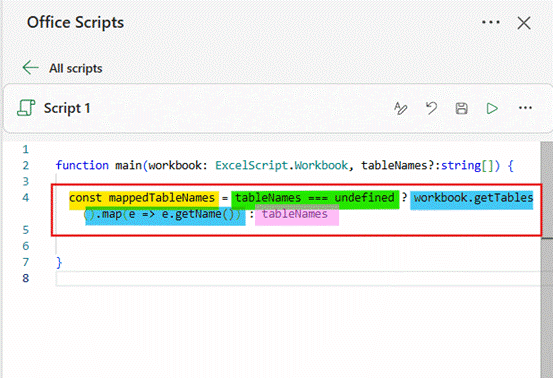
This line uses a ternary operator, which is a compact way of evaluating a condition and assigning one of two possible values to a variable. For readers who are new to Office Scripts or TypeScript, this syntax can look a little unfamiliar. Let’s break down what is happening:
- Variable: const mappedTableNames (in yellow) – we start by defining a variable named mappedTableNames. Its value will depend on the result of the condition evaluated in this line.
- Condition: tableNames === undefined (in green) – this is the condition being evaluated. If tableNames is undefined, meaning that no value was provided for the optional parameter in Power Automate, the expression after the question mark (in blue) is executed. Otherwise the expression after the colon (highlighted in pink) is used.
- True scenario: workbook.getTables().map(e => e.getName()) (in blue) – when no value is provided to tableNames, the Script accesses the name of all tables in the workbook and creates an array, assigning it to the mappedTableNames variable (in yellow).
- False scenario: tableNames (in pink) –when a value is provided to tableNames, this is directly assigned to mappedTableNames. So instead of accessing the headers from all tables in the workbook, the Office Script will process only the tables listed in tableNames.
If you are familiar with Power Automate, you can think of this line as a Condition action. The expression highlighted in green is the condition, while the expressions highlighted in blue and pink represent the true and false outcomes. Only one of these two blocks is executed during each Script execution, and its result defines the value assigned to mappedTableNames (in yellow).
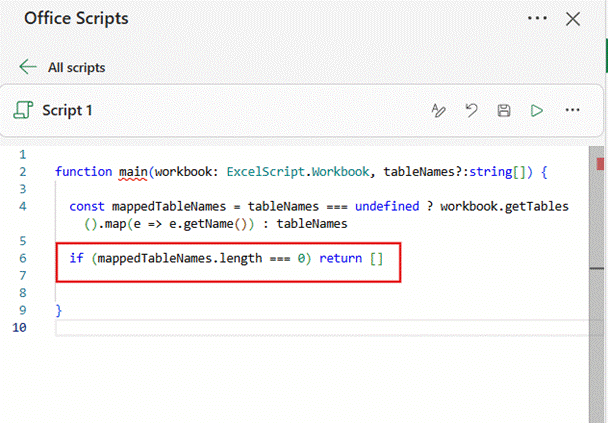
Next, add the line if (mappedTableNames.length === 0) return []. This command tests the quantity of elements in mappedTableNames. If the array is empty, the Script immediately stops, returning an empty array to Power Automate. This is an important step to handle the scenario where no table names are provided and the workbook does not contain any tables:
The next step is to iterate through all the table names stored in mappedTableNames variable, retrieve each corresponding table, and extract its name and column headers. For that, you can use the following code:
const tblHeaders = mappedTableNames.map( name => { const tbl = workbook.getTable(name) return { name: name, columns: tbl.getHeaderRowRange().getValues().flat() } })
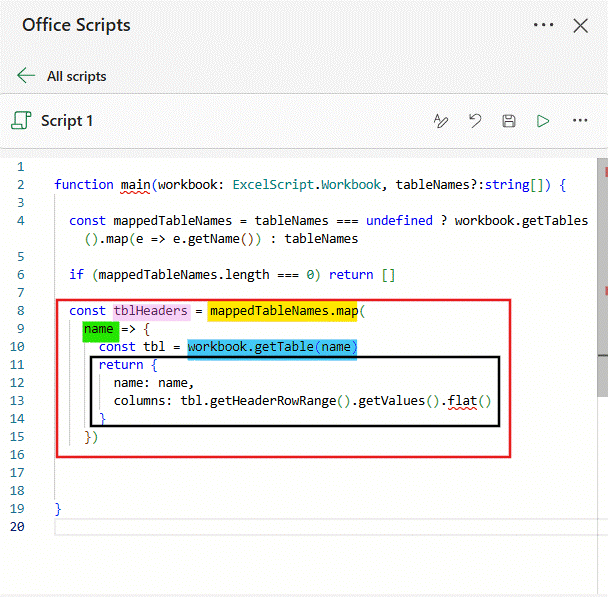
Let’s break down the logic of this snippet:
- Variable: const tblHeaders (in pink) – we start by defining a variable named tblHeaders, which contains the information retrieved from all processed tables.
- Array iteration: mappedTableNames.map (in yellow) – the mappedTableNames, which is an array of strings, is iterated using the map() method.An operation is executed for each item o the array and the results stored in a new array. As an analogy, you can think this operation as an Apply to each loop in Power Automate.
- Array element: name (in green) – this represents the current element being processed from the mappedTableNames array. Whatever appears after the => is applied to each table name.
- Get table object: workbook.getTable(name) (in blue) – for each table name, the respective table object is accessed and stored in the tbl variable.
- Return object: return {name: name, columns: tbl.getHeaderRowRange().getValues().flat()} (in black) –an object is created for each table, containing the table’s name in the name property and an array with the column headers in the columns property.
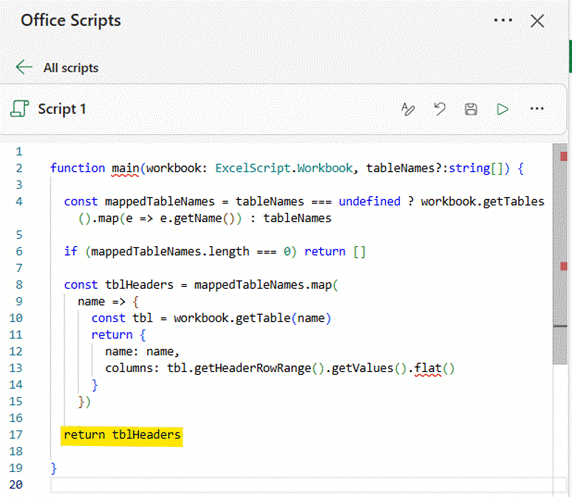
The last command inside the main function is return tblHeaders (in yellow), where the Office Script retrieves to Power Automate the value of tblHeaders. The result is an array of objects containing a table name and an array of its corresponding column headers:
As a final step, we need to explicitly define the data type returned by the main function, adding :object[] | null[] right after the closing parenthesis in the parameters (in green):
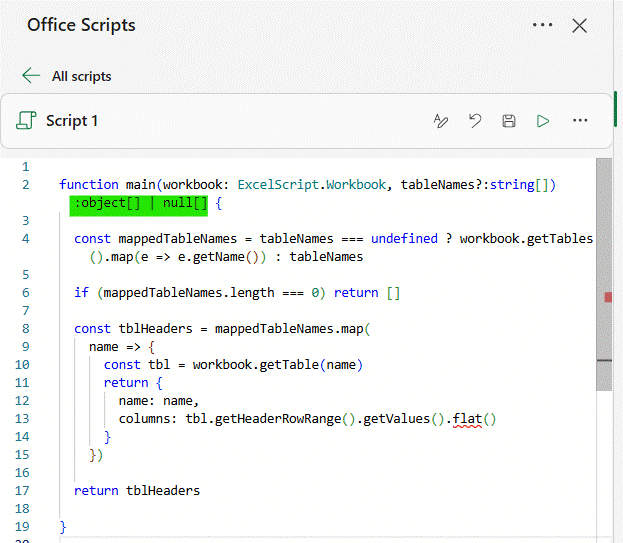
This tells Office Scripts that the function returns either an empty array or a single-dimensioned array of objects, with each element representing a table. In this solution, the normal result is the array of objects, but the empty-array scenario is also covered when the workbook contains no tables to process.
Finally, you can rename the script by clicking the button highlighted in yellow, so it can be easily found in Power Automate:
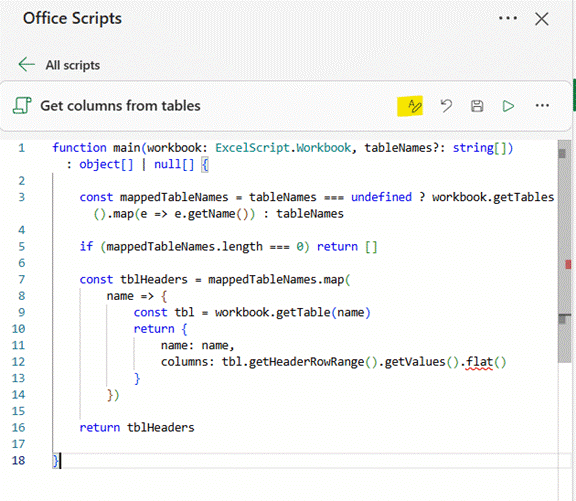
The complete Office Script is here:
function main(workbook: ExcelScript.Workbook, tableNames?: string[]): object[] | null[] { const mappedTableNames = tableNames === undefined ? workbook.getTables().map(e => e.getName()) : tableNames if (mappedTableNames.length === 0) return [] const tblHeaders = mappedTableNames.map( name => { const tbl = workbook.getTable(name) return { name: name, columns: tbl.getHeaderRowRange().getValues().flat() } }) return tblHeaders }
Run an Office Script from Power Automate
In Power Automate, add a Run script action and select the Excel file and the Office Script that should be executed. You can reuse the Script in any Excel files, without the need to repeat the creation process described in the previous section.
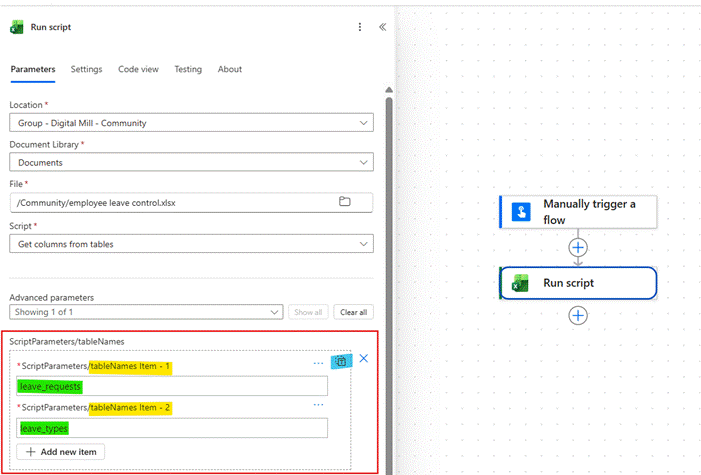
After selecting the Script in the action, Power Automate automatically displays its custom parameters (in red), where you can identify the tableNames defined in the Office Script (in yellow). You can either enter table names individually in the items (in green), or provide an entire array of strings at once (in blue). Since this is an optional parameter, you can also leave it empty to retrieve the column headers from all tables in the workbook. For this example, we’re retrieving the records from two tables:
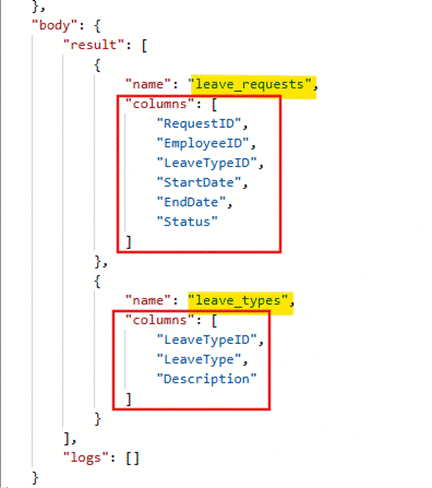
After saving the flow, running it and accessing the Run script raw outputs, we can find an array of objects corresponding to the two tables. Each object contains the table name (in yellow) and its respective column headers, organized as an array of strings (in red):
Conclusion
In this blog, we saw how to use a single action in Power Automate to extract the column headers from multiple table from an Excel file using Office Scripts. Let us know what do you think about this blog in the comment section, and don’t forget to check our website, our YouTube Channel or connect on LinkedIn!

