

Power Automate works great for managing data in Excel tables, including reading, updating, deleting or adding records. However, there is no built-in action for extracting information about an Excel table structure or metadata, such as a list of its column headers.
Although it is possible to access the column headers of a table by combining the xml() and xpath() functions (approach explored in a blog previously posted at Digital Mill website), a simpler solution is to use an Office Script to retrieve the headers in a single Power Automate action.
You can also check the following video about this same topic, available in the Digital Mill YouTube Channel:
Note: There is an article covering a similar solution, where Power Automate and Office Scripts are used to retrieve the column headers from a multiple table located in a same Excel file.
What are Office Scripts?
Office Scripts is a feature in Excel for the web that allows you to automate repetitive tasks using TypeScript. It enables you to record actions or write custom scripts to manipulate data, format worksheets, and perform complex operations programmatically. It works similarly to VBA, but for cloud-based environments, which makes it more suitable for modern automation scenarios.
You can find ready-to-use script templates for a wide range of Excel tasks in the Office Scripts Gallery to help you to get started faster. The template presented in this blog is also available in the Gallery.
Accessing table headers with Office Scripts
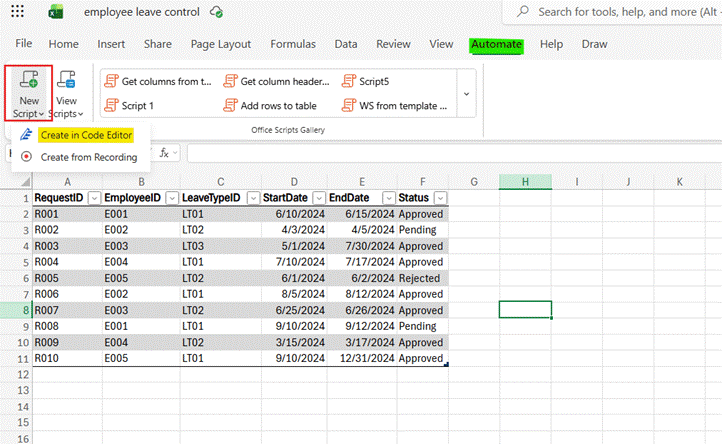
As a first step, let’s create the Office Script. From any Excel file, go to the Automate tab (highlighted in green), click New Script (in red) and Create in Code Editor (in yellow):
The Office Script Code Editor will appear at the right side of the screen. Remove all the code inside the main function, which is enclosed between the curly brackets (highlighted in yellow). Then inside the parenthesis of the main function, add a comma followed by tableName:string (in red):
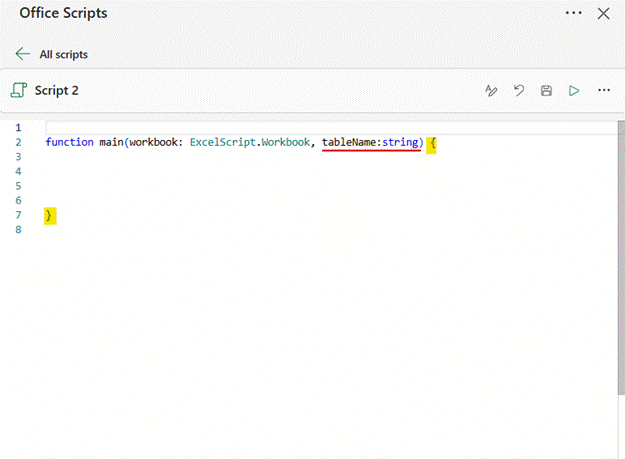
The tableName is a custom parameter for the Script that can receive an input from Power Automate once the flow is executed. In addition to the parameter, we’re defining string as its data type, indicating this parameter must contain a text. Later in this process, we will use this input to pass via Power Automate the name of the table from which the column headers should be extracted.
Next, add the code const tbl = workbook.getTable(tableName) inside the function main (in red):
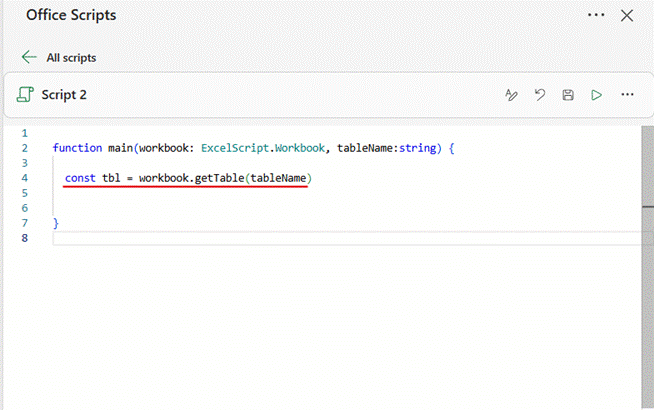
This line accesses a table in the Excel file by its name (received from Power Automate via tableName parameter) and stores it in a variable named tbl. If no table with the specified name exists, Office Scripts will generate an error, which will be returned to Power Automate when the Script is executed.
The last line of code to be added is return tbl.getHeaderRowRange().getValues().flat() (in red). This expression references the tbl variable (in yellow), accesses the table’s header row retrieving its values (in green) and ensure the result is presented as a single-dimensional array of strings. The result is an array containing the column headers that will be returned to Power Automate.
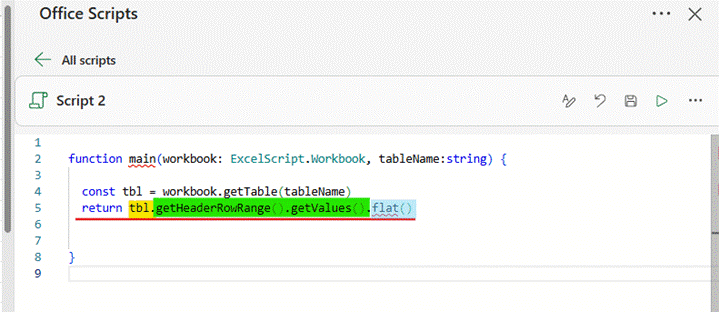
At this point, Office Scripts may highlight .flat() as an error. This will not prevent the solution for running, so you can ignore it. You may also see another error raised at main, indicating that the function cannot return an output with the “Any” data type.
To solve it, we need to explicitly inform the data type of the output returned by the main function. This is not always required in Office Scripts, but for this particular case the editor cannot automatically determine data type produced by the .flat() method. For this reason, we need to explicitly define the data type returned by the function, by adding :string[] right after the closing parenthesis in the parameters (in yellow):
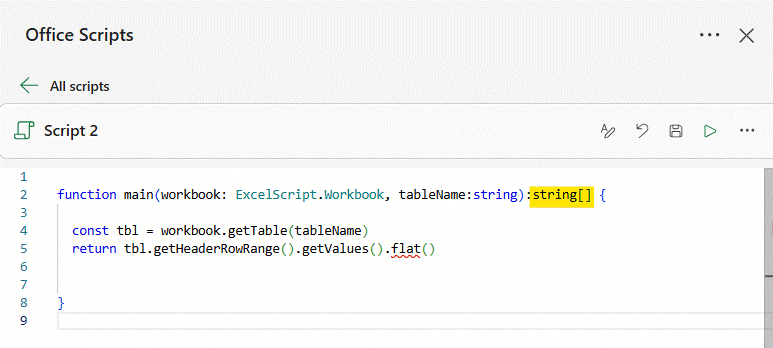
This tells Office Scripts that the function returns a single-dimensioned array of strings, with each element representing one of the table’s column headers.
As a final step, you can rename the script by clicking the button highlighted in yellow, so it can be easily found in Power Automate:
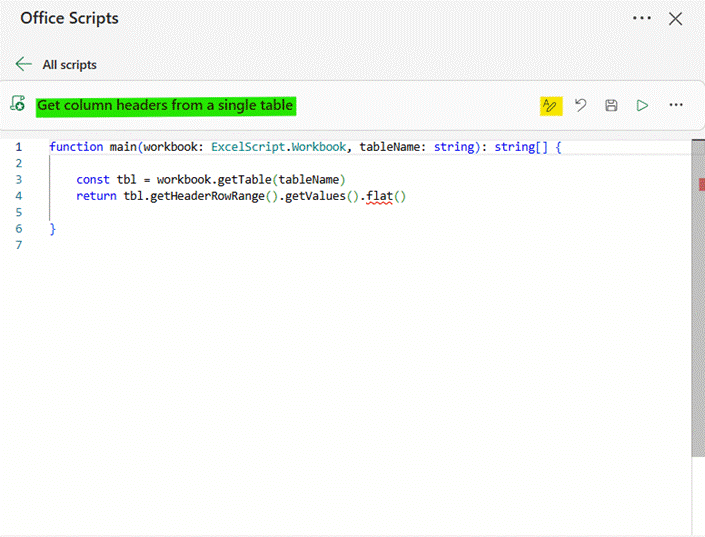
The complete Office Script is here:
function main(workbook: ExcelScript.Workbook, tableName: string): string[] { const tbl = workbook.getTable(tableName) return tbl.getHeaderRowRange().getValues().flat()}
Run an Office Script from Power Automate
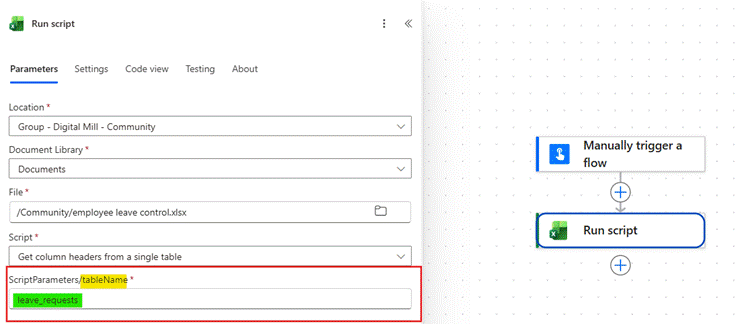
In Power Automate, add a Run script action and select the Excel file and the Office Script that should be executed. You can reuse the Script in any Excel files, without the need to repeat the creation process described in the previous section.
After selecting the Script in the action, Power Automate automatically displays its custom parameters (in red), where you can identify the tableName defined in the Office Script (in yellow). Enter the name of the table whose column headers you want to retrieve (in green):
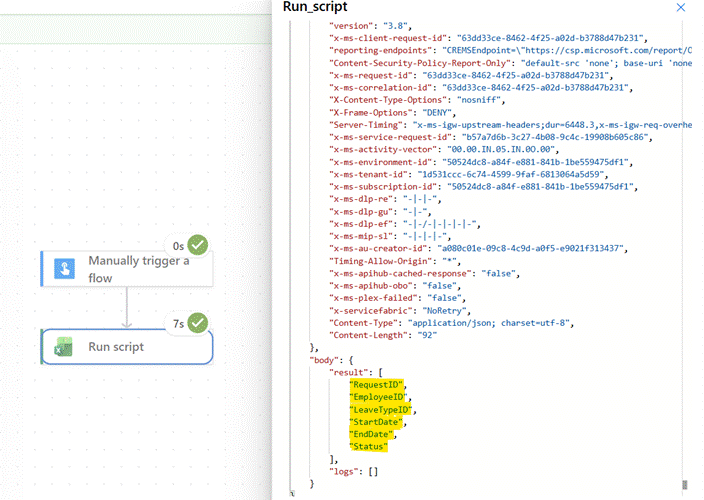
After saving and running the flow, the action retrieves an array of strings containing all column headers under the results property:
Conclusion
In this blog, we saw how to use a single action in Power Automate to extract the column headers from an Excel table using Office Scripts. Let us know what do you think about this blog in the comment section, and don’t forget to check our website, our YouTube Channel or connect on LinkedIn!

