

One of the most common challenges when building Power Apps solutions that use SharePoint Lists as data sources is dealing with delegation limits. Even with Power Apps support to delegable functions, there are scenarios where filtering, searching, or processing large datasets becomes difficult once a list grows beyond a few thousand records.
A popular workaround is to use Power Automate to retrieve the records and return them to Power Apps. The architecture is simple and typically relies on the Get items action being executed inside a loop, which may be enough for smaller datasets. However, the flow’s execution time is strongly increased if you deal with 5,000 records or more, negatively impacting the user experience.
In this article, you will learn an efficient approach that uses the SharePoint REST API within Power Automate to retrieve large datasets and make them available to Power Apps in just a few seconds.
Solution overview
For the purposes of this article, we will work with an employee dataset stored in a SharePoint List containing 10,000 records, from where we want to retrieve only four columns – Title (employee name), Department, Location and ID:

If we want to use this data in Power Apps, a possibility is to directly access the SharePoint built-in connector, quickly retrieving the List items. However, this approach leads to a delegation limit, so we can read only up to 2,000 records (highlighted in yellow), like in the following example:
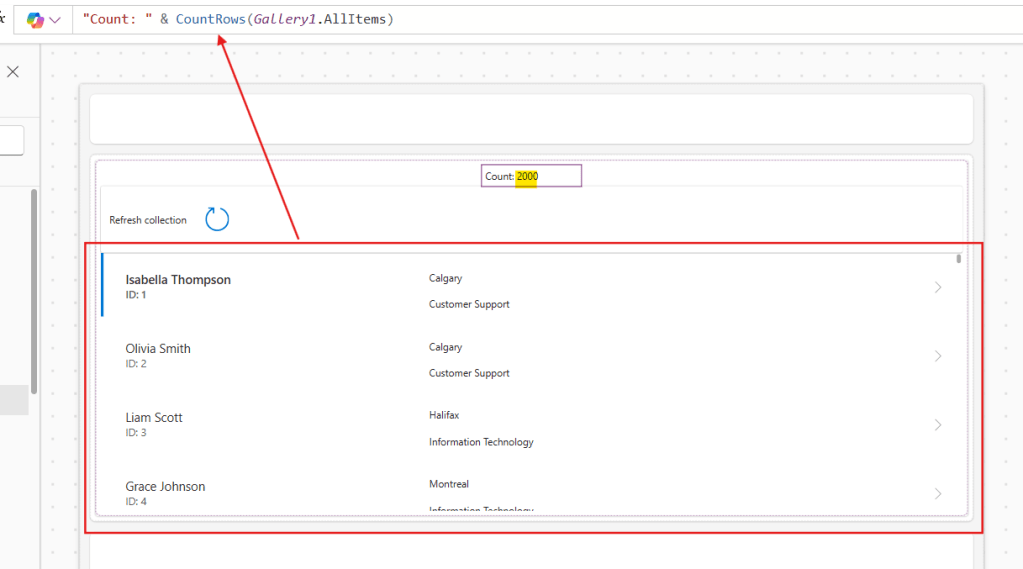
If we use a Power Automate flow to process this task, we can retrieve all 10,000 records to Power Apps, avoiding the delegation limit:

There is also a video version of this tutorial on our YouTube Channel:
Calling a Power Automate flow from Power Apps
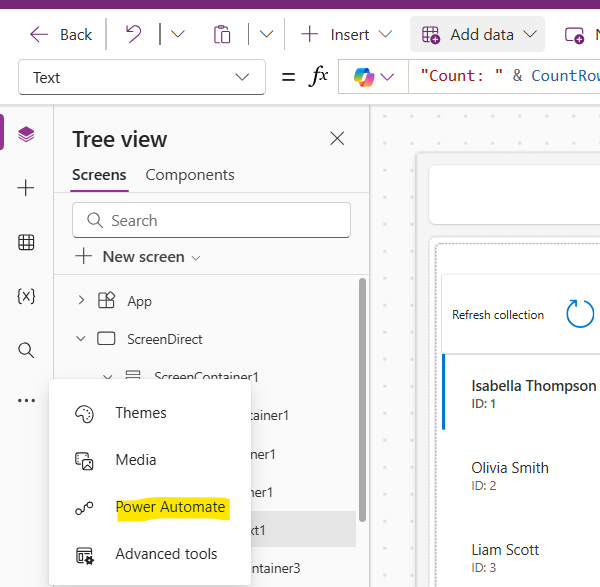
To call a Power Automate flow from a Canvas App, select Power Automate from the App’s navigation menu (highlighted in yellow). Depending on the available space, this option may be hidden under the ellipsis (…):
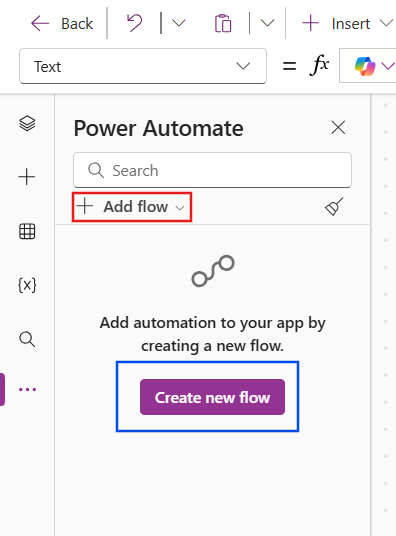
Next, you can either create a new flow (highlighted in blue) or add an existing automation to the app (highlighted in red):
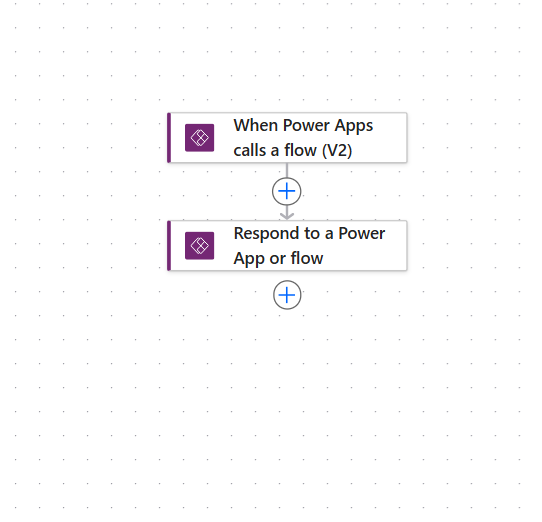
Whether you create a new flow or use an existing one, all automations initialized from a Power App must include a When a Power Apps call a flow (V2) trigger and a Respond to a Power App or flow action. All flow’s logic is placed between these two steps, and the Respond to a Power App or flow action returns the values to be consumed by the Canvas App:
Using Power Automate to retrieve data from SharePoint Lists
When reading the records from a SharePoint List in Power Automate, the most obvious solution is to work with the built-in Get items action. This approach is enough if you’re expecting a limited quantity of records, and will be enough to handle scenarios where the List retrieves between 2,000 (the maximum number of records that can be retrieved directly from a Canvas App) and 5,000 items.
However, if you need to retrieve more than 5,000 records, the Get items may take too long to return the data, resulting in a poor user experience and potential timeout errors. For these cases, a better alternative is to work with the SharePoint REST API, which is much faster than the built-in action.
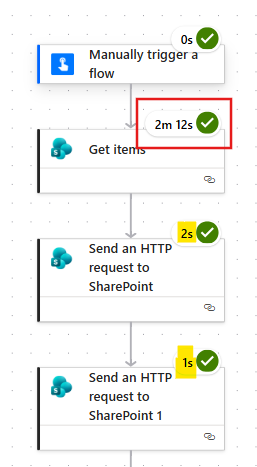
In the following image, both approaches are used to retrieve data from the same SharePoint List containing 10,000 records. Although the REST API strategy requires two actions to read this quantity of items (each HTTP request returns a maximum of 5,000 records), the execution of both steps takes only 3 seconds (highlighted in yellow), while the corresponding Get items is executed in 2 minutes and 12 seconds (highlighted in red), reducing the execution time by 97.7%:
Reading data from SharePoint Lists in Power Automate with REST API
At this point, let’s see how to retrieve the SharePoint List data with REST API in Power Automate. In a flow containing the Power Apps (V2) trigger and Respond to a Power App or flow action, insert a Send an HTTP request to SharePoint step, from SharePoint connector.
To configure the action, select the SharePoint Site where list is located (highlighted in red) and set the method to GET (highlighted in blue). For the URI input, use the endpoint /_api/web/lists/getbytitle(‘LIST_NAME’)/items, replacing “LIST_NAME” with the display name of the SharePoint List you want to query (highlighted in light blue):

By default, this request will retrieve only the first 100 records from the List, but you can expand it by customizing the OData query options in the endpoint. For example, by using the $top query, you can increase this quantity to up to 5,000 records (highlighted in green above), while by using the $select query, you can limit the columns retrieved in SharePoint’s response by its internal names (highlighted in yellow above).
For this example, the complete Uri looks like this: /_api/web/lists/getbytitle(‘Employees – large company’)/items?$top=5000&$select=ID,Title,Location,Department
Still within the Send an HTTP request to SharePoint action, expand the Headers Advanced parameter and set Accept to application/json and odata to nometadata (highlighted in red):
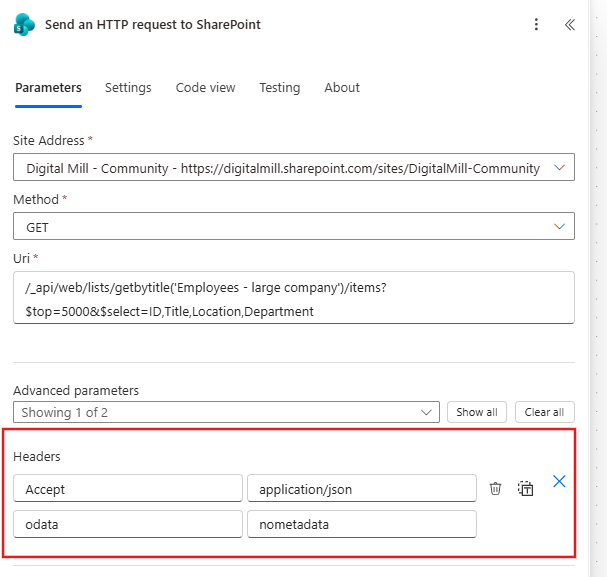
By setting Accept to application/json, we’re explicitly telling SharePoint to return the response in a JSON format, which is read by Power Automate as an array of objects. Using odata equals to nometadata removes the additional metadata from the response, returning only the information required by the flow and reducing the payload size.
Loop SharePoint List to retrieve more than 5,000 records
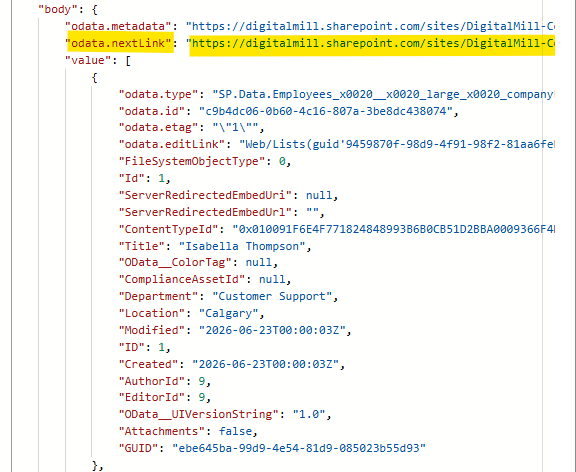
A single Send an HTTP request to SharePoint action supports the retrieval of up to 5,000 records. If a List contains more than 5,000 items, the HTTP request returns a link to a second chunk of the dataset, in a next page of results. This logic continues until all items are retrieved. The link to the next page can be found in the action’s raw outputs under the odata.nextLink property (highlighted in yellow):
Although it would be possible to manually add multiple HTTP actions to handle the pagination, a cleaner, scalable and maintainable approach is to work with loops in Power Automate. For this case, a Do until loop is the preferred solution, as it allows iteration to continue based on a condition – the presence of the odata.nextLink property, which is only returned when additional pages exist.
Before implementing the loop, initialize two variables, so we can store the next page’s link and combine the results retrieved by the multiple HTTP requests into a single array. First, let’s create the next_page variable with a string data type and assign it the dynamic content of the odata.nextLink property from the initial HTTP request (highlighted in red). Second, let’s initialize the all_records variable as an array and populate it with the dynamic content of the body/value property of the same HTTP request (highlighted in blue):

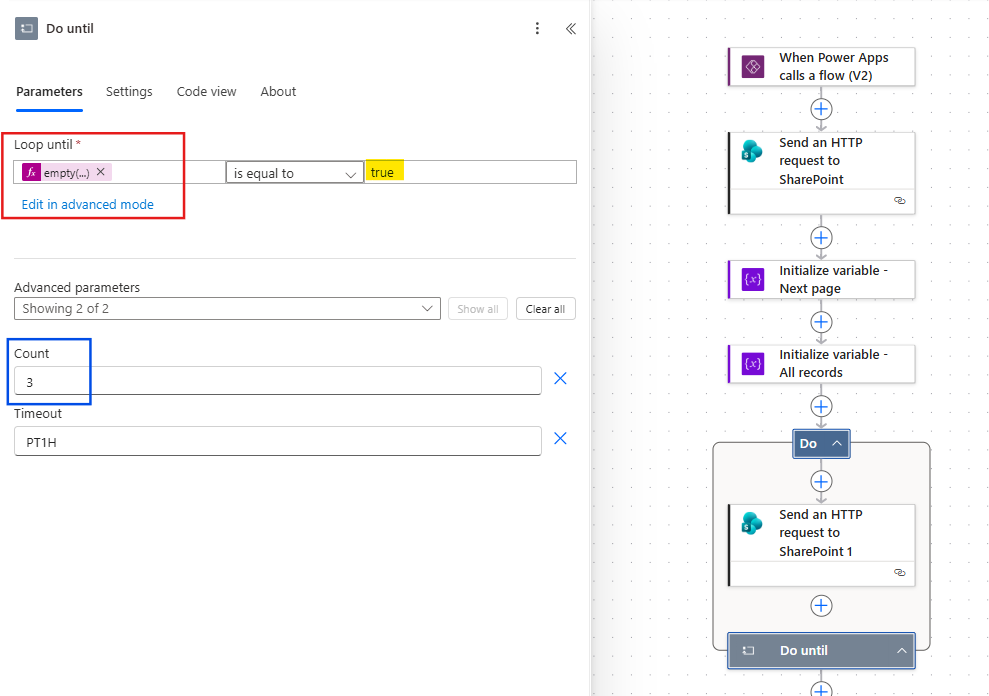
Let’s now add the Do until loop, setting the Loop until condition to the expression empty(variables(‘next_page’)) (highlighted in red), evaluated as true (highlighted in yellow). This Power Automate expression checks if the next_page variable is empty, which indicates that there are no more pages to retrieve. Optionally, you can also set a Count limit, to prevent excessive iterations – in this example, it is set to 3 (highlighted in blue), as only two iterations are expected:
Inside the loop, include another Send HTTP request to SharePoint action and repeat the Site Address, Method and Headers inputs of the initial request. For the Uri, reference the next_page variable, but before using it, we first need to convert it to a relative URI by removing the SharePoint Site URL , since this action expects only a relative path. This text cleaning task can be executed with a replace expression (highlighted in red), where the base site URL (highlighted in blue) is replaced by an empty string:

This is the entire expression:
replace( variables('next_page'), '[SHAREPOINT_SITE_URL]', '')
In practice, the replace expression will remove the full site URL (in red) and preserves the rest of the endpoint (in blue):

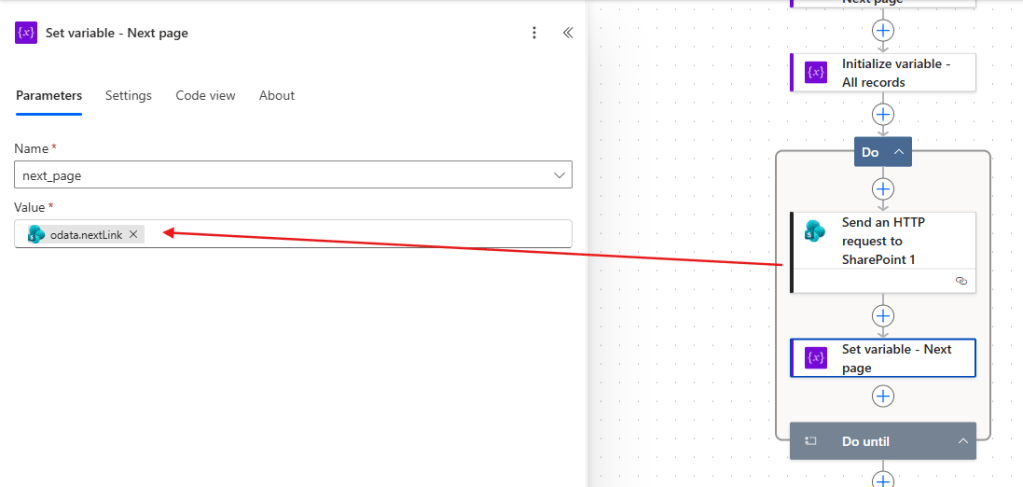
At this stage, the HTTP request inside the loop retrieves the second page of List items. After this step, add a Set variable action to overwrite the next_page value of the endpoint of the upcoming page, by referencing the dynamic content of the odata.nextLink property of the HTTP request from inside the loop (highlighted in red) – be careful to reference the output from the current HTTP action inside the loop, not the initial one outside the loop:
After updating the next page link, it’s time to append the newly retrieved records to the all_records variable. The most efficient way to achieve this goal is to use a union expression inside a Compose to combine the current value of all_records (highlighted in red) with the new HTTP response data (highlighted in blue):
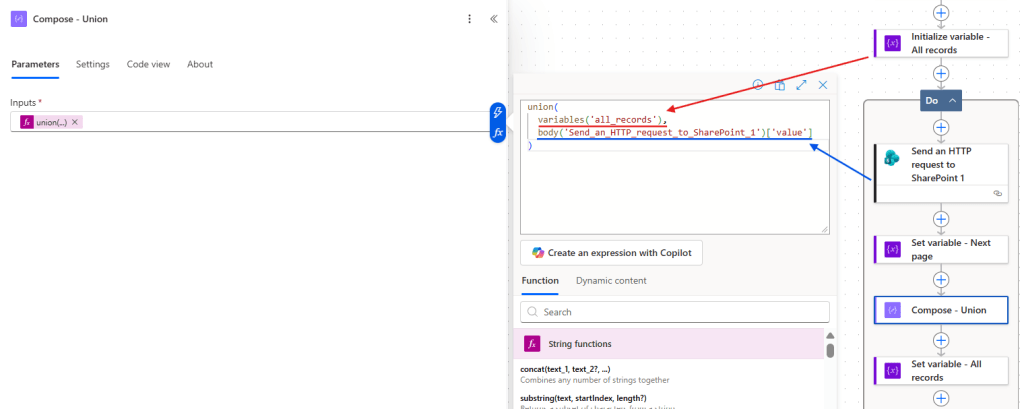
This expression combines both arrays into a single. After this operation, include a final Set variable to overwrite the all_records with the outputs of the Compose:

At this point, the loop continues executing until the next_page variable is empty, which occurs when the final page of items has been retrieved.
As a final step, modify the Respond to a Power App or flow action to include values to be retrieved to the Canvas App. Add an output key of text type called result (in yellow) and use the expression string(variables(‘all_records’)) as its value (in red), so the all_records is converted to a string in order to be transferred to Power Apps:
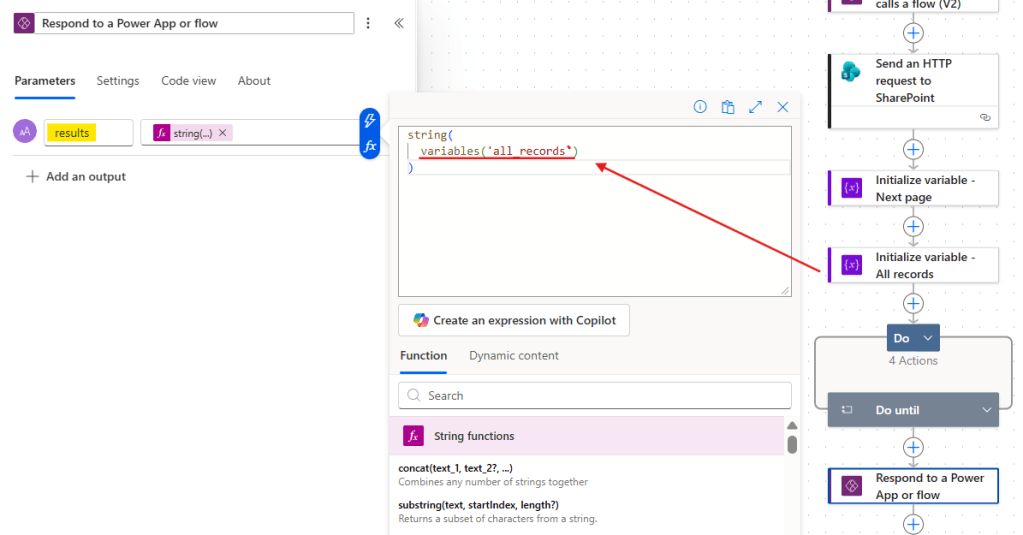
This conversion is required because Canvas Apps don’t natively support complex JSON objects from Power Automate. The data can then be converted back into a table structure within Power Apps.
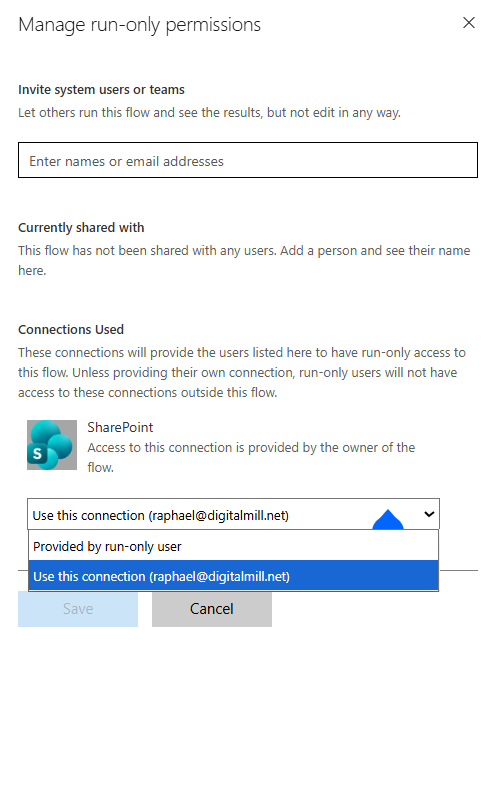
Finally, let’s configure the run-only settings. Go to the flow details page and scroll it down until you find the Run-only user section:

After clicking Edit, select a valid connection to be used for all connectors (in this example, SharePoint) and ensure that no connection is left as Provided by run-only user, then save the configuration:
Testing the solution
We’re now ready to test the solution in Power Apps. Make sure to refresh your flow and add it to a control from which it can be executed.
For the purposes of this blog, the Power App performs the following actions:
- It calls the flow (Read10krecords) when the user clicks the Call flow button. The response from the flow is then converted into a JSON table (in yellow) and stored in the allEmployees collection (PowerFX formula in red).
- A gallery presents all values from allEmployees collection (in green). In the initial state shown in the image, the gallery is empty (so is allEmployees), but once the flow executes and the collection is populated, all SharePoint list records are displayed.
- A Count label (in blue) is used to show the quantity of records visible in the gallery. So far, the value is zero because no records are displayed.

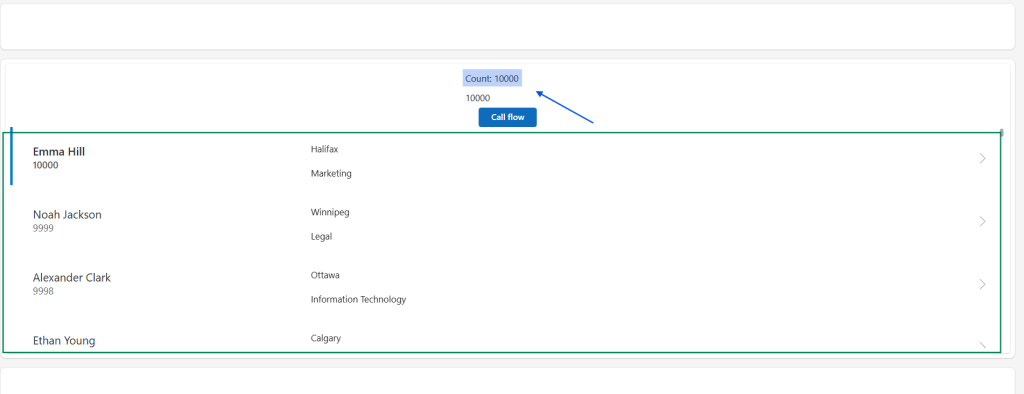
After clicking the button, the flow is executed and the gallery is populated with the records (highlighted in green). The Count label is also updated, displaying the total quantity of gallery items – 10,000 (highlighted in blue):
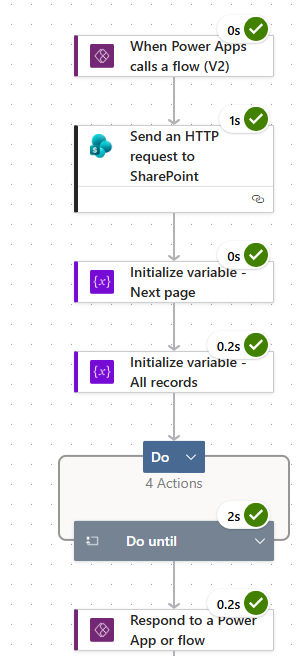
From the Power Automate side, the flow was successfully executed, completing in approximately 4 seconds and returning all 10,000 records to Power Apps:
Conclusion
In this blog, we saw how to efficiently retrieve more than 5,000 records from a SharePoint List using Power Automate, which is very helpful for overcoming delegation issues in Power Apps. Let us know what do you think about this blog in the comment section, and don’t forget to check our website, our YouTube Channel or connect on LinkedIn!

