
As part of the Copilot Studio ecosystem, the workflows are built on top of Power Automate and support the automation of business processes, combining both traditional actions and artificial intelligence capabilities.
In this blog, you will learn how to use Copilot Studio workflows to extract data from an image, structure it as JSON, and create events in an Outlook calendar based on specific conditions.
You can also check the video covering this same topic on the Digital Mill YouTube Channel:
Solution overview
For this example, we will work with a scenario where a parent wants to add their kid’s soccer matches to an Outlook calendar for the next few months. The school shares the schedule by email as an image like the one shown below:
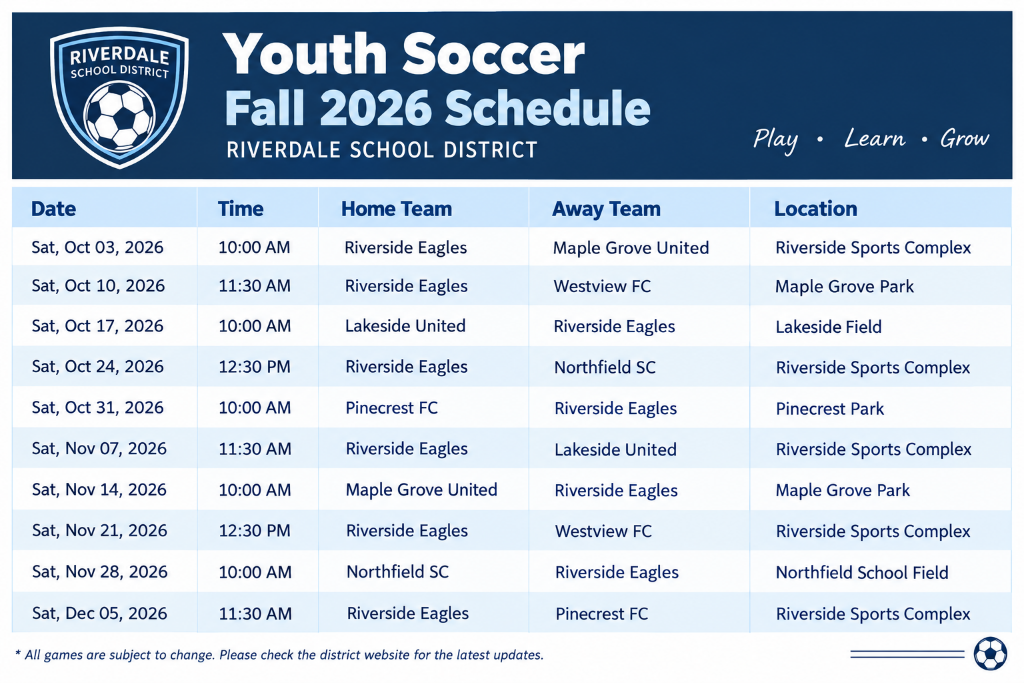
Note: the image above was generated with AI for this example. Feel free to download and use the same image when practicing.
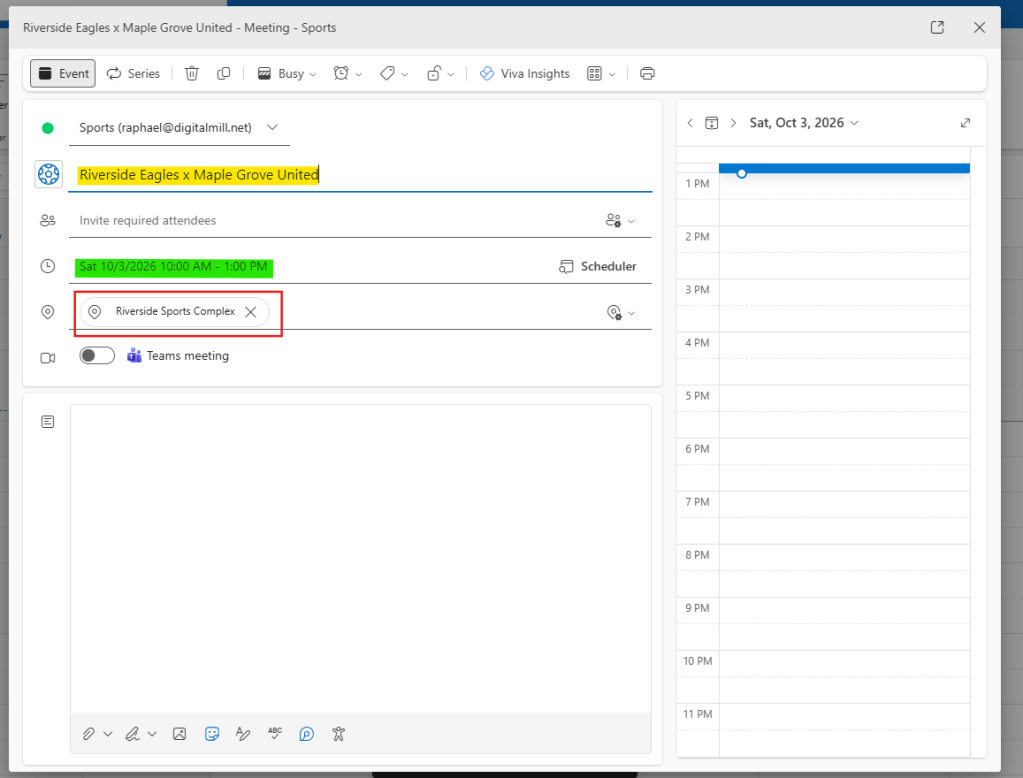
The goal is to extract the relevant information from the image and use it to create events in an Outlook calendar, including the teams playing, the date and time of the match, and its location. To make the workflow more practical, we will limit the events to be created only when the Riverside Eagles are playing at home, or when the match is taking place at Maple Grove Park.
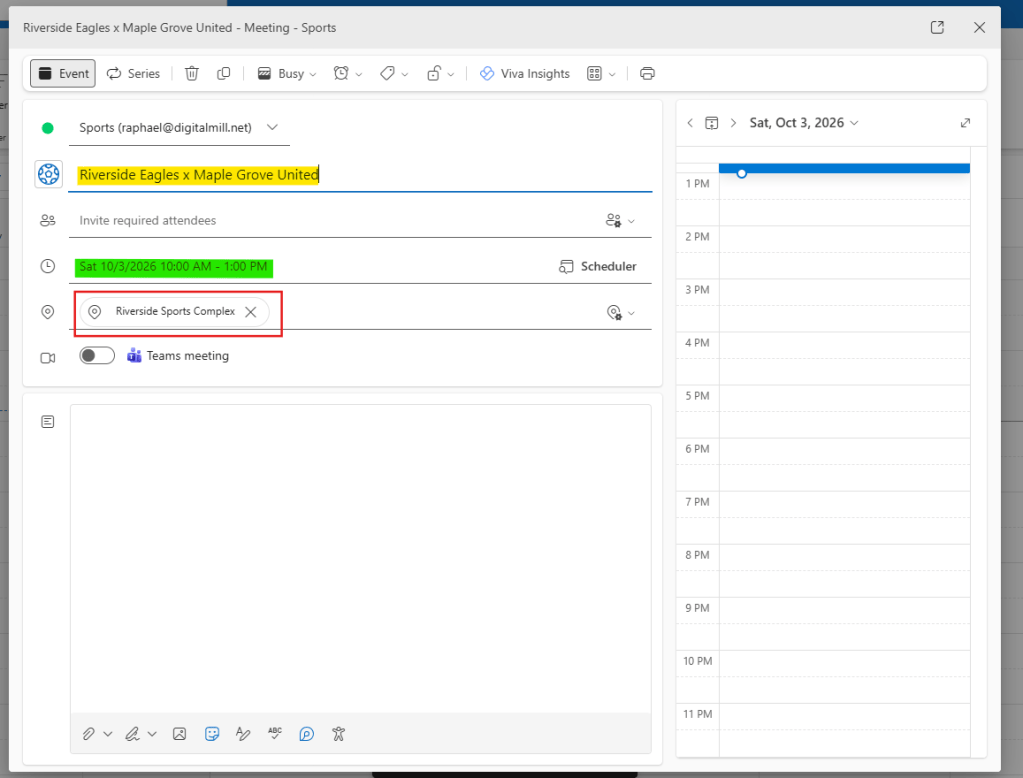
The expected result is a calendar event like this for each match that meets at least one of these conditions:
Creating a Workflow in Copilot Studio
As a first step let’s create a workflow in Copilot Studio to monitor a mailbox for any incoming emails containing the soccer schedule. Go to the Copilot Studio home page and select Workflow:
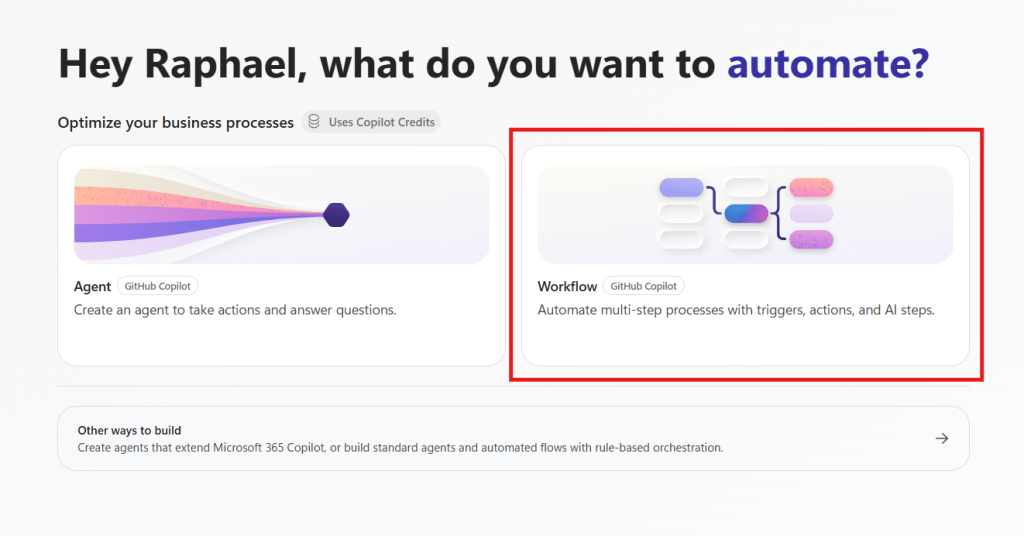
Note: Microsoft frequently updates Copilot Studio interface, so the home and other screens you see may look slightly different from the ones shown in this article, depending on when you’re following these steps.
This will take you to the Workflow canvas. Here you can include multiple steps to automate business processes, leveraging both AI and traditional actions. The experience is similar to creating a Power Automate flow, but including some additional features, such as version control, changes to the user interface and a highlighted access to AI capabilities. To learn more about Power Automate, check our complete course at Udemy.
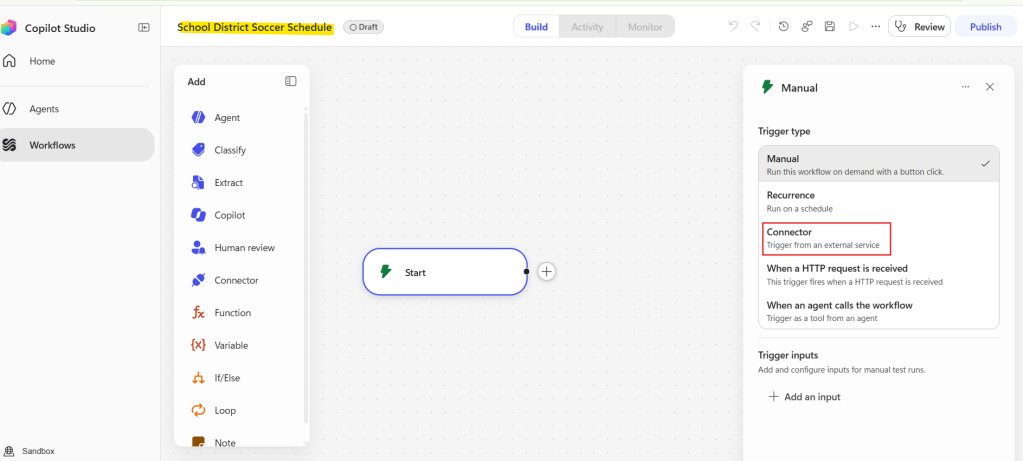
The first thing to configure in the workflow is its name. Give it a meaningful name such as School District Soccer Schedule (highlighted in yellow above). Since the workflow was just created, the only existing step is the trigger (the Start), which is set to Manual by default. Expand the Trigger type dropdown and select Connector (highlighted in red above), so the process can be triggered by an incoming email.
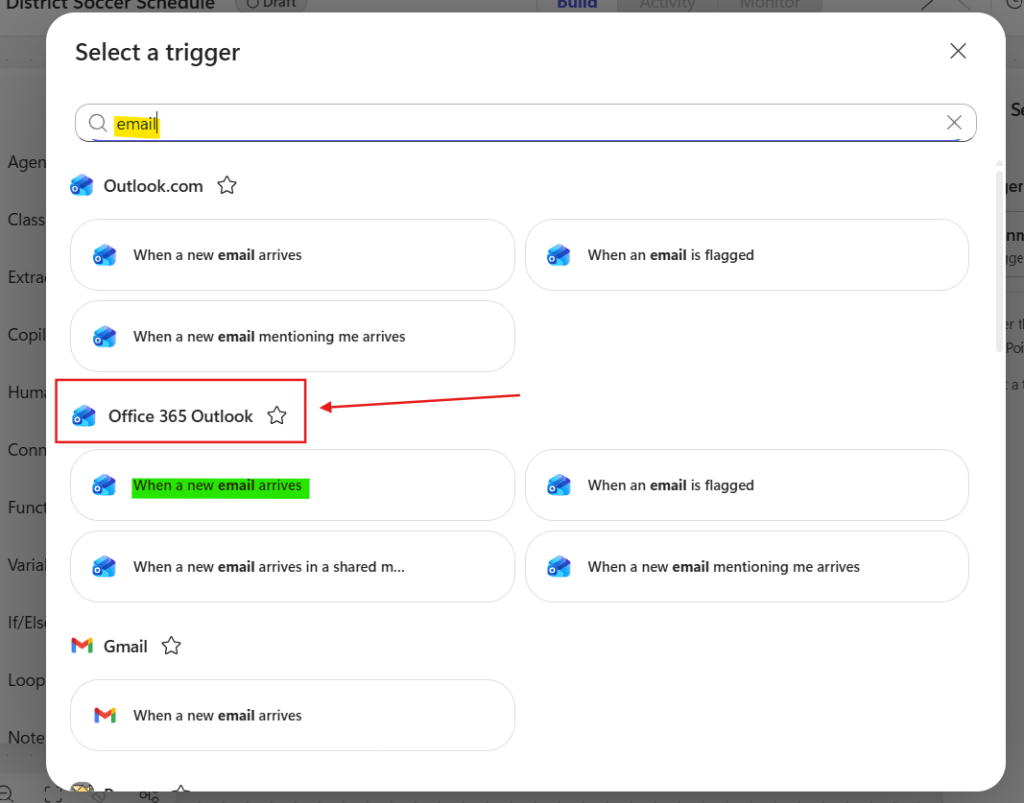
After selecting it, you’re prompted to choose the event that triggers the workflow. You can browse through the available connectors to find a trigger, or simply search for it using the search bar (highlighted in yellow below). Select the When an email arrives from the Office 365 Outlook connector. Make sure you select the trigger from the correct connector (highlighted in red), as the Outlook.com connector uses the same icon and includes some similar events:
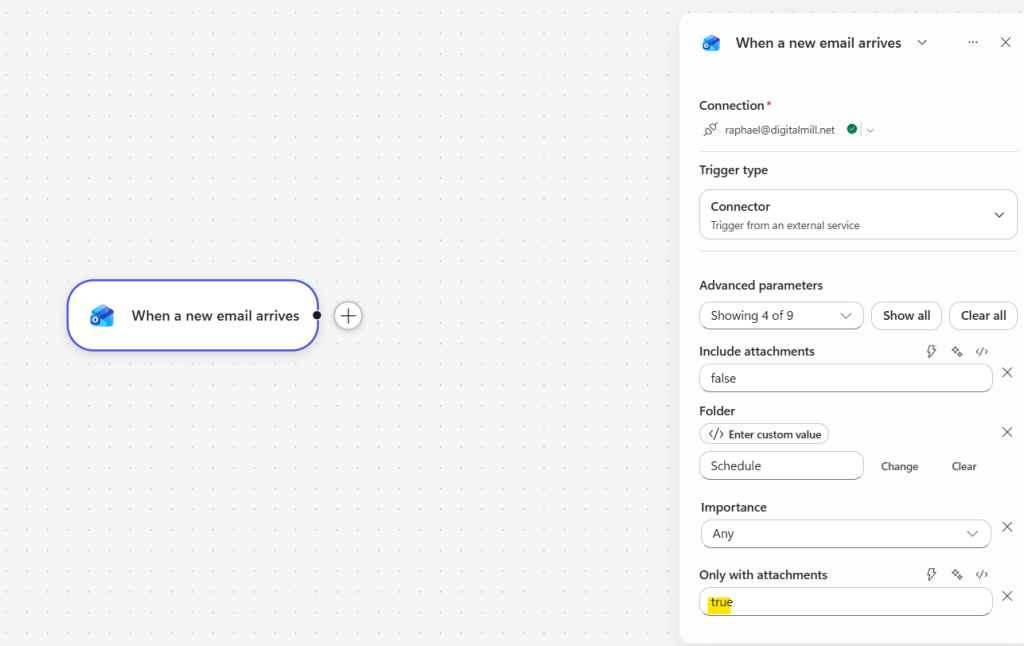
Next, configure the trigger settings on the right side. Start by setting both the Only with attachments property to true (in yellow), since we want to monitor only emails that contain attachments. You can also limit the process to run only for the emails arriving to a particular subfolder in the mailbox (in the example below, we set it to the Schedule folder, but you can leave it as the default Inbox):
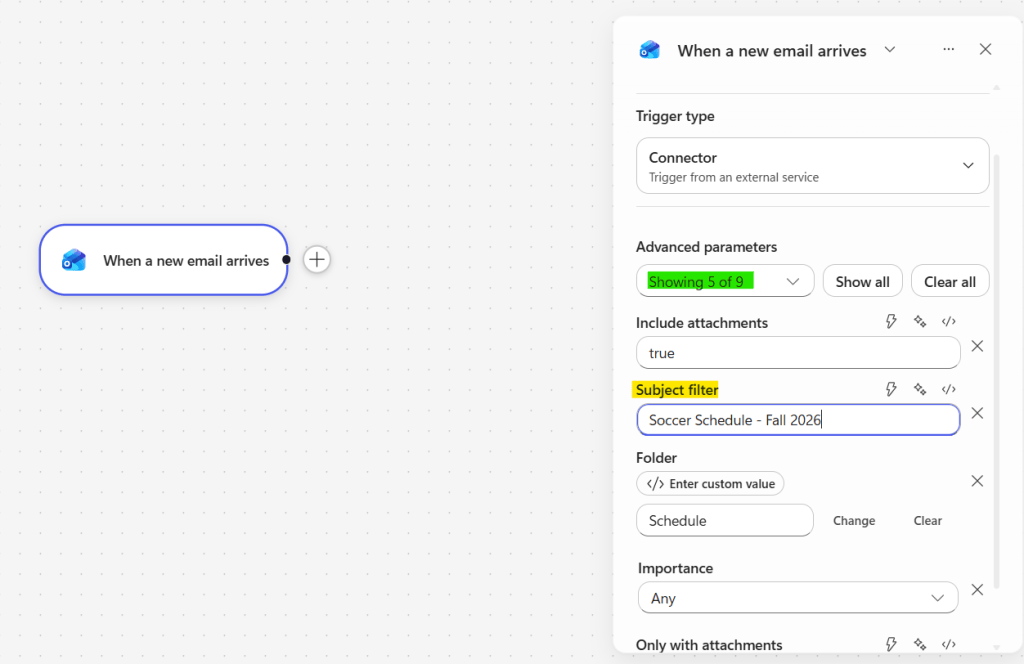
You can also expand the Advanced parameters dropdown (in green) to configure other properties. For this example, select the Subject filter (in yellow) and define it as Soccer Schedule – Fall 2026, so only emails containing this expression in the subject line will trigger the automation:
Get email attachment content in Copilot Studio Workflow
Next, let’s access the email attachment containing the schedule image and extract its data for further processing.
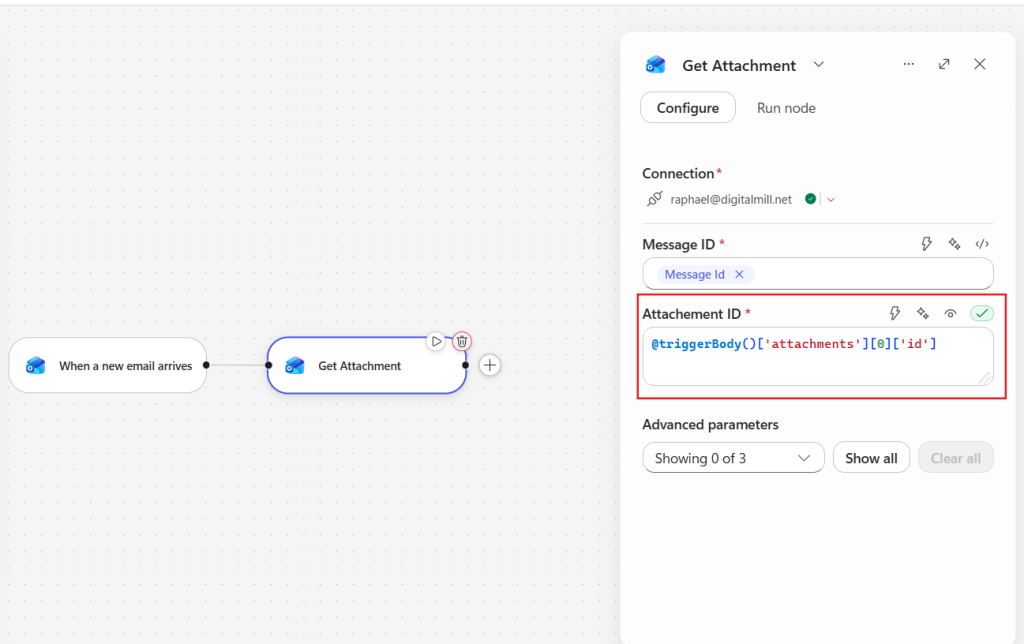
Add a Get Attachment step to the workflow (in red) by clicking the plus sign to the right of the trigger. The action requires inputs: the Message ID and the Attachment ID. For the Message ID, reference the dynamic content of the ID retrieved by the trigger, by clicking the lightning icon above the input (highlighted in yellow):
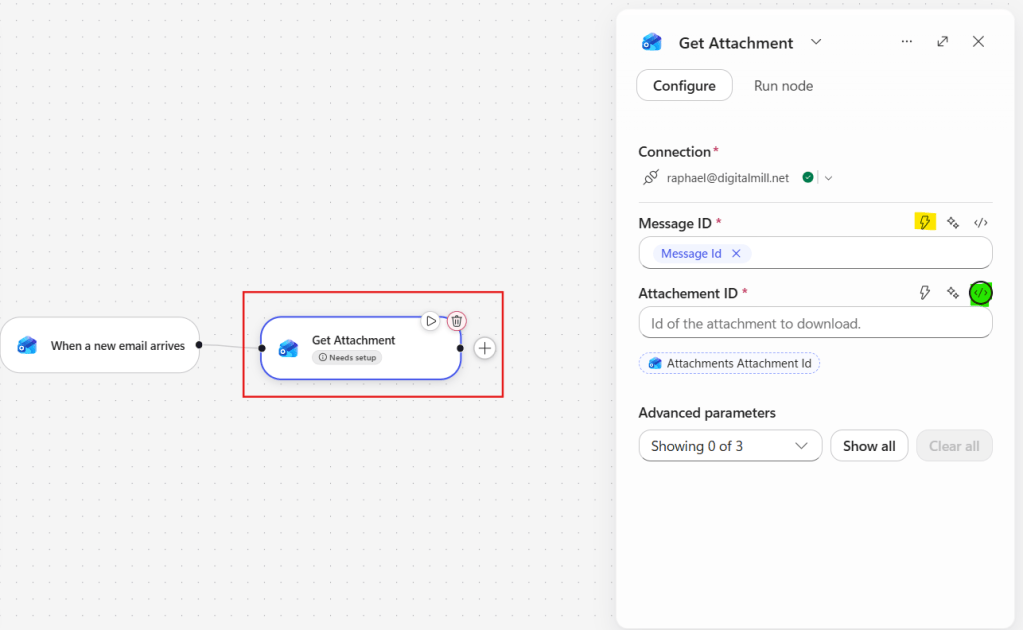
In the Attachment ID, switch the input to the expression mode (highlighted in green above). Although this property can be also retrieved from the trigger, we need to use an expression because attachments are returned as an array of objects.
Expressions in Copilot Studio workflows are similar to Excel formulas or functions in Power BI DAX, allowing you to access, transform, and manipulate data using built-in functions and syntax. In this example, we want to access the attachments returned by the trigger, and retrieve the ID property of the first element in the array. To do this, you can use the expression @triggerBody()[‘attachments’][0][‘id’] (in red):
Now that we are retrieving the content of the file attached to the email, we need to extract the data from it. On the left side of the canvas, select Extract under Add (highlighted in yellow below), which will include this step to the workflow. This action expects a document from which the data will be extracted (highlighted in red below) – in the input field, click the lightning to reference the dynamic content of the Content Bytes property from the Get Attachment.
You can also select the model to be used for extracting the data (highlighted in green). For this example, Claude Opus 5 is sufficient:
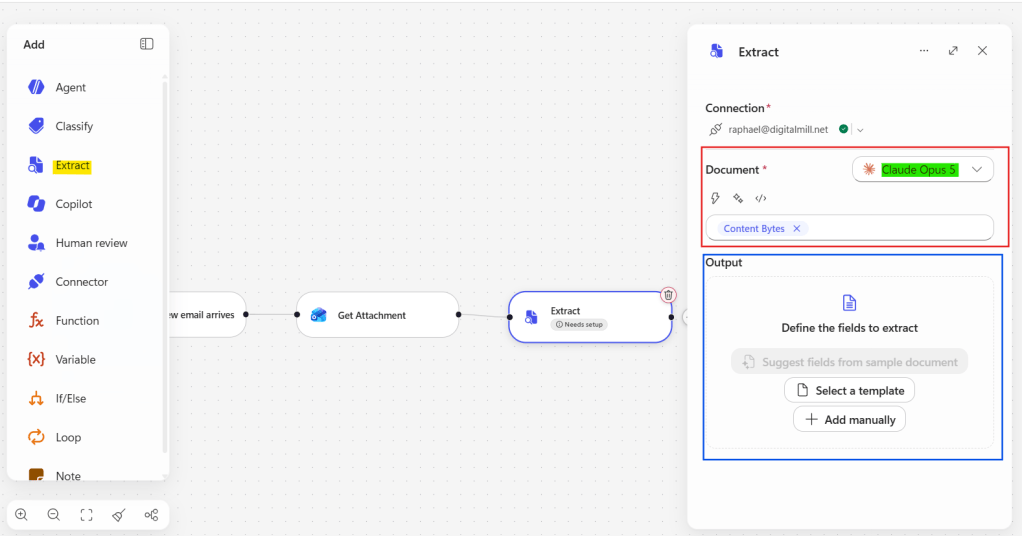
One last setting to be configured is the list of properties that should be extracted from the document. You can either provide a template, or manually define the properties. Let’s add them manually.
For each property, you must define a name, a data type and optionally a description. In this case, we want to retrieve the extracted information as JSON array, with each object corresponding to a game and identifying its date and time, the home and away teams, and the location. Set the property name to games and its type as List (highlighted in blue). This will allow you to enter multiple properties that must be extracted for each list element (highlighted in red):
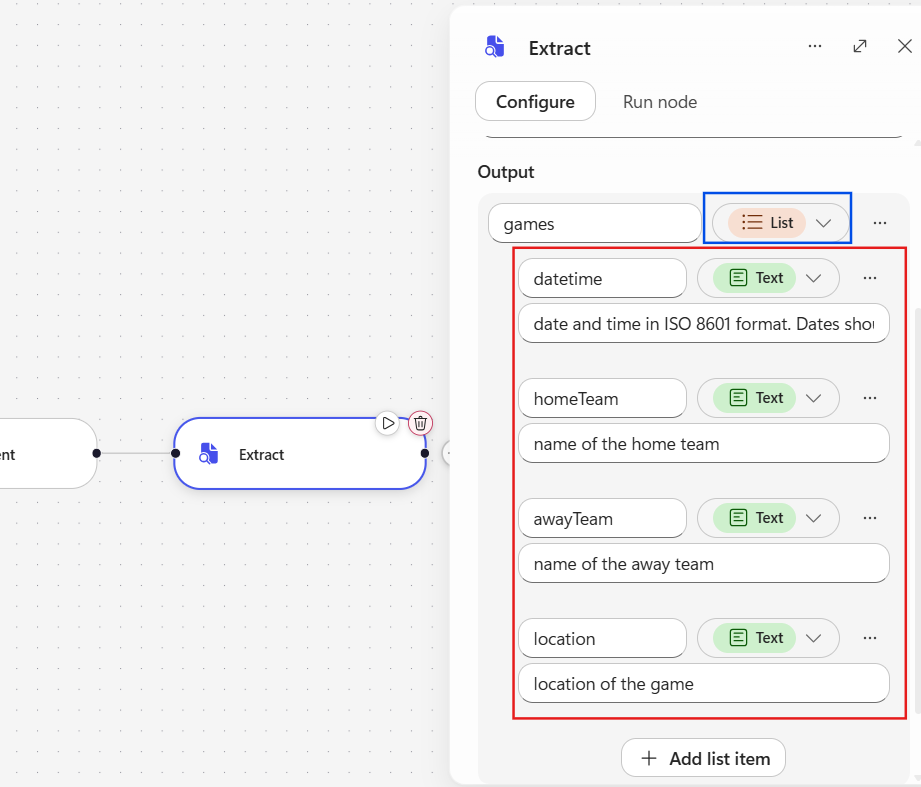
Define the properties of the list as follows:
- datetime
- Text
- date and time in ISO 8601 format. Dates should be represented in UTC
- homeTeam
- Text
- name of the home team
- awayTeam
- Text
- name of the away team
- Location
- Text
- location of the game
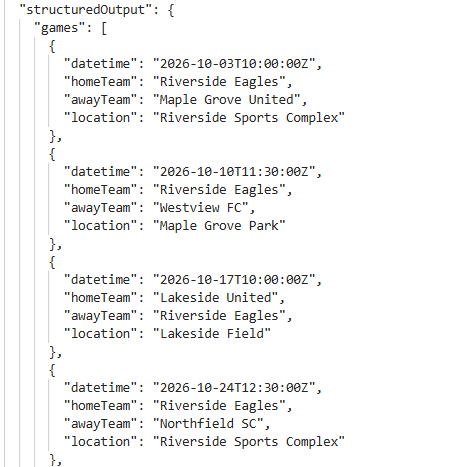
At this point in the workflow the data extracted from the schedule image will be represented like this:
Creating events in Outlook calendar with Copilot Studio workflows
Now that we have structured data for the soccer games, we can create an event in the Calendar for each game, observing our requirements – Riverside Eagles plays at home, or the match is being played at Maple Grove Park.
Since the extracted data is organized as an array of objects, let’s first access each of these elements by clicking Loop, under the Add section (highlighted in yellow). This will add a new block to the canvas (in red). For configuring the step, set the Loop type to For each (in blue) and reference the dynamic content of Games in the Array expression (in green):
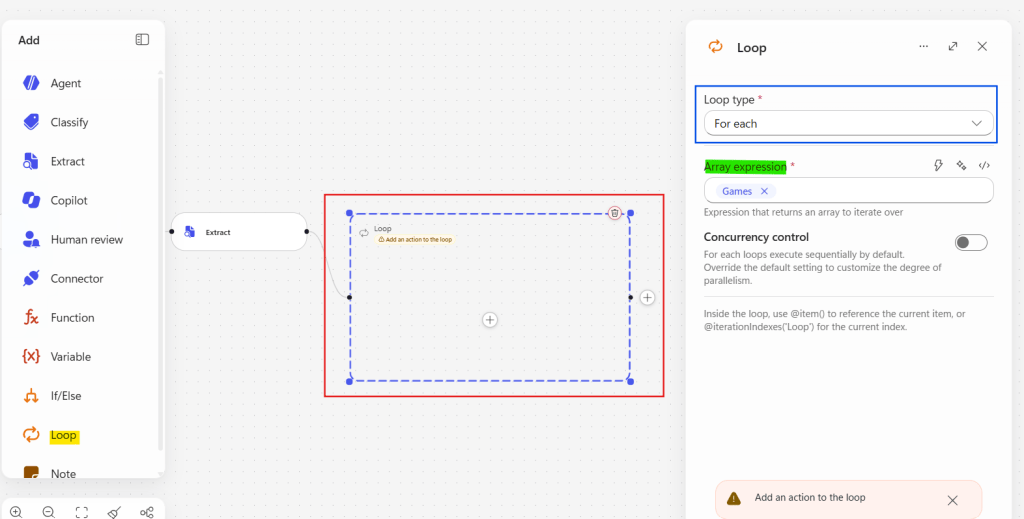
Click the plus sign inside the loop area to add a new step and select If/Else. This step evaluates a condition, branching the workflow execution depending on its outcome (true or false). Here we will test each game, evaluating if the Riverside Eagles are playing at home, or if the match is being played at Maple Grove Park, even where the Eagles are playing as a visitor.
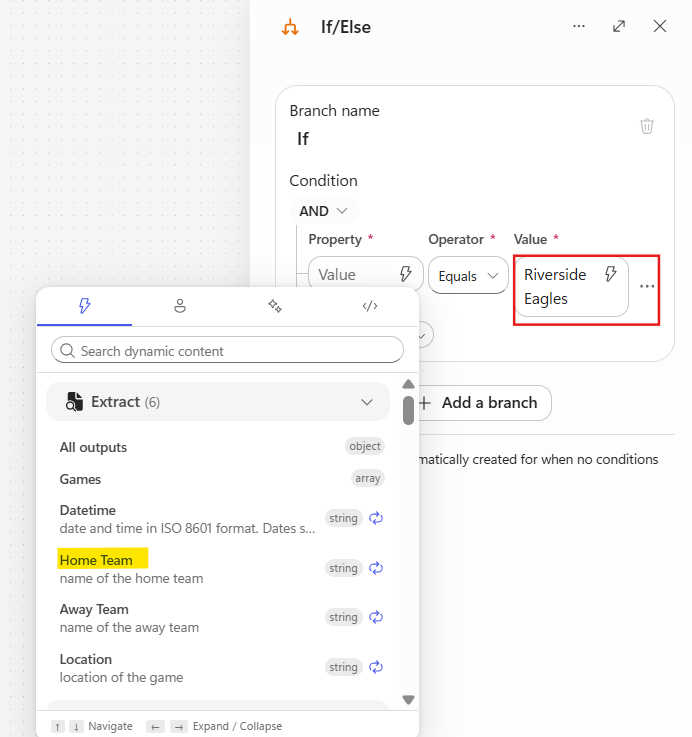
Let’s start by setting the Property input as the dynamic content of the Home Team from the Extract step (highlighted in yellow). Leave the Operator as Equals and set the Value to Riverside Eagles (highlighted in red):
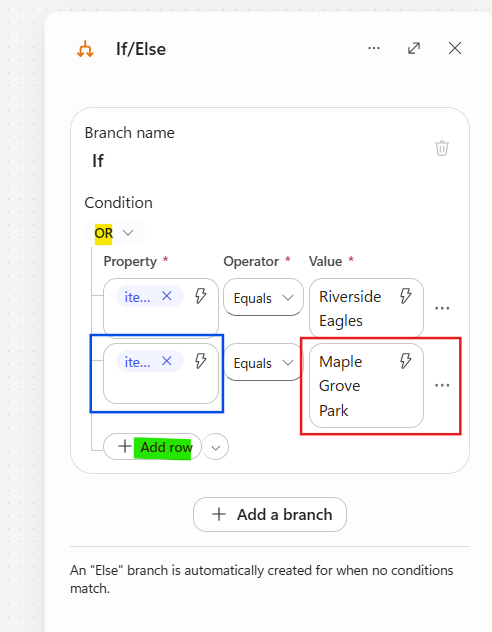
In addition to the home team, we also need to evaluate the match location. Click Add row (highlighted in green) to add a second condition, include the dynamic content of Location as a property (highlighted in blue) and set the value to Maple Grove Park (in red). Finally, to ensure that the events are created in the calendar if any of the two conditions is true, set the operator to OR (in yellow):
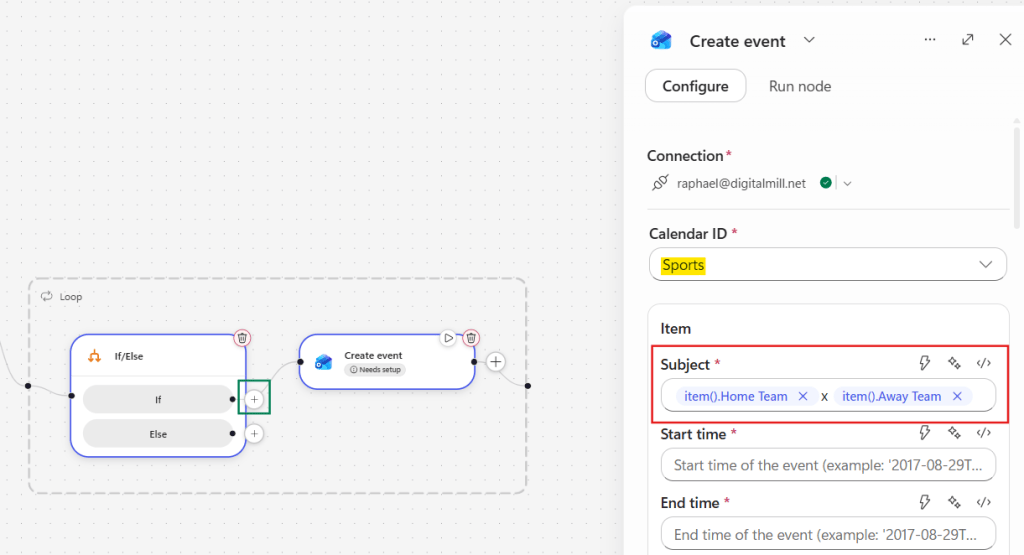
We can now create calendar events only for the games that meet at least one of these conditions. For that, click the plus sign to the right side of the If (highlighted in green) and add a Create event step, from Office 365 Outlook connector. In the settings, start by defining the calendar where the event should be created (highlighted in yellow) and a event subject using the dynamic content for the home and away teams (highlighted in red):
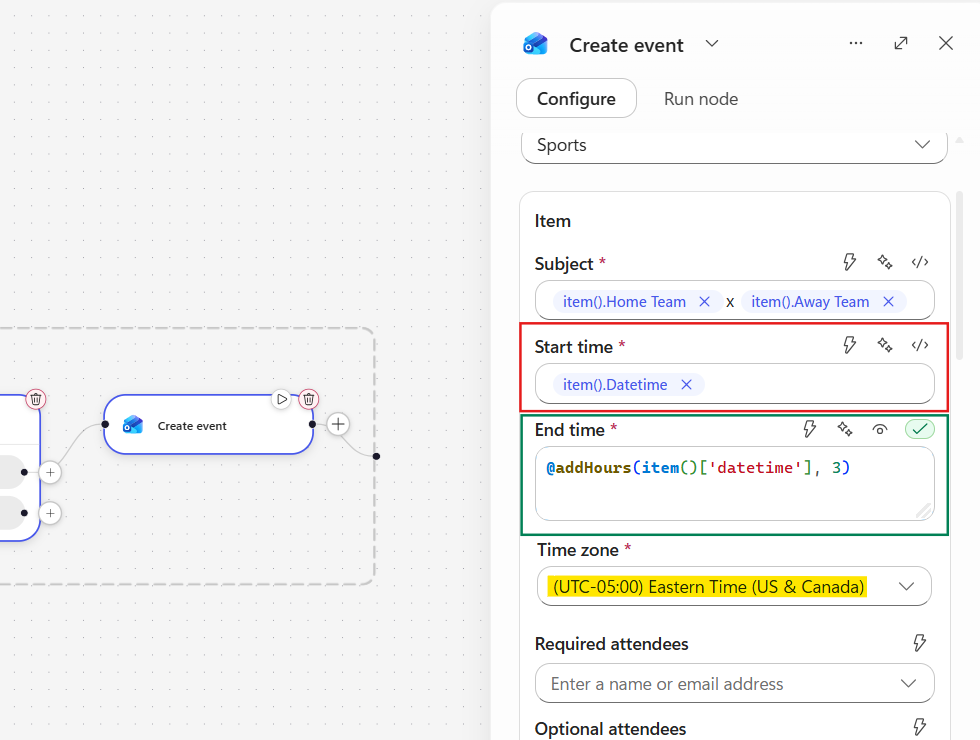
Next, set the Start time as the datetime dynamic content from Extract (in red) and use the expression @addHours(item()[‘datetime’], 3) as input to the End time (in green), to set the event to end 3 hours after it starts. You can also specify your preferred time zone (in yellow):
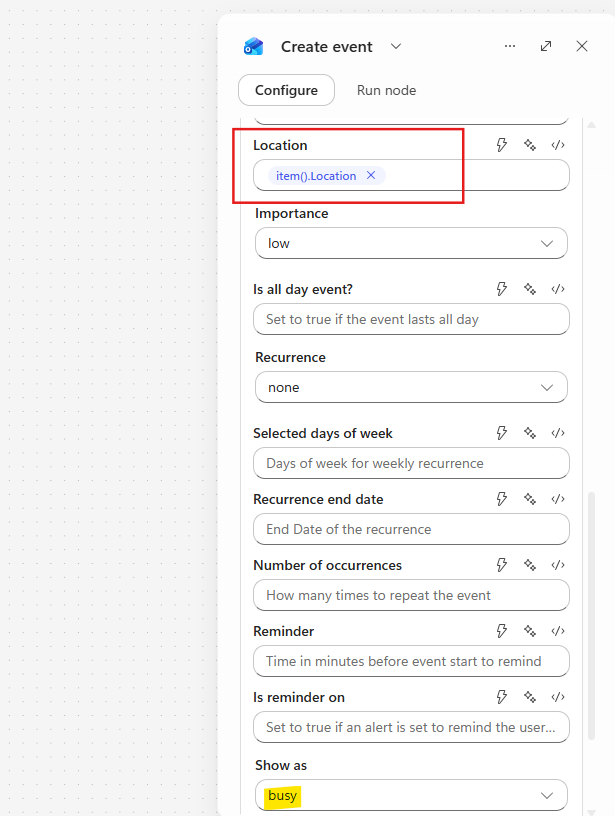
You can configure additional properties for the event, such as the location, which can be populated dynamically using the Location output from the Extract outputs (highlighted in red). Another possibility is to set the timeslot to be displayed as busy in the calendar (highlighted in yellow):
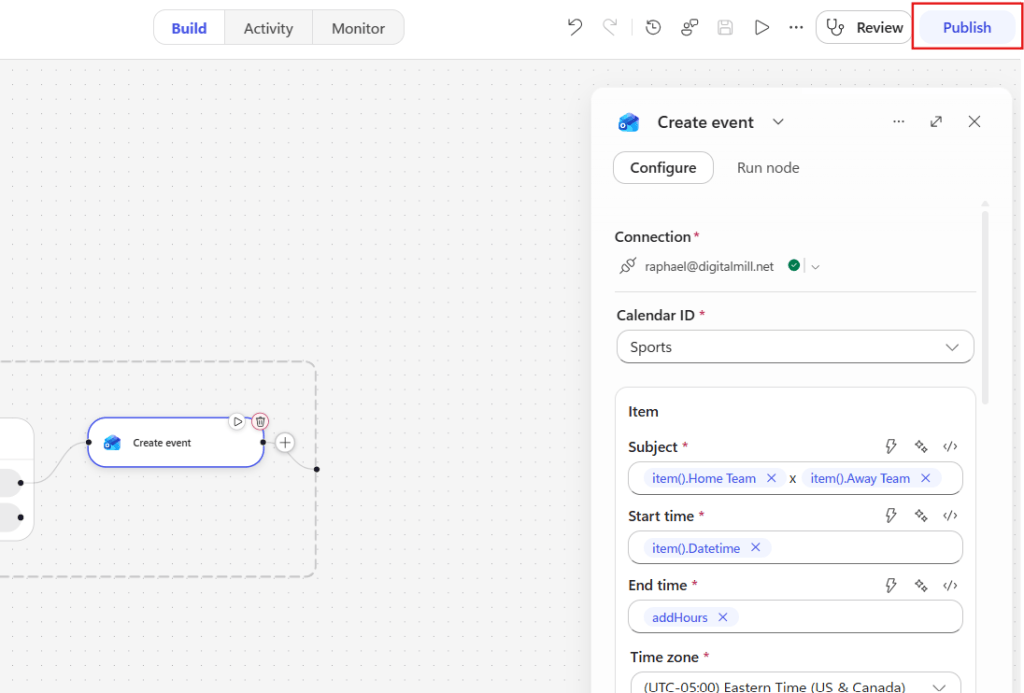
As the final step, Publish the workflow (in red):
Testing the solution
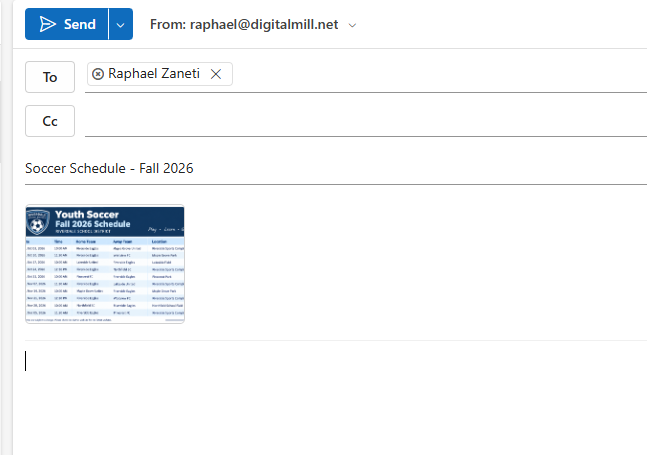
To test the workflow, let’s send an email to the monitored mailbox using the configured subject filter and attaching the schedule image:
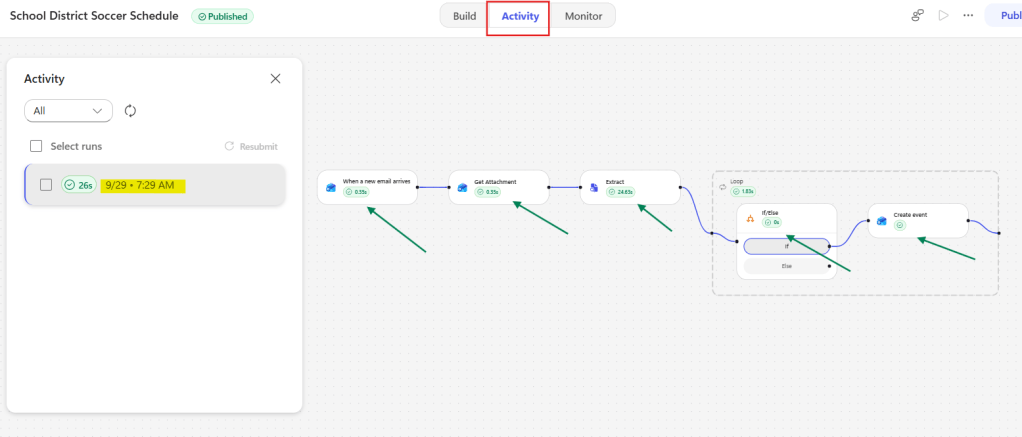
After the email is received, the workflow is executed. You can check the results in the Activity tab in Copilot Studio (highlighted in red), where all workflow runs are listed (in yellow). By selecting a run, you can see the details of each step and verify that each action was successfully executed (in green):
In Outlook, you can also find events for each of the matches in the calendar, including the teams playing, the date and time, and the location:
Conclusion
In this blog, we saw how to use Copilot Studio workflows to extract data from images and create events in Outlook calendars. Let us know what do you think about this blog in the comment section, and don’t forget to check our website, our YouTube Channel or connect on LinkedIn!

