Microsoft Forms is a convenient tool for quickly creating basic public-facing forms, especially given how easily it integrates with Power Automate to trigger workflows based on responses. However, it comes with several limitations when building more advanced solutions.
One of the main constraints is the lack of dynamic behavior: forms cannot adapt in real time based on external data sources such as Excel, SharePoint or APIs. This makes it difficult to create personalized experiences, such as pre-filled fields or conditional dropdowns driven by live business data.
For scenarios that require deeper integration, dynamic content, or a more tailored user experience, combining Power Automate with custom HTML forms becomes a much more flexible and powerful alternative. In this blog, you will learn how to build a fully customizable public-facing form from scratch with Power Automate, including how to create dynamic dropdown fields and efficiently handle user submissions.
There is also a video version of this tutorial in our YouTube Channel:
Solution overview
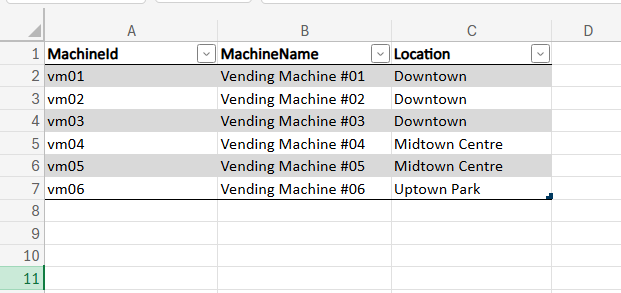
This solution retrieves data from an Excel table containing a list of vending machines along with their respective locations:

It then renders this data in a public-facing HTML form, where users can select both a location and a specific machine. Additionally, the form supports a dynamic filtering logic, so that the list of available vending machines is automatically updated based on the selected location:

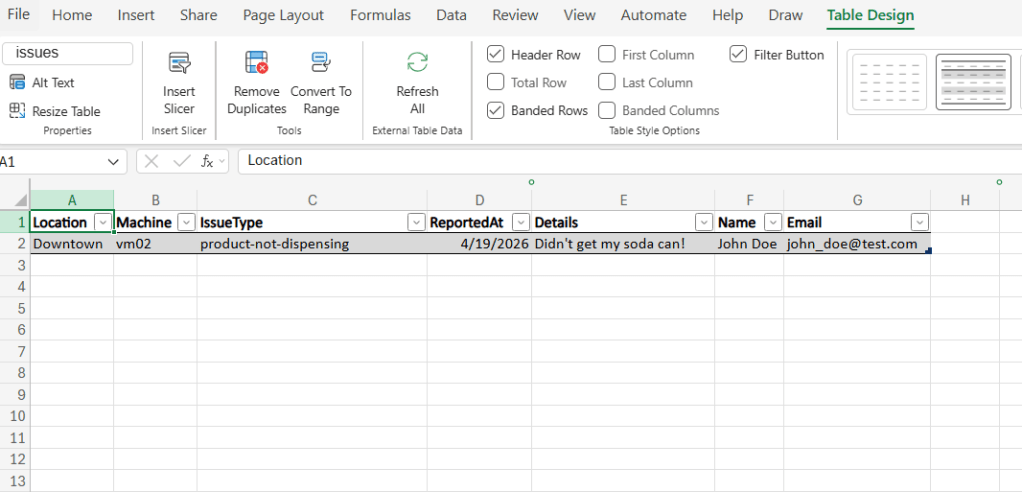
After the user submits the form, Power Automate processes the request and creates a new record in a separated issues table within the same Excel file. This record captures all user inputs and links them to the corresponding vending machine via MachineId:
Security considerations
The approach described in this blog should be used with caution and is not intended to replace all data collection solutions. Since it relies on exposing an HTTP endpoint through Power Automate and serving a custom HTML form, this architecture introduces security considerations that are not typically present in more controlled platforms, such as Microsoft Forms.
Since the form is essentially delivered through a public or semi-public endpoint, it may be more vulnerable to misuse, unauthorized access, or data interception proper safeguards are not implemented. Unlike built-in form solutions, this approach requires additional responsibility in securing the endpoint and validating incoming data.
For this reason, it is best suited for low-risk scenarios where no sensitive or confidential information is being collected. For use cases involving personal, financial, or regulated data, more robust solutions should be considered to ensure proper authentication, data protection, and compliance with security standards.
Flow logic: HTTP GET request that returns a website
In Power Automate, the solution is divided into two separate flows: the first generating the web-based form with dynamic data, and the second handling the form submission. Both flows have the same trigger: When a HTTP request is received.
Most internet traffic relies on the HTTP protocol, including how browsers load websites. This protocol is based on an exchange of requests and responses between the client and the server, and for website access it typically sends a GET request, which the server responds with the content of the page. You can find further details on HTTP requests here.
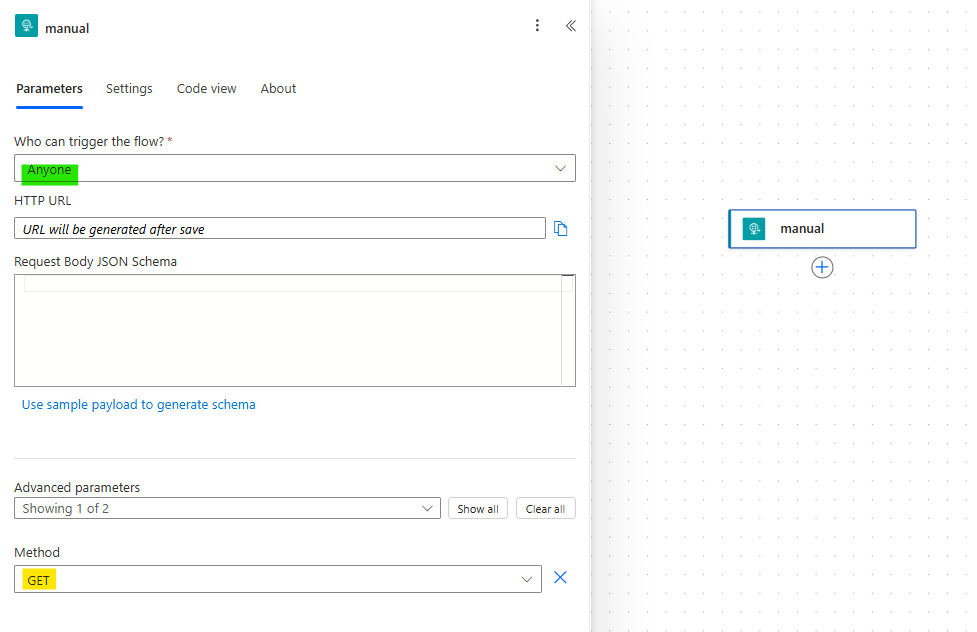
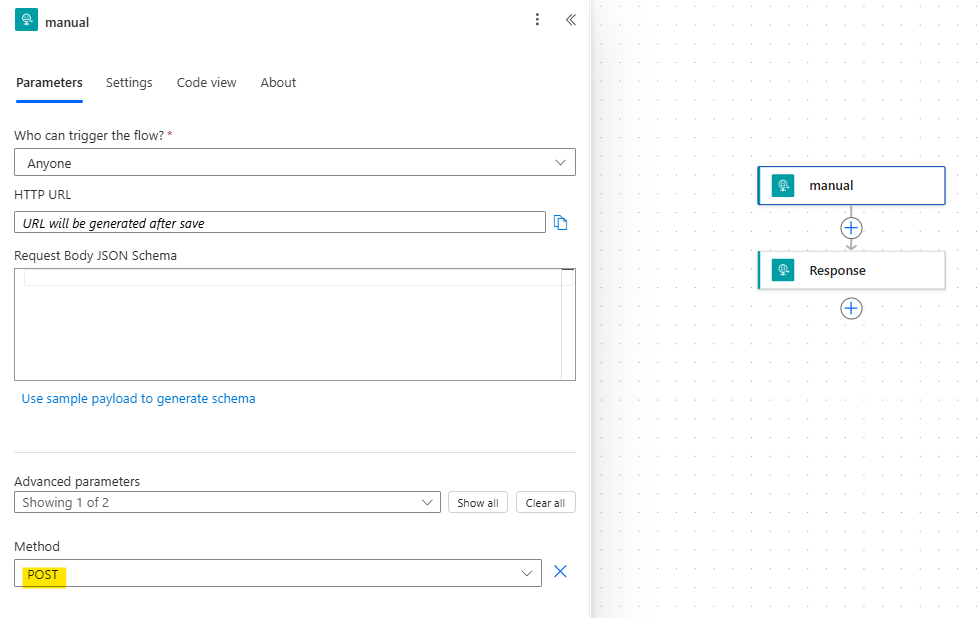
For hosting the web-based form in Power Automate, the first step is to configure the When a HTTP request is received trigger. You must set the Who can trigger the flow to Anyone (highlighted in green) and select GET as method (highlighted in yellow), allowing the flow to respond to browser requests:
Cybersecurity note: by allowing the trigger to be accessed by Anyone, any user that has the HTTP URL will be able to execute this flow. As a consequence, the endpoint may be exposed to potential spam or abuse, which can make your tenant reach throttling limits for some connectors. Additionally, it is strongly recommended avoid exposing sensitive data through this approach and restrict its use to low-impact scenarios, as highlighted earlier.
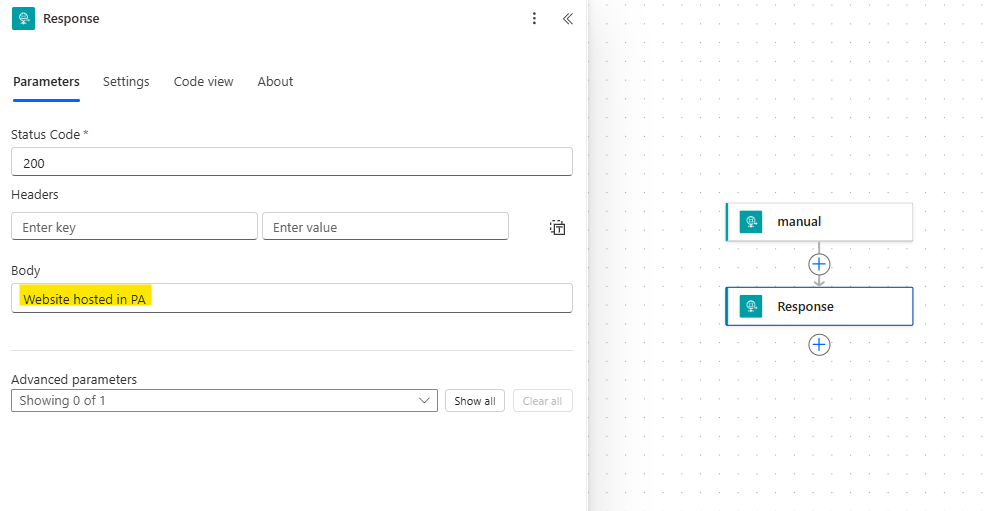
Next, include a Response action, which retrieves the content of the webpage to the user. For now, you can temporarily include placeholder text in the Body property (highlighted in yellow), as it will later be replaced with the full HTML structure of the form:
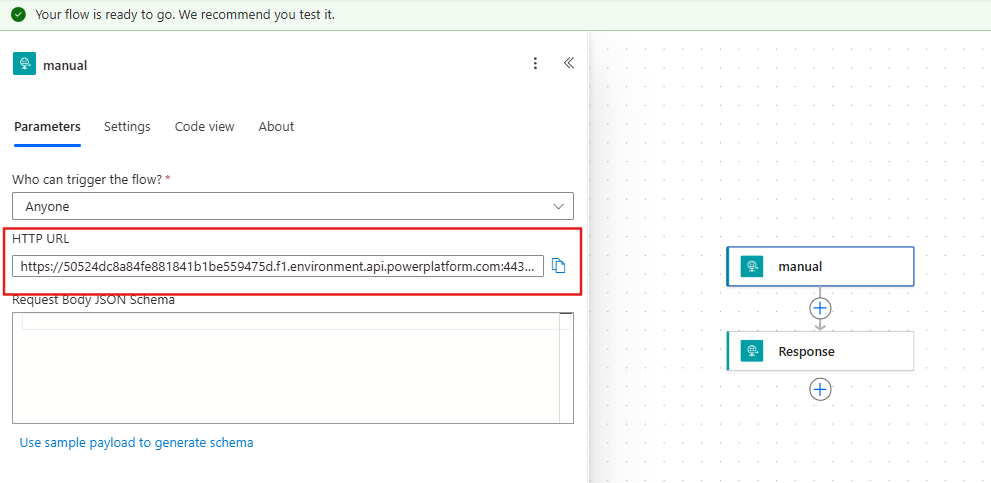
After saving the flow, a HTTP URL will be generated (highlighted in green):
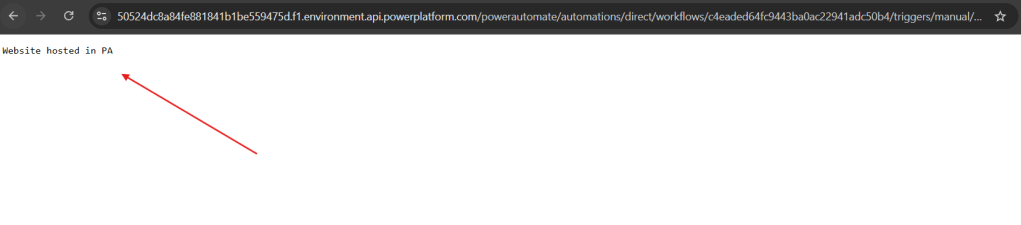
When accessed through a browser, this URL will display the content defined in the Response’s Body property:
All the core logic of the solution will be implemented between the trigger and the Response action, so enabling you to dynamically generate and return a fully functional HTML form to the end user.
Read data from Excel file with Power Automate
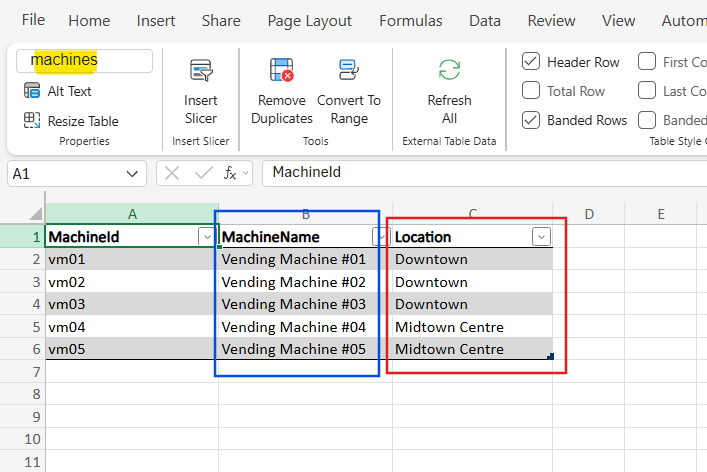
Since the data to be presented in the HTML form comes from an Excel table, the first step is to extract all vending machine (in blue) and the distinct values from the Location column (in red). These two datasets will be used to populate the form fields dynamically:
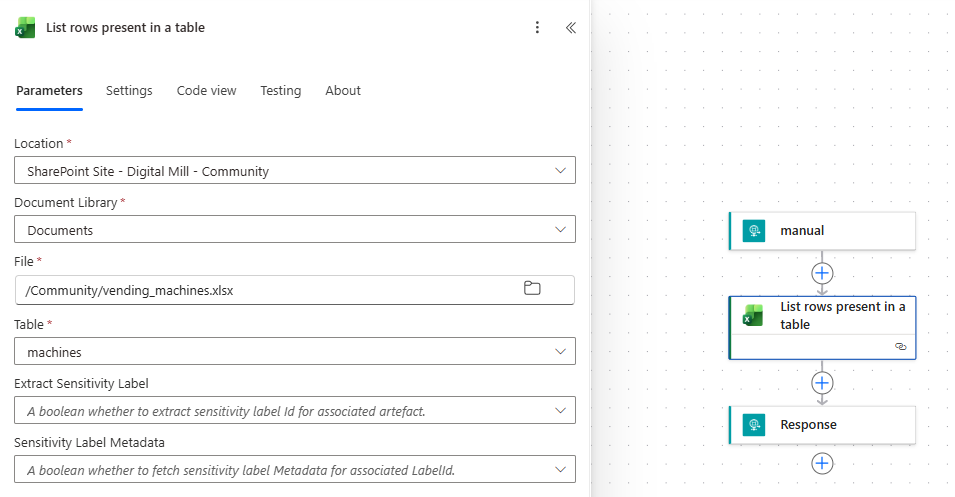
For retrieving all records from the Excel table, use the List rows present in a table action in Power Automate:
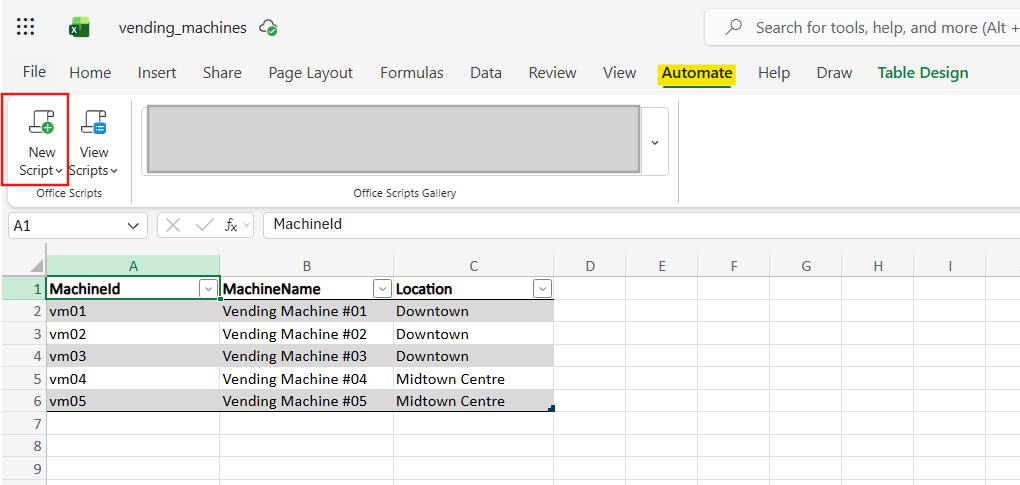
While it is possible to extract distinct Location values directly from the table, a simpler and more efficient strategy is to use an Office Script. Office Scripts allow you to perform data transformations directly in Excel, making it easier to retrieve unique values from a specific column. To create an Office Script on Excel, go to the Automate tab (highlighted in yellow) and click New Script (in red):
It will open the Code Editor, where you can define your script. For this example, you can use the Get distinct values from table column template, available in the Office Scripts Gallery:
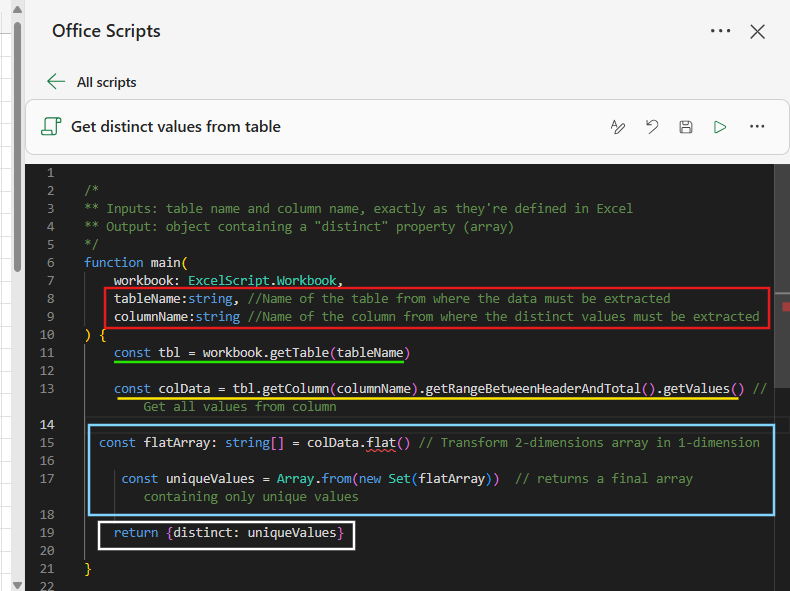
If you are not familiar with Office Scripts, this is what’s happening in the code above:
- Lines 8 and 9 (in red): Inputs of the Script. The expected values are Request the names of the table and the column from where the distinct values must be read. These inputs will be passed automatically from Power Automate when the script runs.
- Line 11 (in green): Access the Excel table that matches the name received from Power Automate.
- Line 13 (in yellow): From that table, the script selects the specified column and retrieves all its values (excluding the header and total row). The result is a list of values, but in a nested format (a list of lists).
- Lines 15 to 17 (in light blue): Data transformation steps to convert the nested lists into a flat list (lien 15) and to remove duplicates using a Set, later formatting is as an array (line 17).
- Line 19 (in white): The script returns the final result (the list of distinct values) to Power Automate, wrapped inside an object with a distinct property.
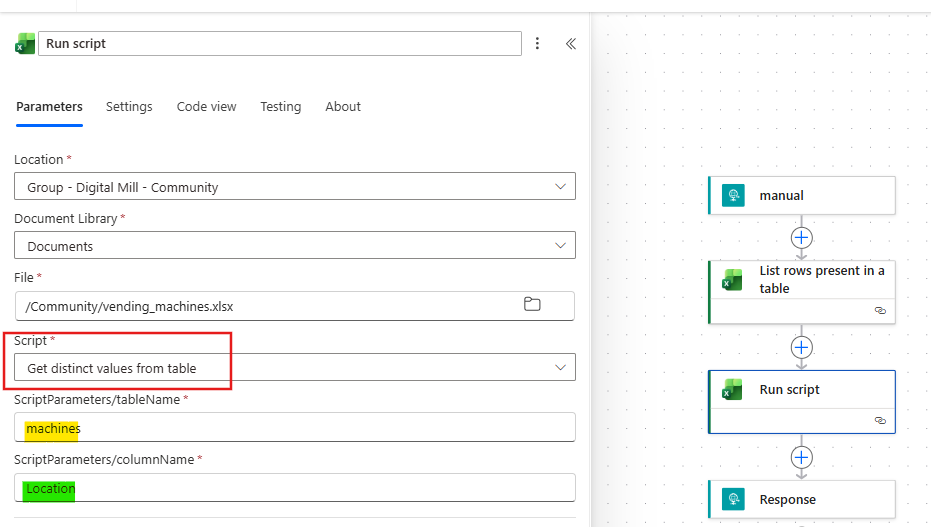
After saving the Script, return to Power Automate and add the Run script action, informing the appropriate Excel file and the script you just created (highlighted in red below). After selecting the script, the required input parameters will appear, where you need to specify the table name (in yellow) and the column name (in green):
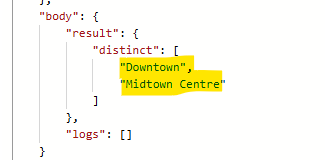
If you save and execute the flow at this stage (by accessing the HTTP trigger URL), the raw outputs of the Run script action will return an array of strings corresponding to the distinct values of the Location column, organized under the body/result/distinct property:
Converting Excel data into HTML Form dropdown options
After retrieving the data from Excel, the next stop is to convert it from a simple text to HTML with Power Automate, so it can be rendered as selectable options within dropdown fields in the web-based form:
In HTML, the questions above are represented like this:
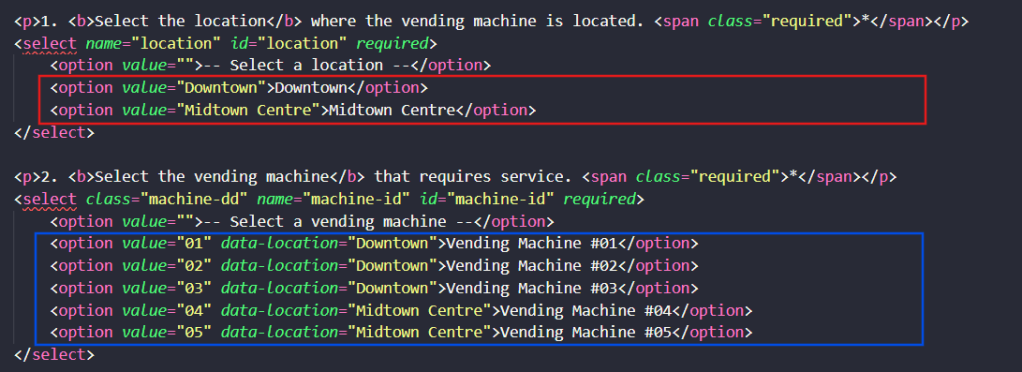
The dropdown lists are created using the <select> element, with each selectable item defined by an <option> element. In this solution, we will build two dropdowns: one for locations and another for vending machines, both dynamically populated from Excel data.
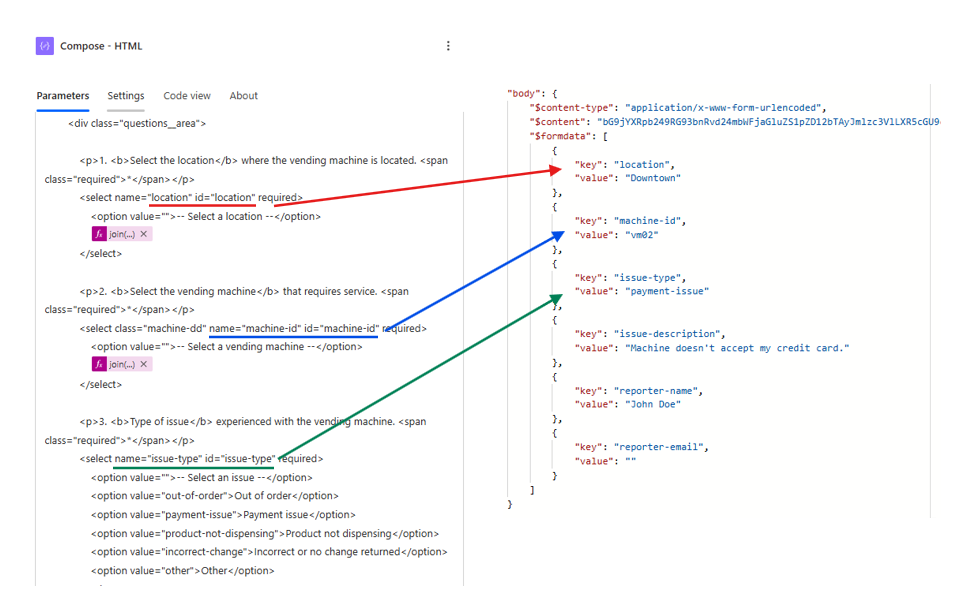
In the Location dropdown (highlighted in red above), each <option> element contains the location name. The text displayed to the user (for example, “Downtown”) is also assigned to the value attribute, which is used internally when the form is submitted.
In the Vending Machine dropdown (highlighted in blue above), each <option> represents a specific machine. The visible label (such as “Vending Machine #01”) is shown to the user, and the value attribute stores the machine’s number. Additionally, each option includes a custom data-location attribute that specifies the associated location. This extra attribute is important because to enable the dynamic filtering, so the form will display the list of machines based on the location selected by the user.
To transform the locations plain text into HTML <option> elements, use a Select action in Power Automate. In the From input, reference the distinct output retrieved from the Run script action using the expression body(‘Run_script’)[‘result’][‘distinct’] (in red). Next, click Switch to text mode (In yellow):

Within the Map field, use an expression to concatenate the location name with a few default keywords, in order to format it as a HTML dropdown option:
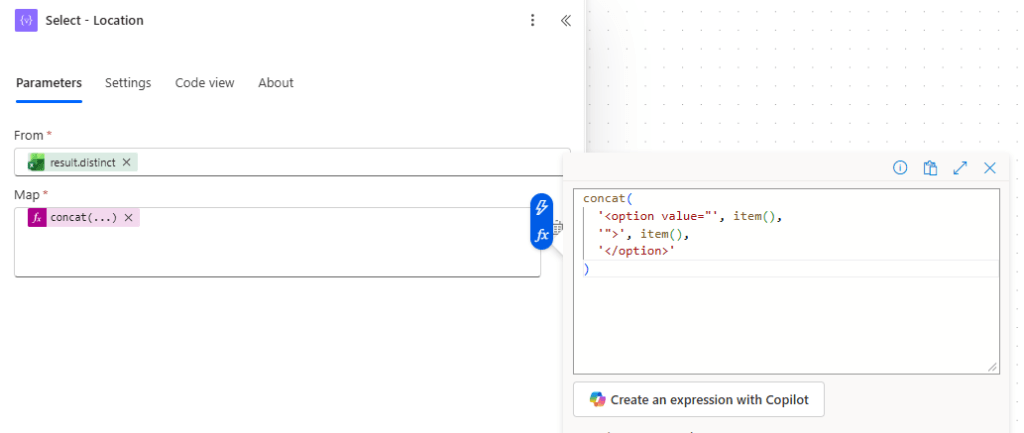
The full expression is:
concat( '<option value="', item(), '">', item(), '</option>')
Next, apply the exact same logic for the machines. Add a new Select and use the body/value outputs from List rows present in a table action as input to From:
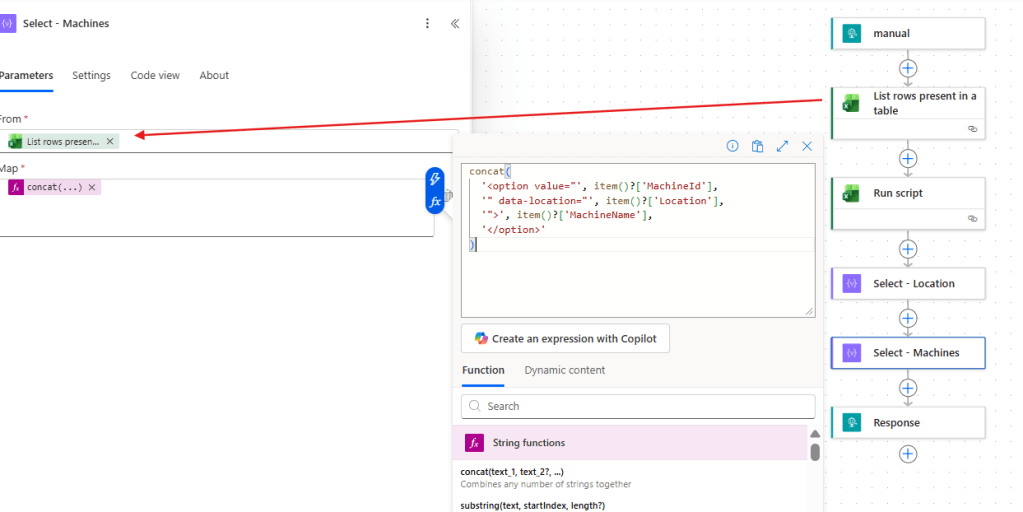
The expression for machines is a little longer than the location ones, since it needs to cover the data-location attribute:
concat( '<option value="', item()?['MachineId'], '" data-location="', item()?['Location'], '">', item()?['MachineName'], '</option>')
Returning webpage to client in Power Automate
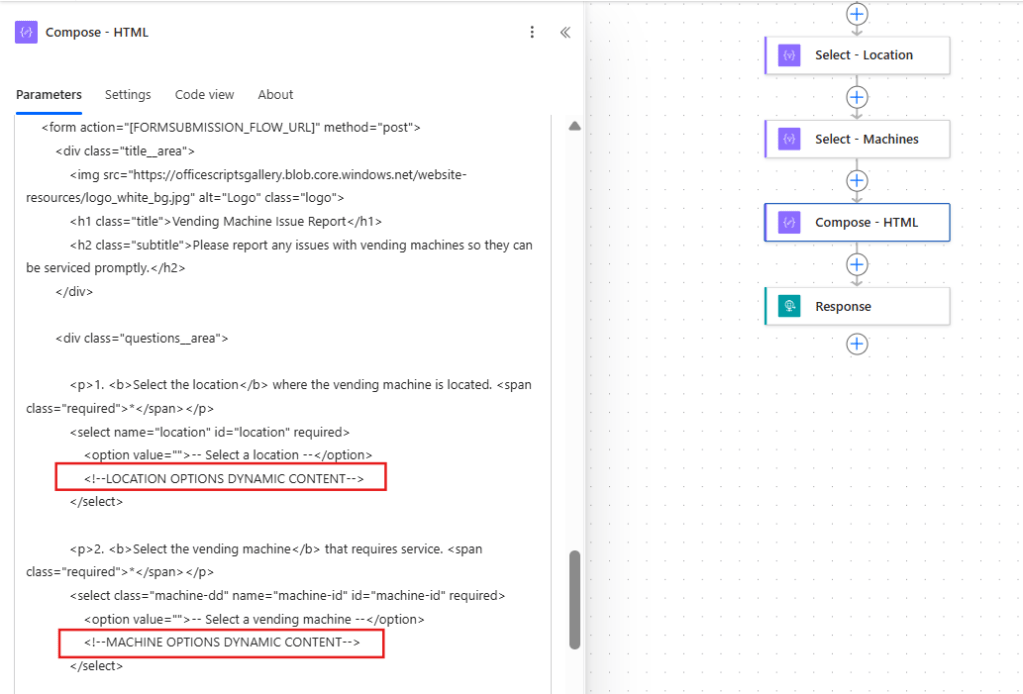
After formatting the dropdown options for both locations and machines, the next step is to include this into the HTML form. For this example, we will work with this code, which combines HTML, CSS and JavaScript into a same HTML document.
Copy the entire code and paste it into a Compose action in Power Automate. Then, locate the placeholder comments <!–LOCATION OPTIONS DYNAMIC CONTENT–> and <!–MACHINE OPTIONS DYNAMIC CONTENT–> within the code, as highlighted in red:
Replace each of these placeholders with a join() expression, passing the respective outputs of the respective Select action as a first parameter and a ‘\n’ as second. This expression converts all elements for the Select arrays into HTML strings, separated by a line break:

In the image above, the expression join(body(‘Select_-_Location’), ‘\n’) is being used for the Location options, while the expression join(body(‘Select_-_Machines’), ‘\n’) is being used for the Machines.
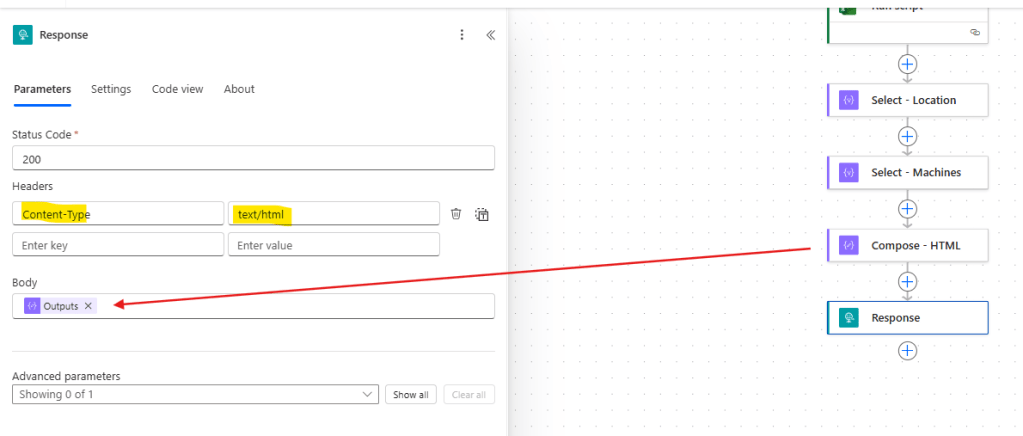
At this point, your HTML form is fully assembled. . To return it to the user, go back to the Response action, replace the existing content in Body with the dynamic content from the Compose containing the HTML code (highlighted in red). Additionally, set the header Content-Type to text/html (in yellow):
Once the flow is saved, you can access the trigger URL in your browser to view the form with the dynamic dropdown options for both locations and machines. However, at this stage, the form is only capable of displaying data—the submission logic still needs to be implemented.
Second flow: Processing user HMTL Form submission with Power Automate
For handling the form submissions, we will need to create a second flow. This flow also uses a When a HTTP request is received trigger, configured with access set to Anyone, but at this time using the POST method (highlighted in yellow). A Response action is also included, which will be configured later to return a confirmation page to the user:
Since this flow’s URL will be used as the action attribute in the HTML <form> element, receives the submitted data as an array of objects. Each object contains two properties: a key (representing the input field ID defined in the HTML form) and a value (representing the user’s response):
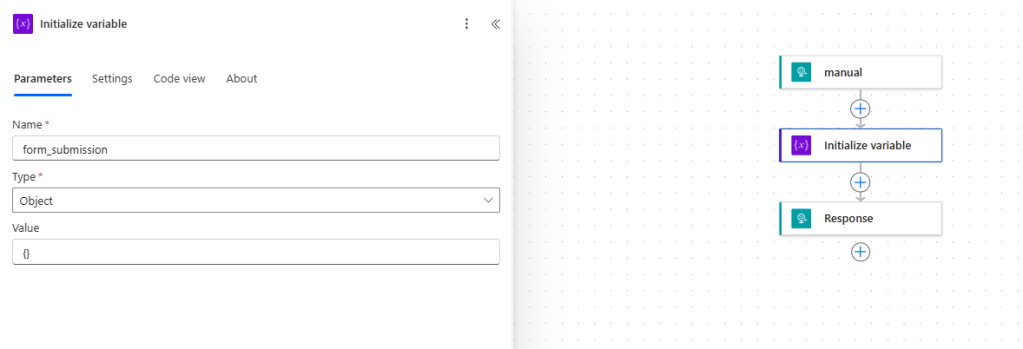
Before loading this data to the issues Excel table, we need to convert it from an array of objects into a single object, where each form field id becomes a property and the corresponding user input becomes its value. Let’s start by initializing a new variable named form_submission, with an object data type and empty object as value ({ }):
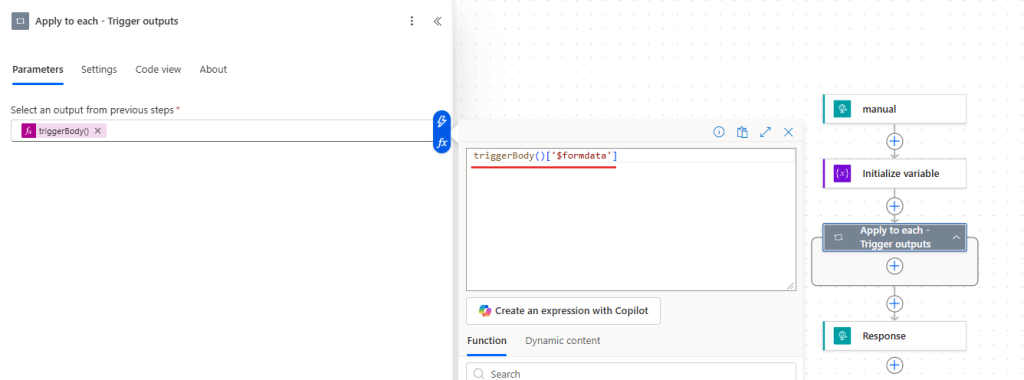
Next, add an Apply to each loop to iterate through the array of submitted form data. Use the expression triggerBody()[‘$formdata’] (highlighted in red) to access the array:
Each iteration of Apply to each is accessing an object retrieved by the trigger (a field submitted in the form). To progressively build the final object, add a Compose inside the loop, using the expression addProperty(variables(‘form_submission’), item()[‘key’], item()[‘value’]):
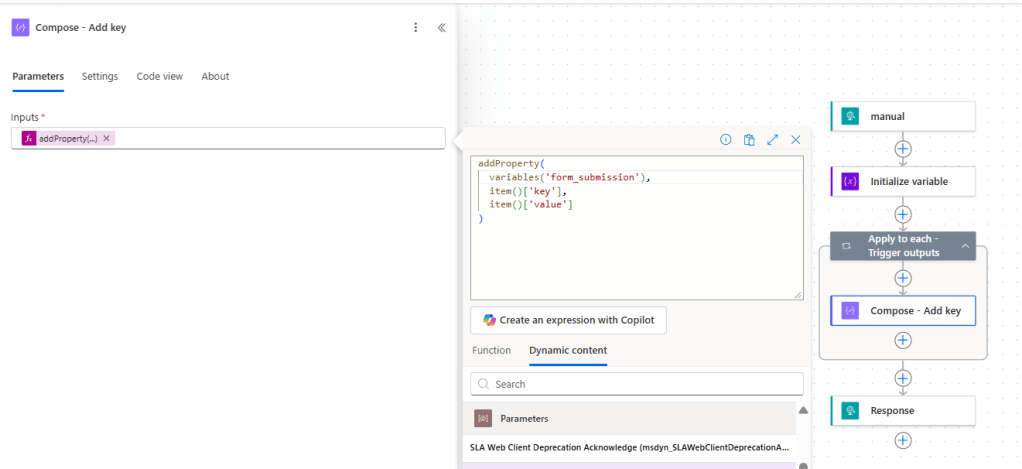
This expression takes the current content of the form_submission object variable and adds a new property, where the field ID is the key and the user’s input is the value.
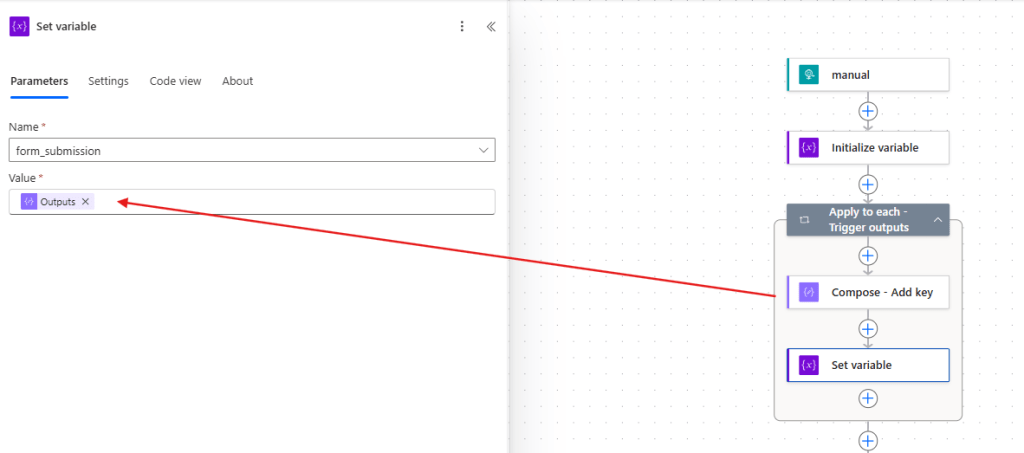
Then, add a Set variable action to overwrite the form_submission variable with the output from Compose action:
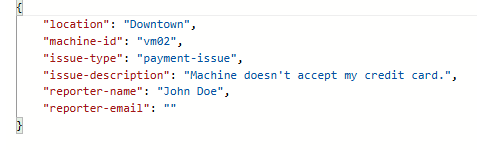
After all iterations of Apply to each, the final value of the form_submission variable is a structured object with all inputs properly mapped:
With the data now formatted, you can use the properties from form_submission as inputs for an Add a row into a table action, to populate the issues table in Excel. For each column, reference the corresponding property from form_submission using expressions:
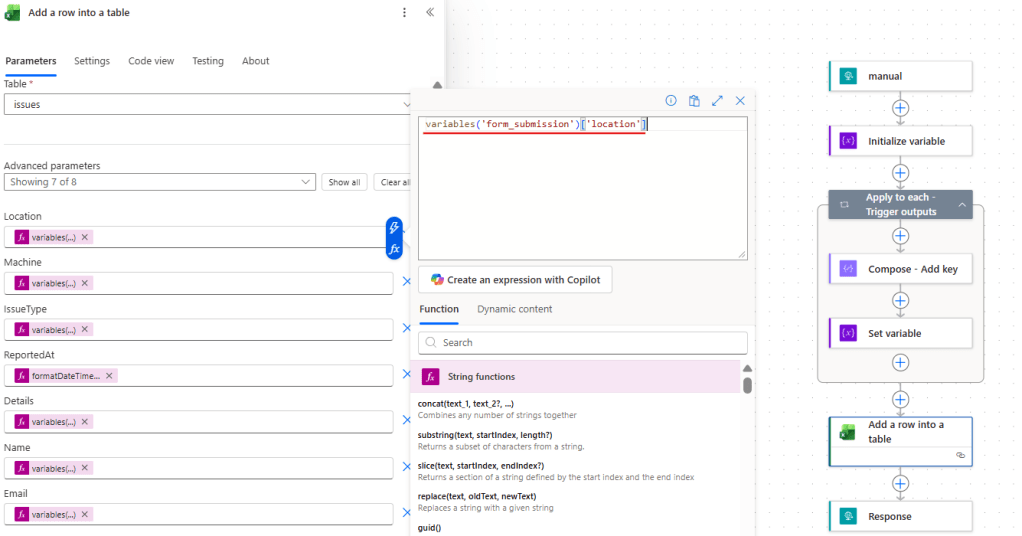
The only exception is the ReportedAt, where you can generate the current date using formatDateTime(utcNow(), ‘yyyy-MM-dd’) as date expression.
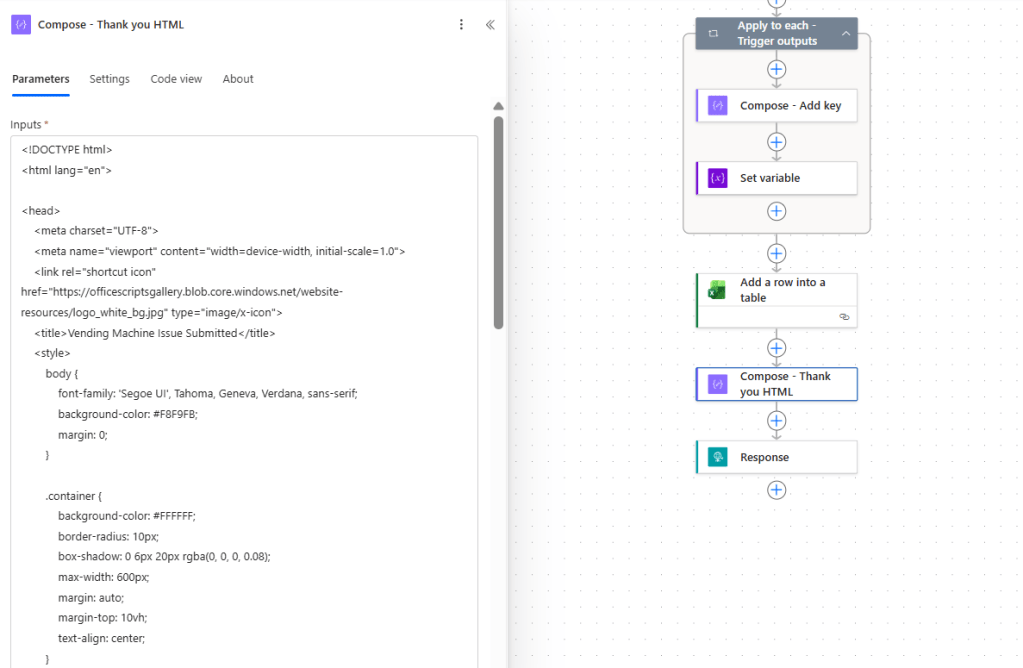
The flow is fully functional at this point. As a last improvement, we can return a “Thank you” page to be displayed to the user after form submission, confirming the operation. This can be done by adding the HTML code for the “Thank you” page (sample here) in a Compose action:
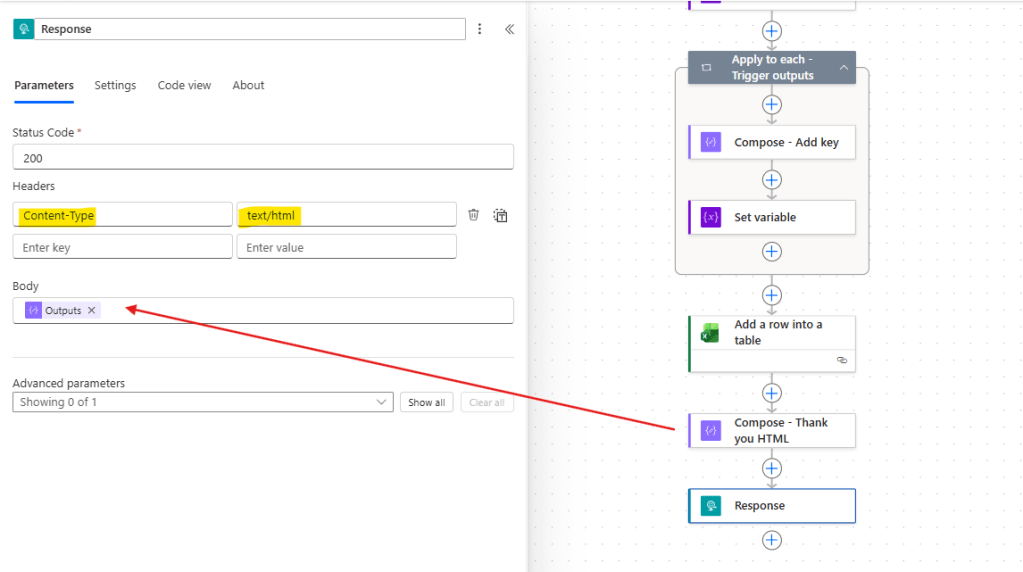
And then referencing it in the Response body (highlighted in red), while setting the Content-Type header to text/html (highlighted in yellow):
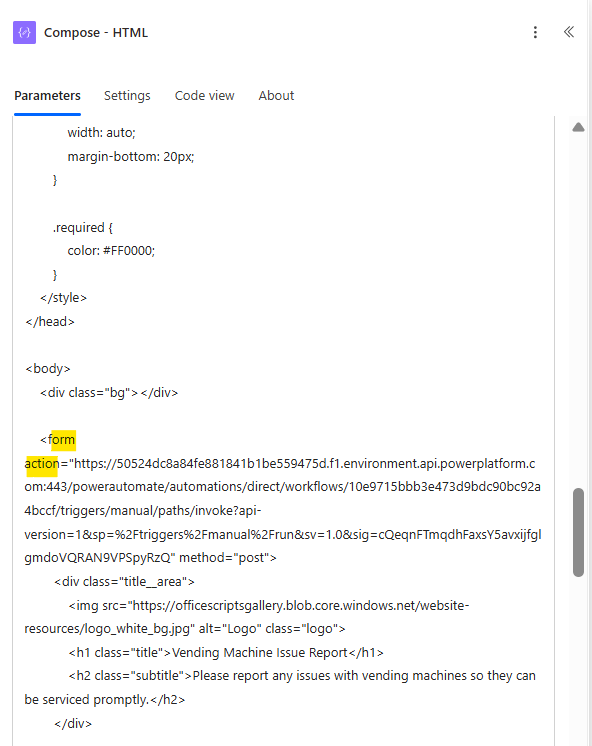
As a final step, save the flow, copy its URL and update the HTML form in the first flow, by replacing SUBMISSION_FLOW_URL_HERE in the <form> element’s action attribute with this URL:
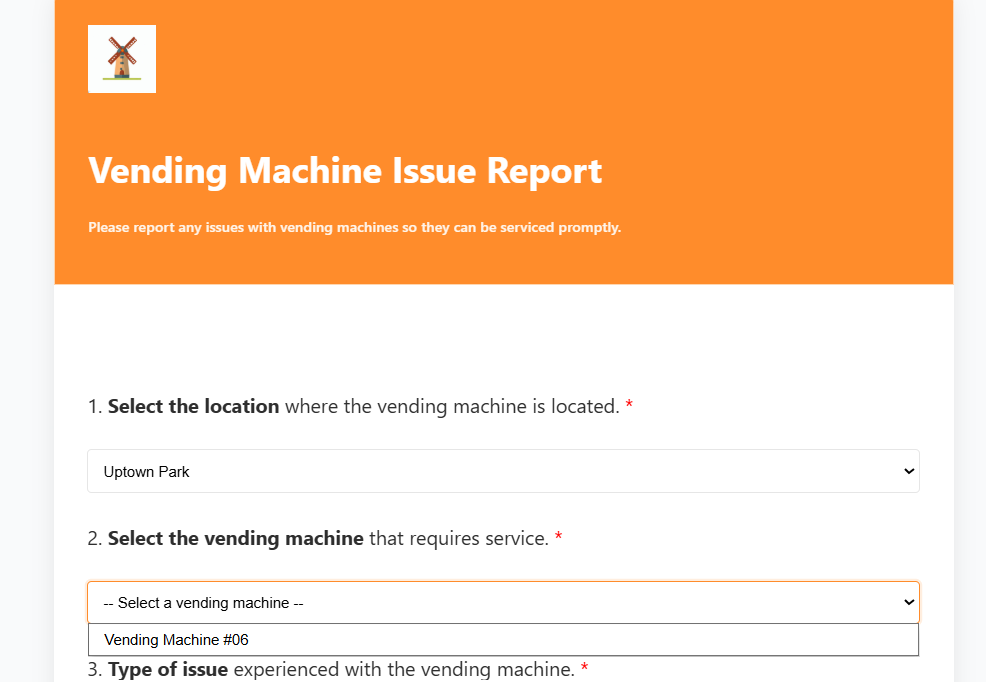
Testing the solution
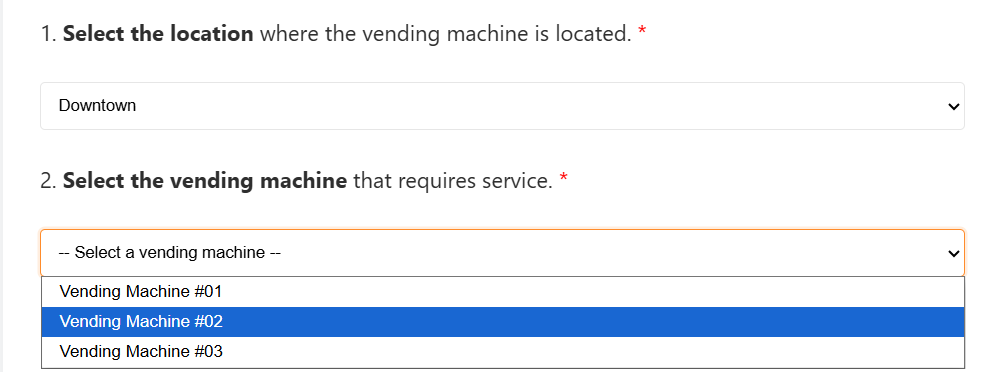
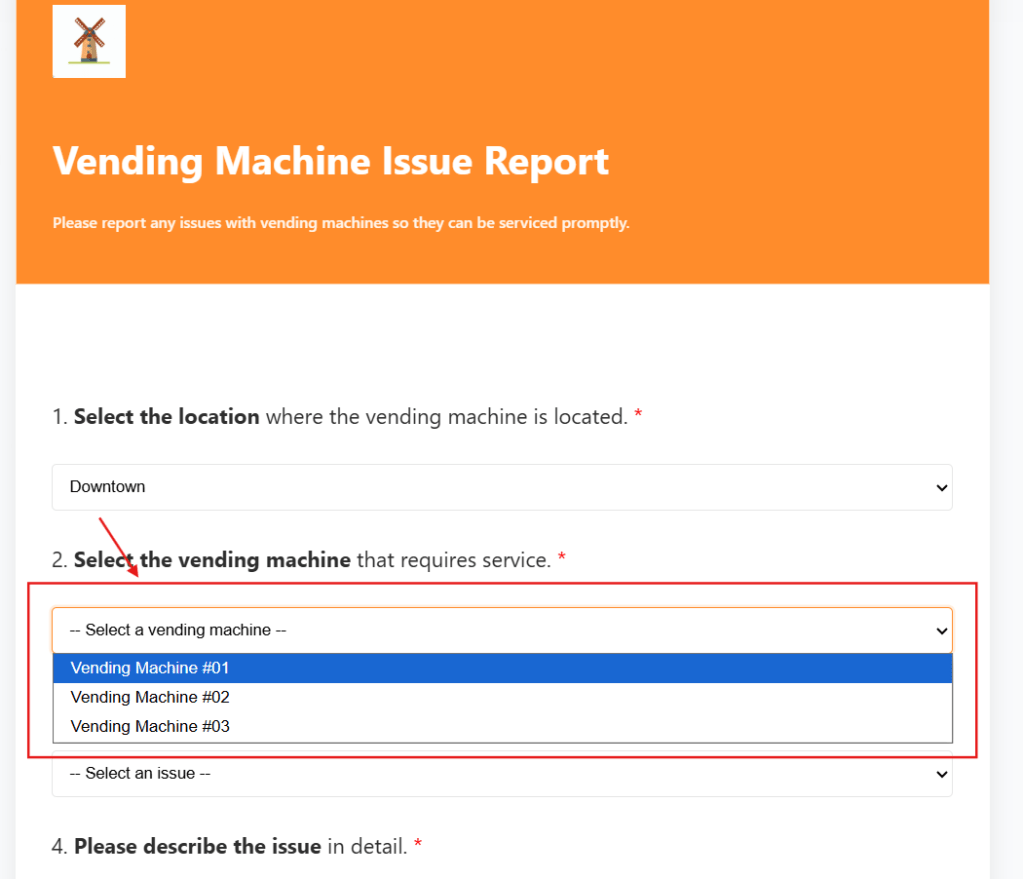
Now it’s time to test the solution. When accessing the form, you will notice that the list of available vending machines is dynamically filtered based on the selected location:
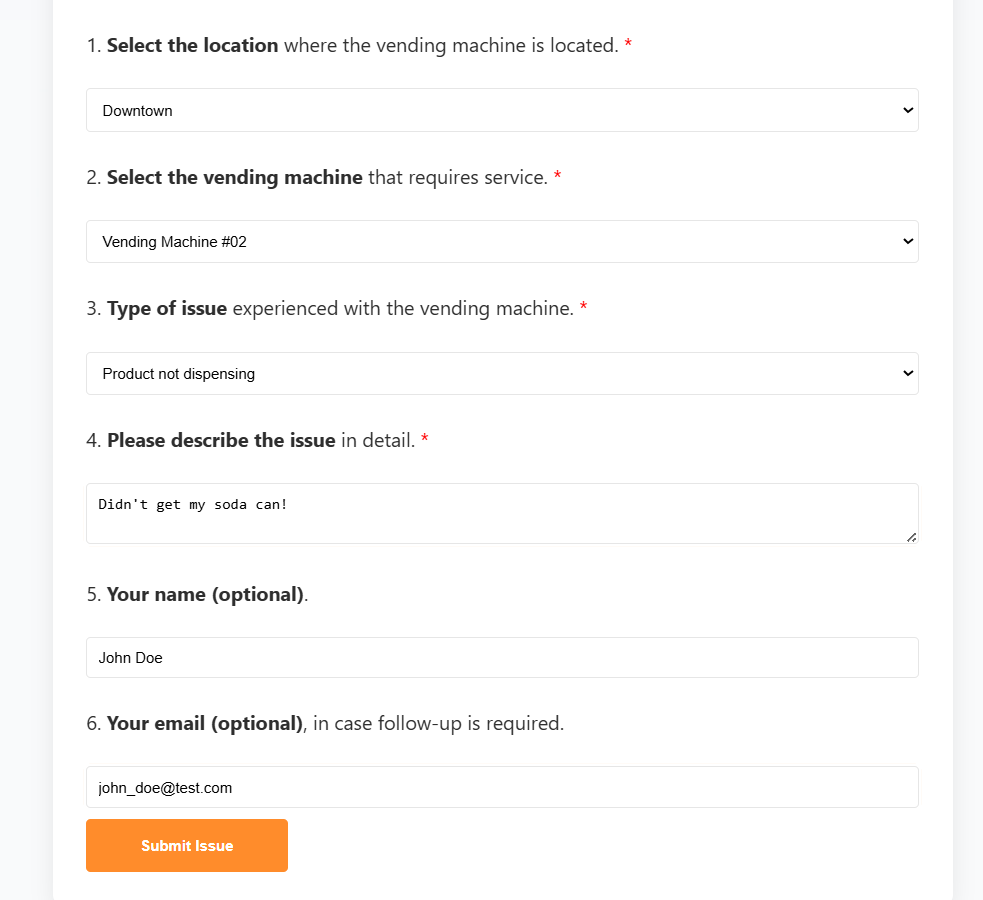
You can then proceed to fill out the remaining fields in the form and submit an issue as expected:
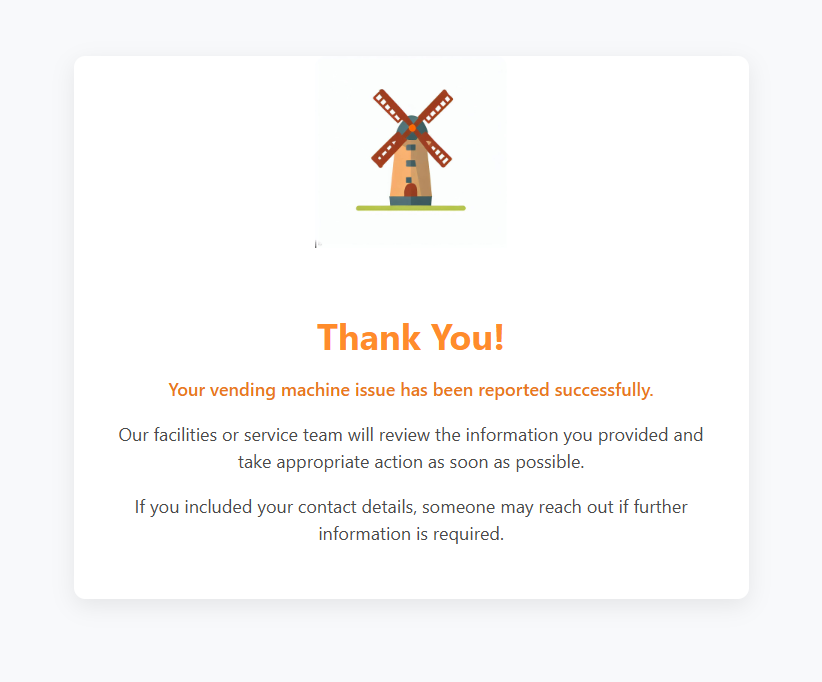
After clicking Submit Issue, the submission flow is triggered, and the user is redirected to a “Thank you” page, confirming that the request has been successfully processed:
At the same time, the reported issue is recorded in the Excel file, within the designated issues table. All submitted data is captured and correctly linked to the selected vending machine:

If we now include a new vending machine and/or location in the machines table:
The new option will automatically become available in the HTML form:
Conclusion
In this blog, we saw how to take the customer-facing forms in Power Automate to the next level by using a HTML-based approach to increase its flexibility. Let us know what do you think about this blog in the comment section, and don’t forget to check our website, our YouTube Channel or connect on LinkedIn!
