Managing data across multiple Excel files is a frequent use case for automation. In Power Automate, transferring data is straightforward when both the source and the destination are formatted as a table, making it a convenient option for many standard use cases.
In this article, you’ll learn how to copy data between Excel files using Power Automate and Office Scripts, enabling the migration of data regardless of whether it is structured as a table or not.
There is also a video version of this tutorial in our YouTube Channel:
What are Office Scripts?
Office Scripts is a feature in Excel for the web that allows you to automate repetitive tasks using TypeScript. It enables you to record actions or write custom scripts to manipulate data, format worksheets, and perform complex operations programmatically. It works similarly to VBA, but for cloud-based environments, which makes it more suitable for modern automation scenarios.
You can also find ready-to-use script templates for a wide range of Excel tasks in the Office Scripts Gallery to help you to get started faster.
Reading data from Excel with Office Scripts
For this example, we’ll use an Excel file where Sheet1 contains a risk matrix along with a risk legend:
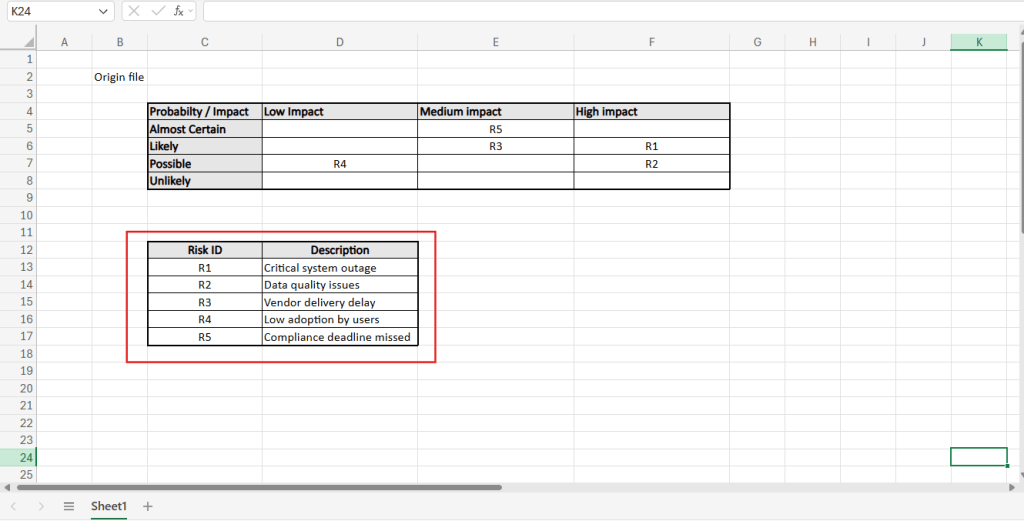
The objective is to extract the values from the risk legend (highlighted in red) and migrate them to a new spreadsheet. To keep the scope focused, this tutorial only covers the transfer of values and does not include any formatting such as bold text, borders, or background colors.
To read the data from this specific range and return it to Power Automate, you only need a few lines of code:
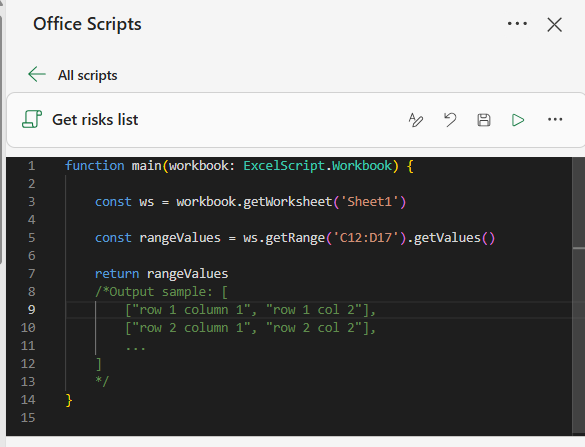
In line 3, the script references the worksheet Sheet1 and assigns it to a variable named ws. In line 5, it accesses the target range (C12:C17) from ws, retrieves its values, and stores them in a variable named rangeValues. In line 7, the script returns the values from rangeValues variable to Power Automate, making them available for use in your flow.
Although this basic script is functional, we can make it more flexible by requesting the worksheet name and the range address as inputs in Power Automate at runtime, instead of hardcoding these values. To achieve this, simply add the new parameters to the main function definition and replace the previously hardcoded values in the script with these dynamic inputs. In this example, we are prompting the user to provide the sheetName input, used in the line 3 (highlighted in red), and the rangeAddress input, used in line 5 (highlighted in yellow):
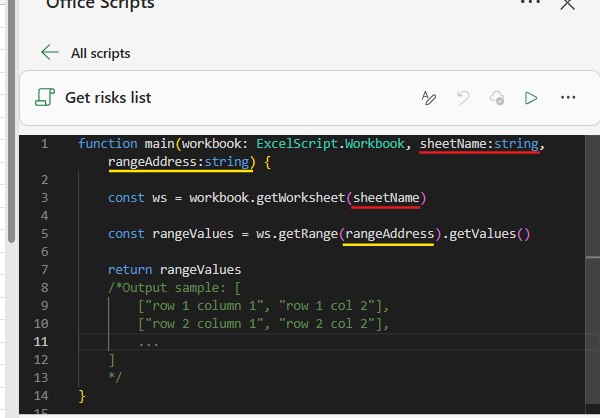
When defining the inputs, ensure to specify the expected data types as string, since both worksheet name and range address are text values. The full code used for this script is:
function main(workbook: ExcelScript.Workbook, sheetName:string, rangeAddress:string) { const ws = workbook.getWorksheet(sheetName) const rangeValues = ws.getRange(rangeAddress).getValues() return rangeValues }
You can find the most up to date version of this script, within other resources, in their respective Office Scripts Gallery page.
Saving data to destination Excel file with Office Scripts
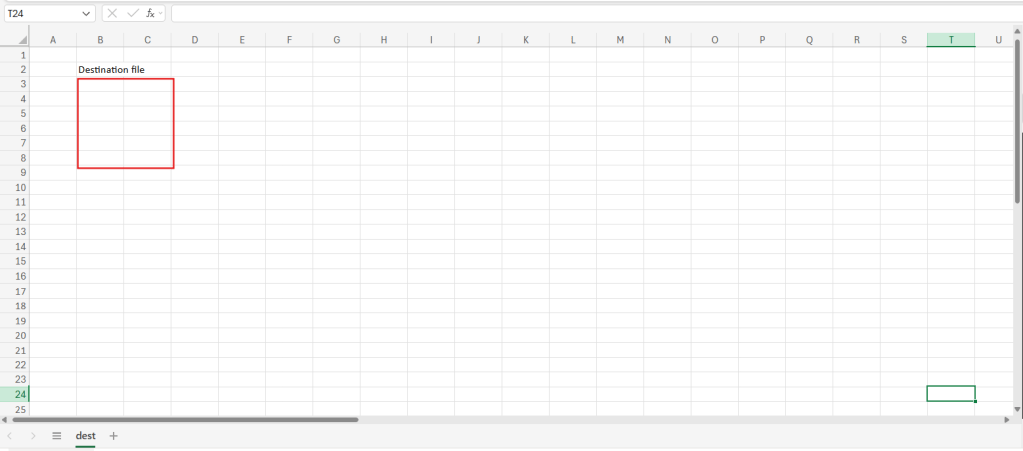
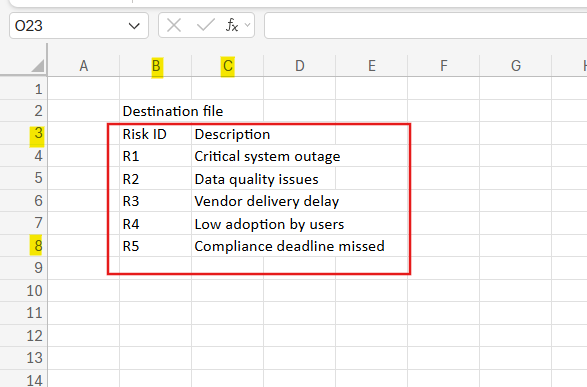
Now it’s time to create a second script, which will write the risks legend data to the destination file, specifically into the range B3:C8 of the target worksheet (named dest):
The script for writing the data is also straightforward and requires three inputs to the main function:
- sheetName: the name of the worksheet where the data will be stored. This input has a string data type.
- risksRangeValues: the values to be written to the destination file. This corresponds to the data retrieved from the source file and is represented as a two-dimensional array.
- destRange: the address of the range where data will be written (e.g., B2:C9). This input has a string data type.
The logic is simple: the script first accesses the worksheet specified by sheetName and assigns it to a variable (typically named ws). It then targets the range defined by destRange and writes the values provided in risksRangeValues into that range.
The logic itself is simple: the script first accesses the worksheet specified by sheetName and assigns it to a variable named ws (line 9). Next, the script targets the range defined by destRange address and writes the values provided in risksRangeValues into that range (line 11):
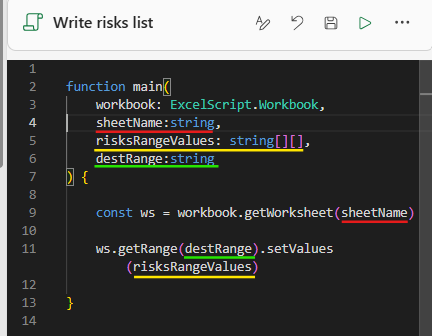
One limitation of this approach is that the destination range must match the exact dimensions of the data being written. For example, if the dataset contains 3 columns and 2 rows, the specified range must have the same structure, such as D8:F9 or A1:C2.
The full code used for this script is:
function main( workbook: ExcelScript.Workbook, sheetName:string, risksRangeValues: string[][], destRange:string ) { const ws = workbook.getWorksheet(sheetName) ws.getRange(destRange).setValues(risksRangeValues)}
You can find the most up to date version of this script, within other resources, in their respective Office Scripts Gallery page.
Running scripts from Power Automate
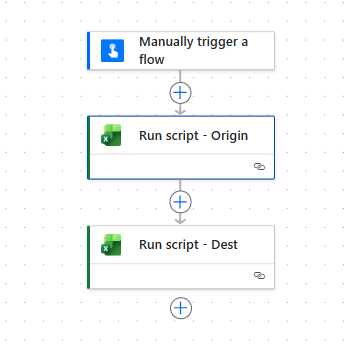
After saving both scripts, we can connect the process with Power Automate – and if you are not familiar with this tool, get your discount for this complete online course. Just three steps are enough to complete the data migration: a trigger to start the flow, a script to read data from the source file and a final script to write the data to the destination file:
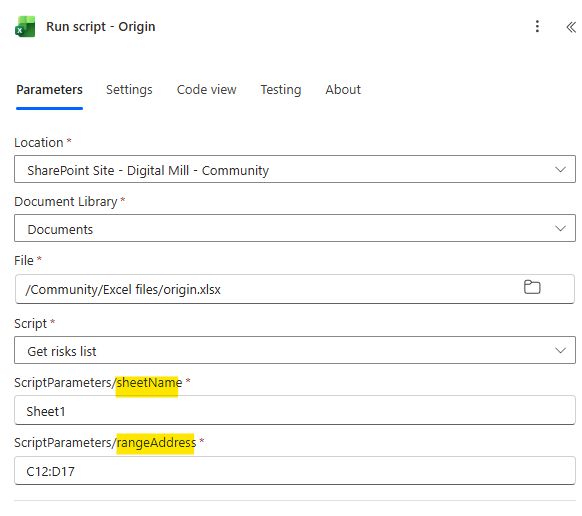
For reading the data from the origin, add a Run script action and configure it with the appropriate file and script. Once selected, additional fields will appear, corresponding to the inputs defined in the script’s main function (highlighted in yellow). Populate these fields with the worksheet name and the range address from which the data should be extracted:
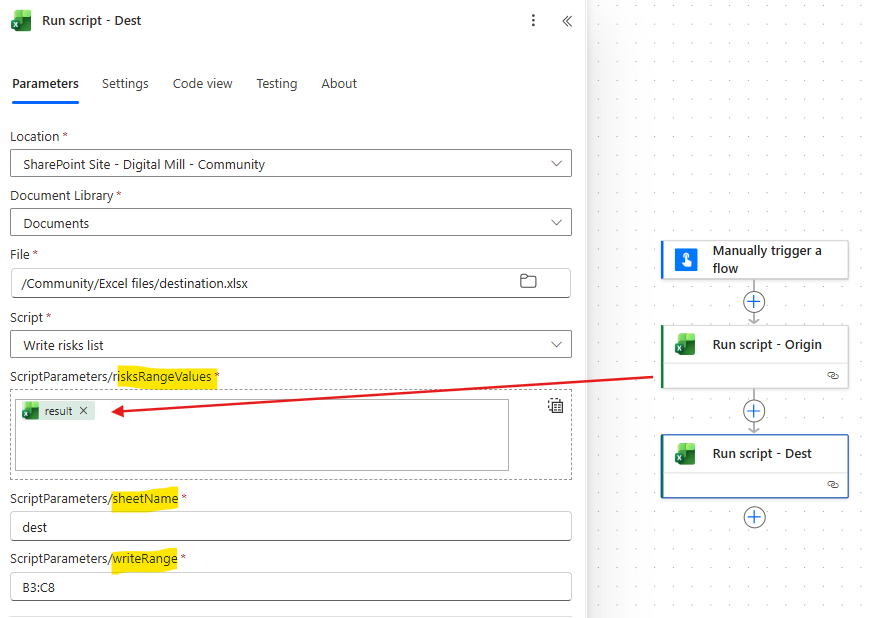
Next, repeat the same process, but at this time informing the destination file and script. Again, input fields will appear based on the script parameters defined in the main function (highlighted in yellow). Provide the destination worksheet name and range address where the data should be written. For the risksRangeValues input, use the dynamic content corresponding to the result property from the source script, since this field expects a two-dimensional array rather than a single text value:
Testing the solution: Power Automate + Office Scripts
After running the flow, you can inspect the raw outputs of the origin script to better understand how the data is structure. In the result property (highlighted in yellow), you will see the two-dimensional array containing all values extracted from the original file. Each inner array represents a row from the selected range (highlighted in green), while each element within this inner array corresponds to an individual cell value:

If you then access the destination Excel file, you will find that the data has been successfully migrated from the origin file into the ranges specified when defining the destRange input:
Conclusion
In this blog, we saw how to migrate data from one Excel file to another by combining Power Automate and Office Scripts. Let us know what do you think about this blog in the comment section, and don’t forget to check our website, our YouTube Channel or connect on LinkedIn!
