When working with Microsoft Graph API, proper authorization is required to ensure secure access to the different Microsoft services. There are different authentication and authorization approaches, but for most scenarios, creating an App Registration in Microsoft Entra ID (accessed via Azure Portal) is the simples and most practical solution.
In this article, you will learn how to set up an App Registration in Azure Portal with client secrets, so you can send authenticated requests to Microsoft Graph API from different services, including Power Automate flows. If you are not familiar with Graph API, check this blog for further reference.
What is API authorization?
API authorization is the security mechanism that determines who is allowed to access an API and what actions can be performed. For Microsoft Graph API, authorization ensures that applications, such as a Power Automate flow, can only read, write, or modify data if they received explicitly granted permission. These permissions define the exact level of access the application has within Microsoft 365 services.
What is App Registration on Azure Portal?
An App Registration is a feature within Microsoft Entra ID (formerly Azure Active Directory) that allows you to define how an application authenticates and authorizes access to the Microsoft Graph API. Through an App Registration, you specify the authentication method, such as client secrets or certificates, and assign the required API permissions that determine which data and services the application can access.
You can access App Registration in the Azure Portal, using a user-friendly interface that does not require advanced IT expertise, making it easier to manage what happens behind the scenes in the OAuth 2.0 authorization flow. From the same configuration panel, you can generate client secrets, upload certificates, configure redirect URIs, and grant delegated or application permissions.
Note: To create an App Registration, you may need a built-in or custom role in Microsoft Entra ID, depending on how your organization governs access to cloud resources and identity management.
Create App Registration in Azure Portal
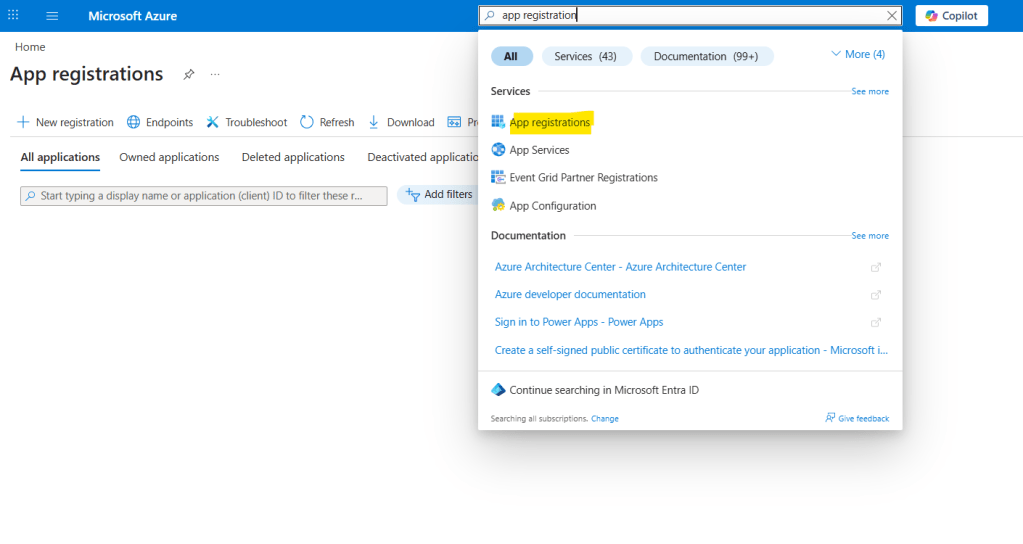
Go to Azure Portal and search for App Registration in the top search bar. Then, select the corresponding service form the results list (highlighted in yellow):
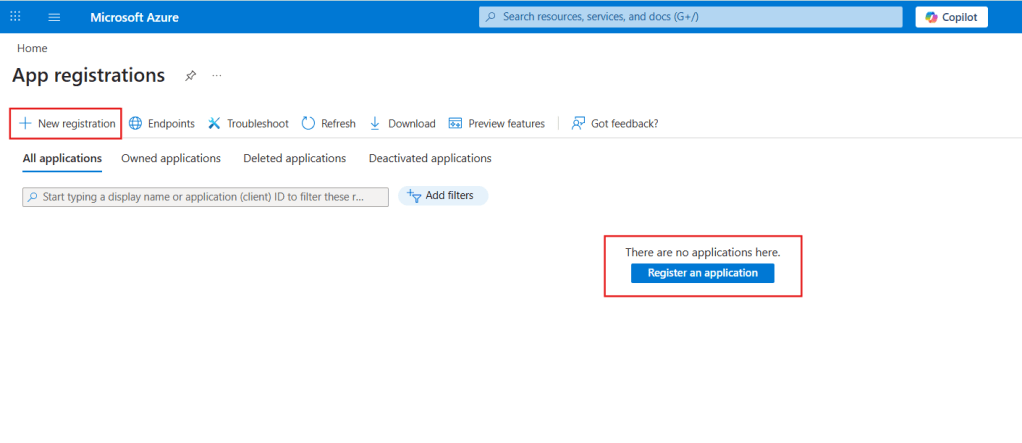
Once inside the App registrations area, you will find a list of all existing App Registrations that you have access to – in the image below, there are no registrations yet. To create a new one, click New registration in the top-left corner of the menu, or Register an application in the center of the page:
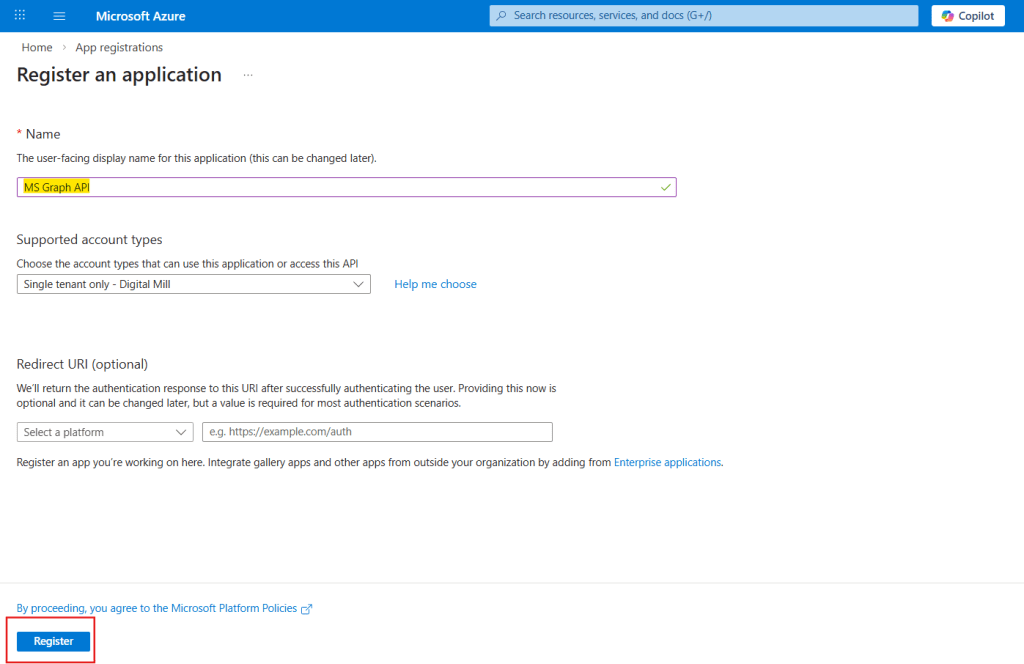
The only required information for registering a new app is the registration name (in yellow). In the supported account types dropdown, you can choose which accounts are allowed to authenticate using this App Registration. For the purposes of this example, you can leave it as Single tenant only, since the API will not accept requests from external organizations. You may also configure a Redirect URI, but this is not required for this scenario. Click Register (in red) to proceed:
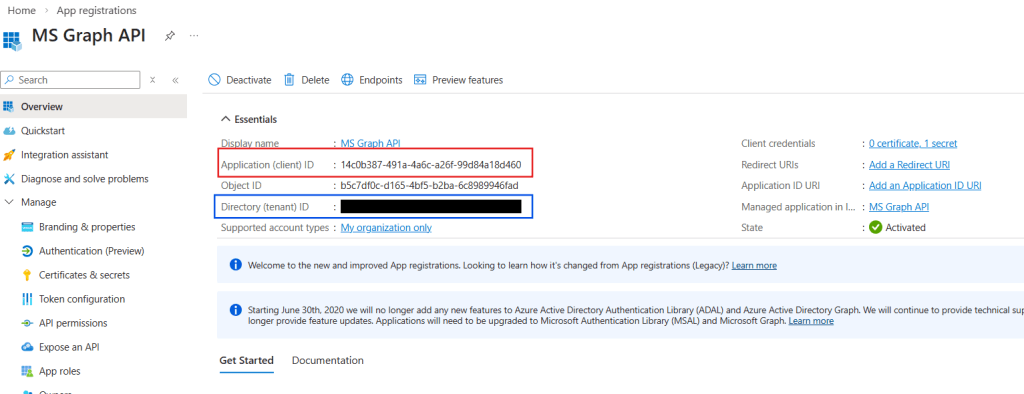
That’s all you need for creating the App Registration. After clicking Register, you will be redirected to the Overview page, which contains the details about the resource (in red) and a navigation menu (in blue), where you can configure authentication settings, API permissions, certificates, and secrets:
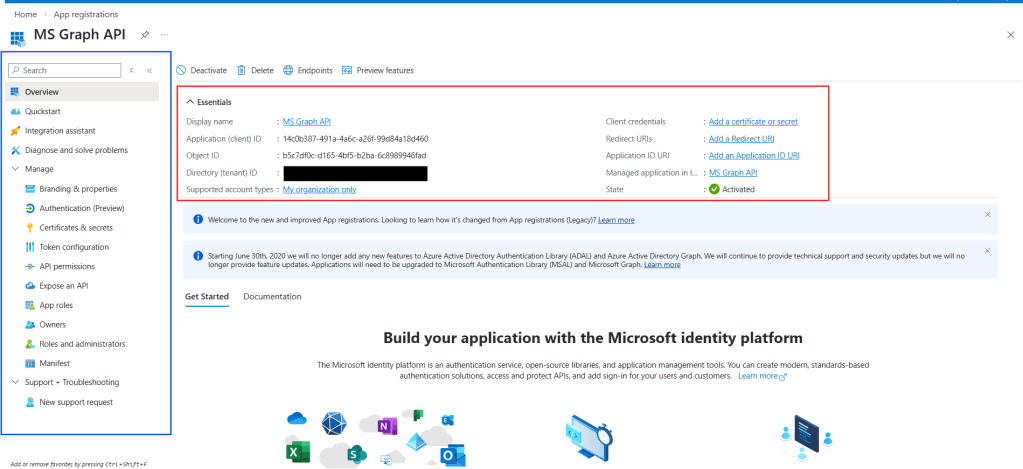
Note: for cybersecurity reasons, you should never publicly share sensitive App Registration details such as the Application (client) ID, Directory (tenant) ID, or client secrets. The example shown in this article is for demonstration purposes only, and the App Registration used here will be removed before publication.
Adding permissions to an App Registration on Azure Portal
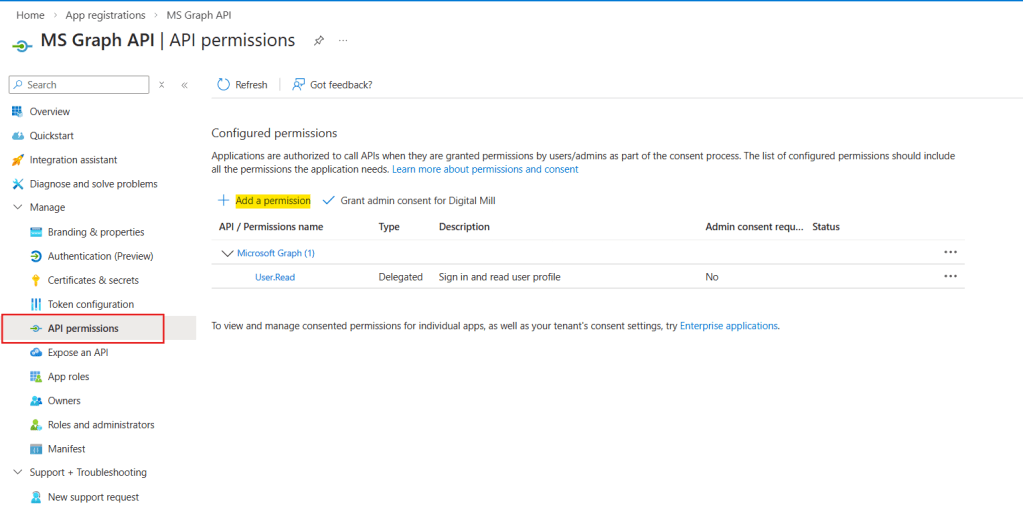
There are many different services that can be accessed via Microsoft Graph API, and we can select which ones we want to expose and explicitly define the level of permissions in the App Registration. By clicking API permissions in the navigation menu (in red), you will see a list of the available permissions for the App Registration. By default, it contains the User.Read already included, which allows the Application to read basic information about the currently signed-in user. To include additinoal permissions, click Add a permission (in yellow):
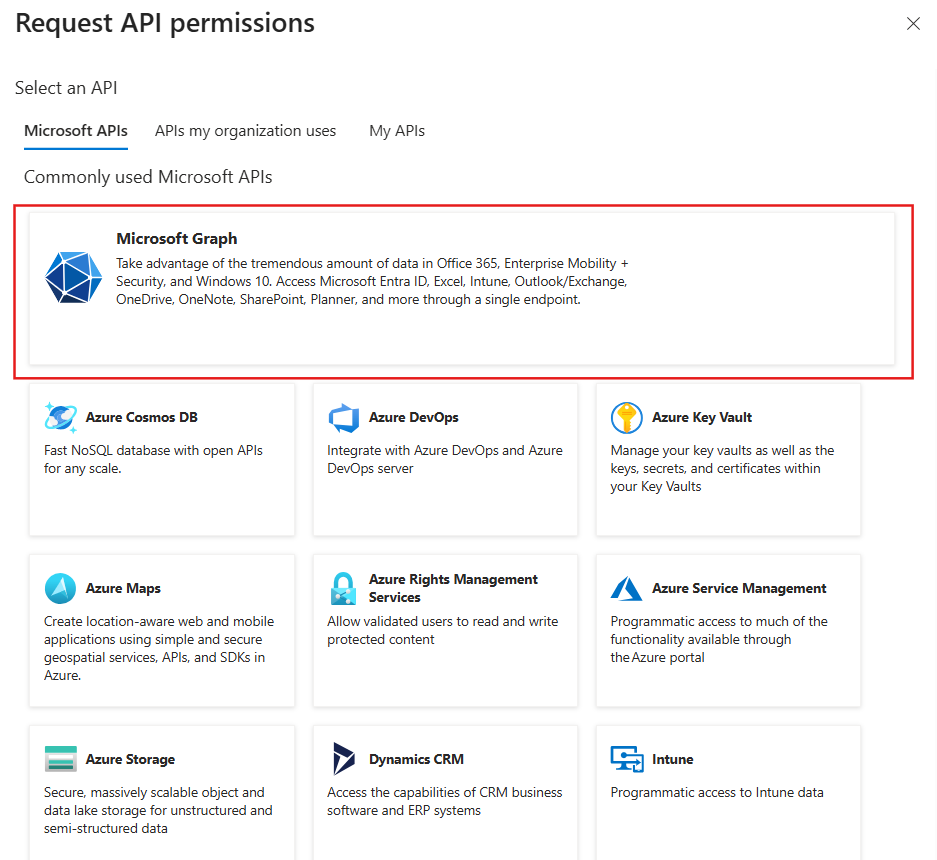
A pane will open on the left side of the screen displaying available Microsoft APIs. Select the Microsoft Graph (highlighted in red):
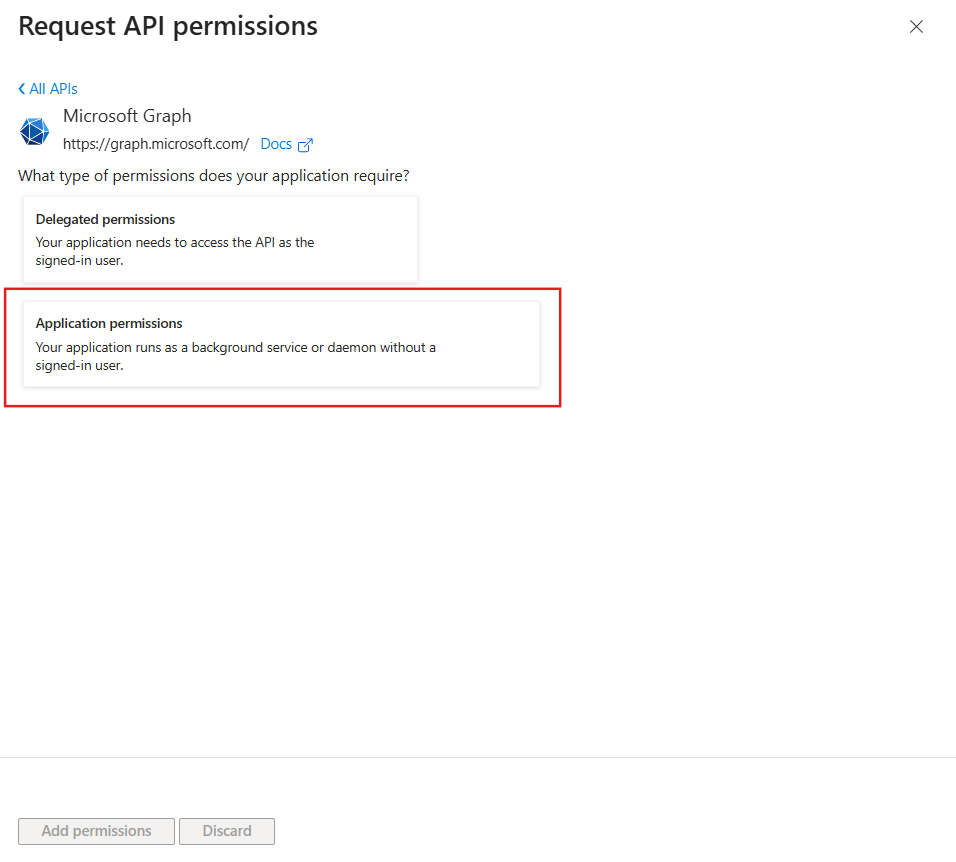
You will then need to choose between Delegated and Application permissions. With Delegated permissions, the application acts on behalf of a signed-in user and the access is limited to that user’s privileges. For the Application permissions, the application acts independently, without a signed-in user. For the purposes of this blog, we will configure an App Registration to retrieve tasks from any Microsoft Planner Plans existing in the organization, which requires Application permissions:
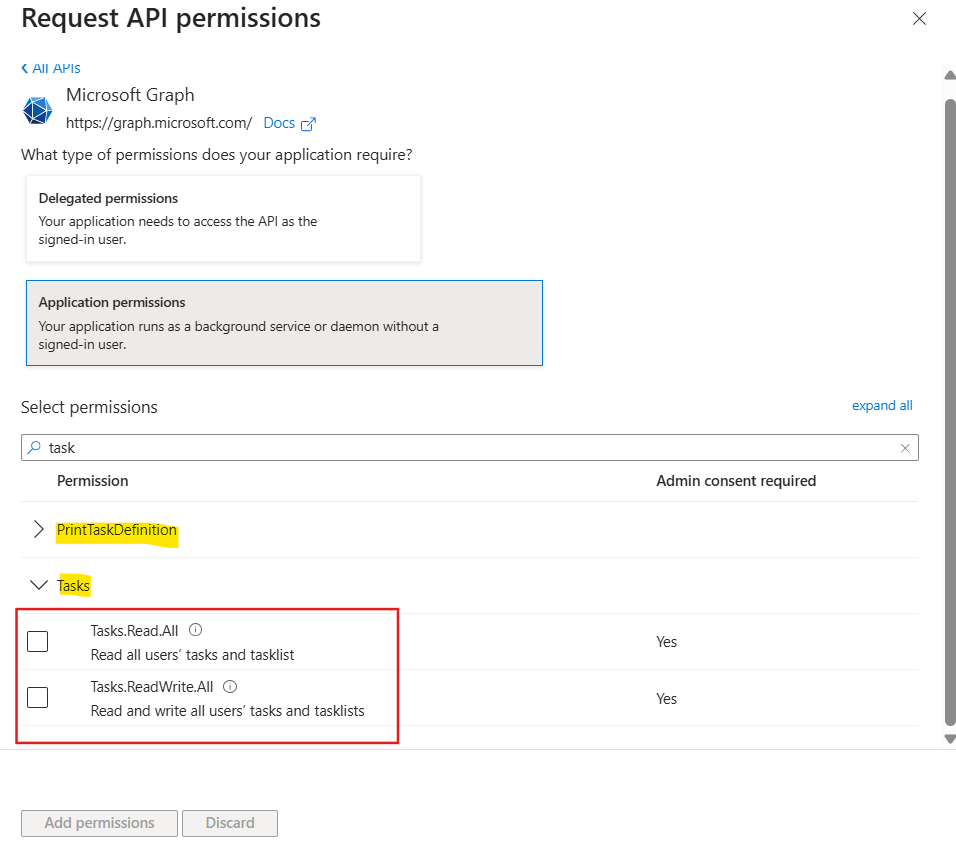
The permissions are organized into groups (in yellow), and once you expand it, you can see the available permissions and what kind of actions they allow (in red). For example, under the Tasks group, there are two permissions, Read.All, used for read all data related to tasks, and ReadWrite.All, used for reading, creating, updating and deleting tasks:
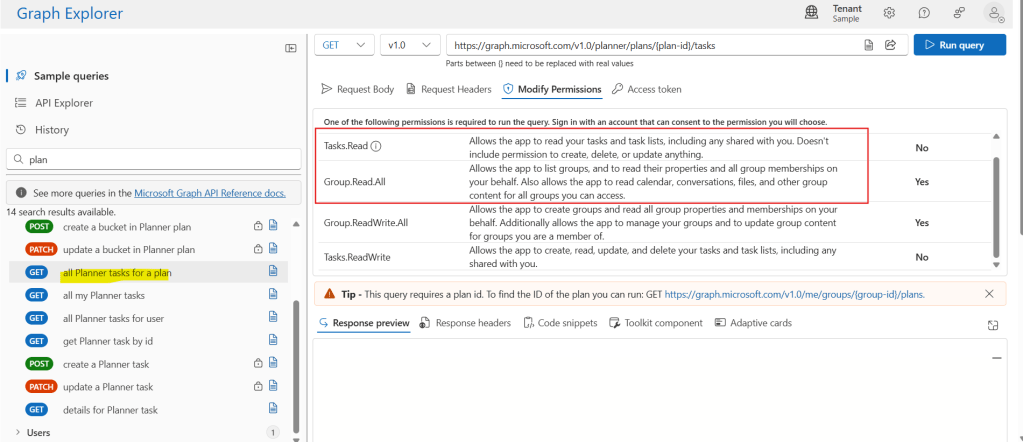
To determine which permissions are required to perform a specific operation, you can go to Graph Explorer, search for the desired endpoint and review the permissions tab. For the purposes of our example, we are using the all Planner tasks for a plan (in yellow) and, among the required permissions, we can rely on Tasks.Read and Group.Read.All, which are the least privileged permissions for this operation (in red):
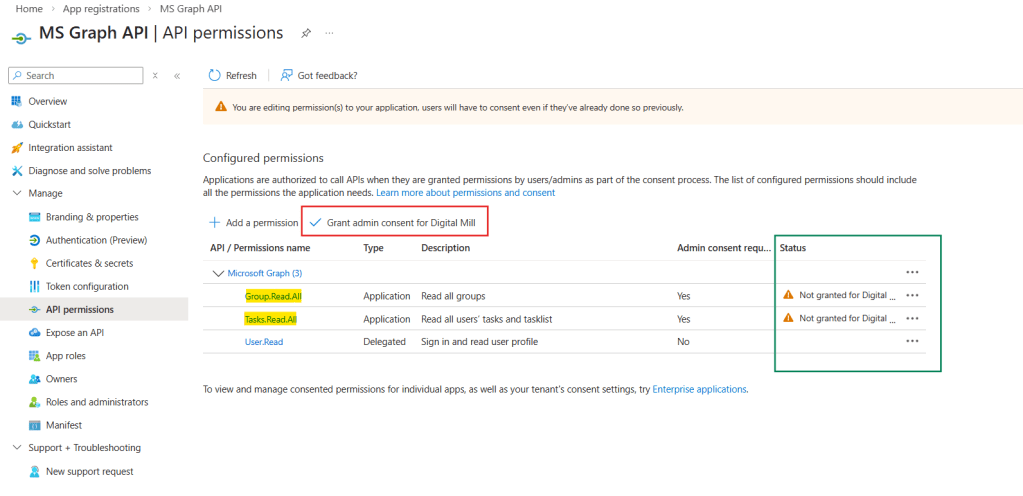
Since this example relies entirely on Application permissions, we must select Tasks.Read.All and Group.Read.All and click Add permissions. The permissions will be included to the list (in yellow), but it still requires the admin consent to become valid (in green). If you are an admin, you can click Grant admin consent (in red); if you are not, it will require a user that has at least an Application Administrator role on Azure Portal to grant it:
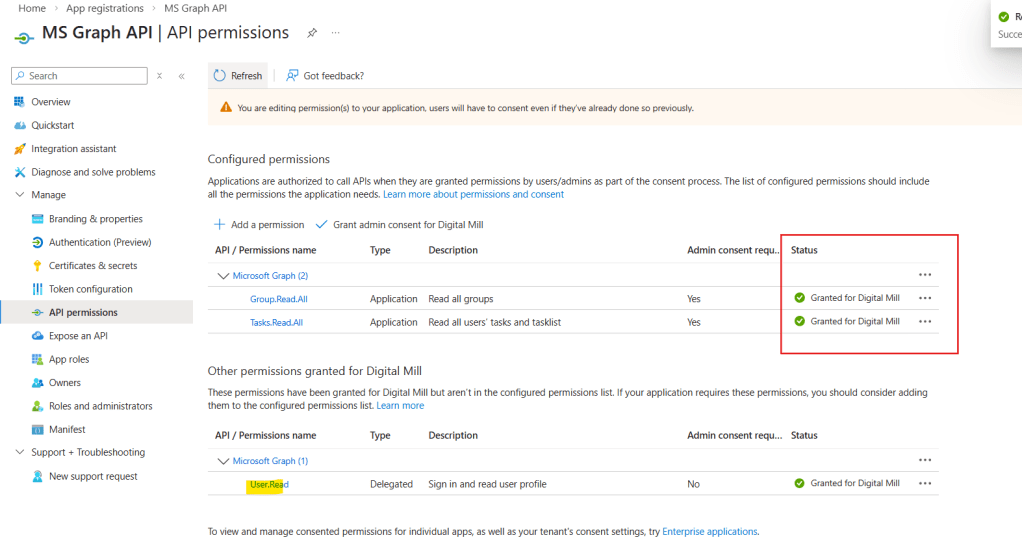
After granting admin consent, the status will reflect it (in red). You can also remove the User.Read permissions from the App Registration, since it won’t be required for our example:
Generate client secrets for an App registration
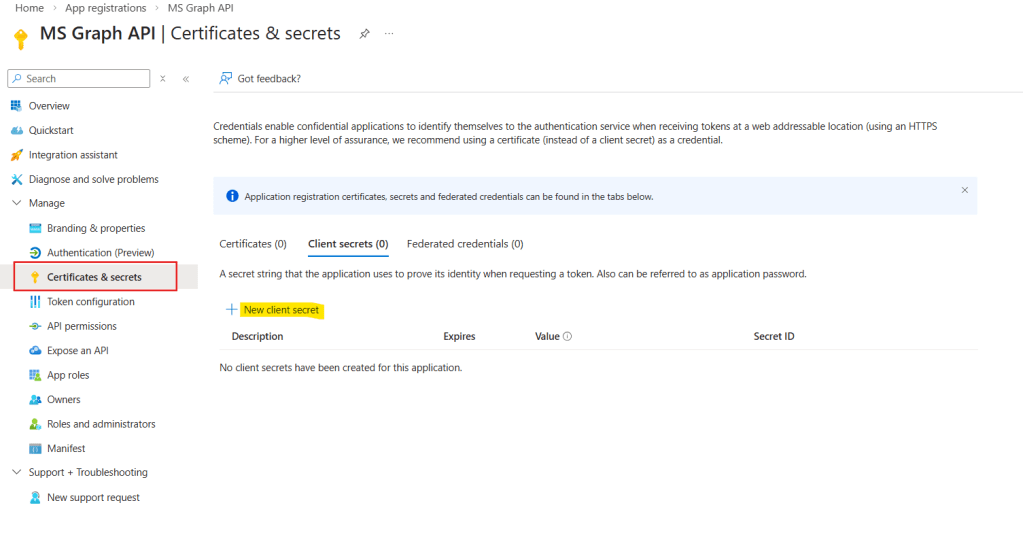
After configuring the required permissions, it’s time to create a client secret. This secret will be used by your application to authenticate and request access tokens from Microsoft Entra ID in order to call the Microsoft Graph API. In the navigation menu, select Certificates & secrets (in red) and click New client secret (in yellow):
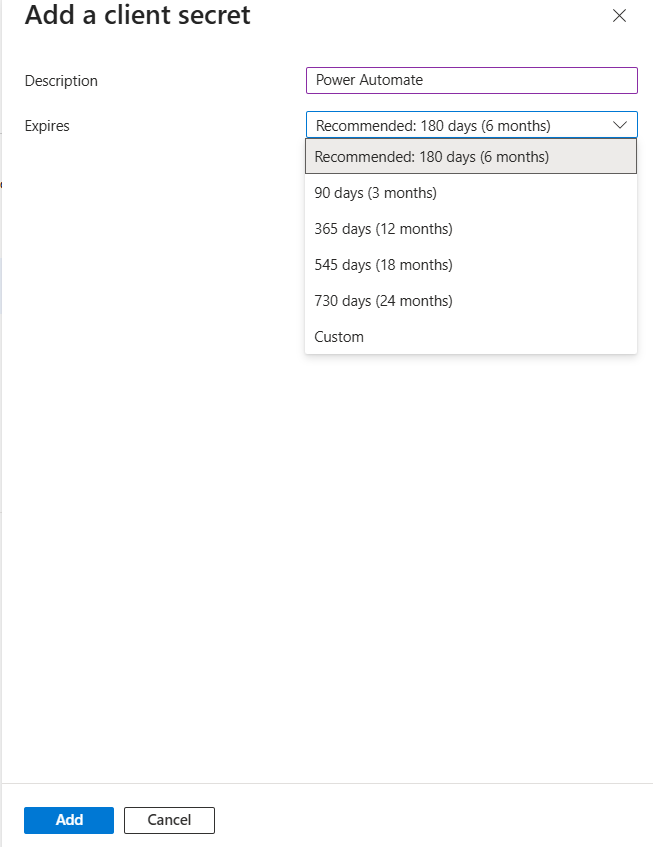
Add a description to the client secret and an expiration date, and click Add:
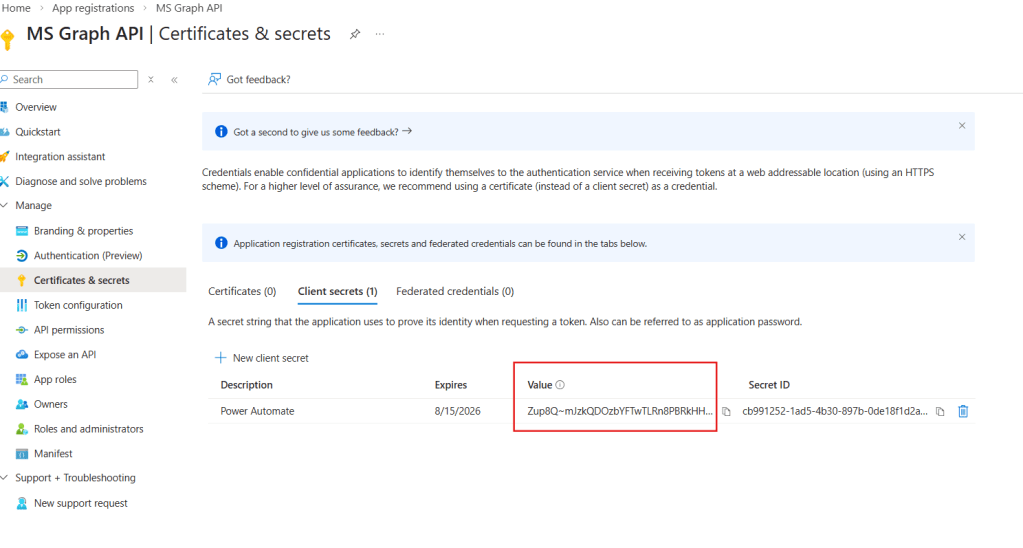
The client secret will then be generated and displayed in the list. Make sure to copy the Value (in red), as it will not be visible again after you leave or refresh the page:
Testing the solution: Making Graph API Requests via Power Automate
To validate the App Registration, let’s read the tasks from a Planner Plan using Power Automate. We will call the following Microsoft Graph endpoint https://graph.microsoft.com/v1.0/planner/plans/{plan-id}/tasks.
To find the Plan ID, you can simply open the desired Plan in Microsoft Planner and copy it directly from the URL (highlighted in red):

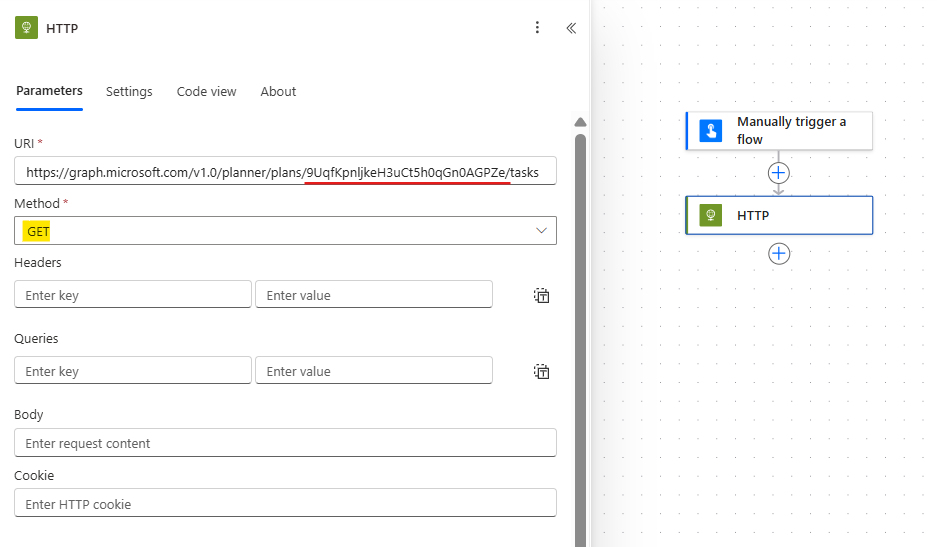
In Power Automate, add a HTTP action and use the provided endpoint, including the Plan ID extracted from MS Planner URL (in red). You must also leave the Method as GET, since this particular endpoint expects this method to retrieve the tasks from a Plan:
In the advanced parameters, enable Authorization, set the type to Azure Directory OAuth (in yellow) and enter https://graph.microsoft.com as the Audience (in red):
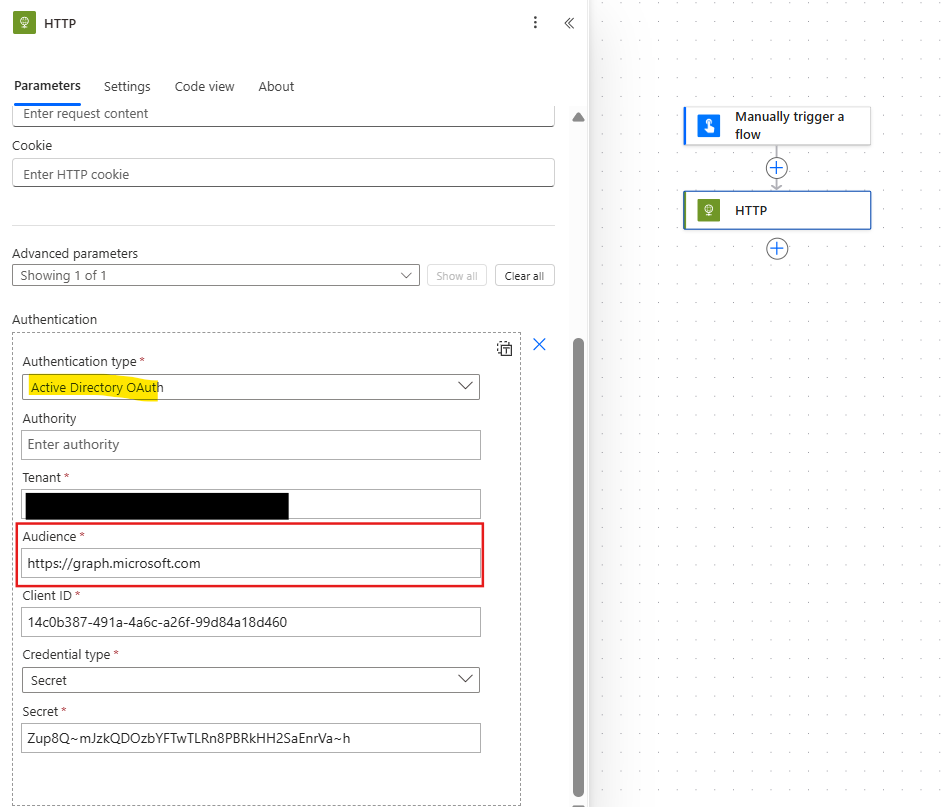
All other parameters can be found in App Registration. In the Overview page, you can find the Tenant ID (in blue) and the Client ID (in red):
Leave the Credential type as Secret and past the value copied from App Registration during the previous section.
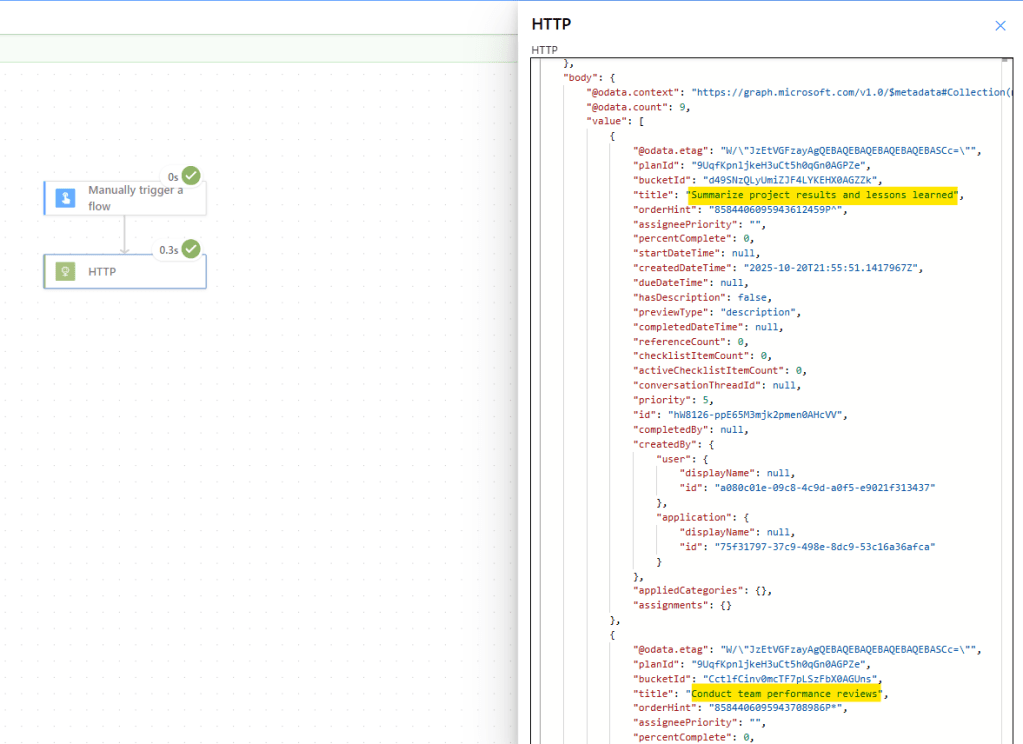
You can now save the flow and run it. If everything is configured correctly, the HTTP action will return a successful response. In the raw outputs, you will see a JSON array containing all tasks associated with the specified Planner plan:
Conclusion
In this blog, we saw how to make requests to Microsoft Graph API after setting up App Registration on Azure Portal. Let us know what do you think about this blog in the comment section, and don’t forget to check our website, our YouTube Channel or connect on LinkedIn!
