With the rise of Microsoft Copilot, the usage of customizable chatbots powered by AI gained attention from many organizations. As a general purpose chatbot, Copilot can save time with many daily tasks, such as drafting emails, summarizing meeting notes or finding documents in OneDrive or SharePoint, but it would be even better if we could create a custom agent to address more specific scenarios, such as provide responses based on some documents internal to the organization or perform tasks in other tools, such as Microsoft Planner or Excel.
Luckly, this is possible with Microsoft Copilot Studio, a solution from Power Platform to develop virtual agents without requiring deep programming skills. Whether your goal is to automate customer service, internal help desk operations, or common business interactions, Copilot Studio offers a low-code environment that makes it easy to get started.
In this blog, we will walk you through in details on how can you create an Agent in Copilot Studio, since the simple set up of a Chatbot until the usage of custom knowledge sources, topic management, generative answers, conditions and variables.
Use case overview
In this step-by-step, we will create an Agent to receive questions about Power Platform and provide the answers exclusively based on a few Microsoft Word documents stored in a SharePoint Document Library:

As an AI-powered Agent, it will use the Generative Answers feature in Copilot Studio to search for a response within the Microsoft Word documents stored in SharePoint. To keep the control on how trustable are the answers, the prompt is configured to prevent the Agent from searching for information online, so the answers will be restricted to use exclusively the data available in the knowledge base provided by us, which mirrors the blogs on the Digital Mill website.
What is Copilot Studio?
Copilot Studio is a part of the Microsoft Power Platform that allows users to build, customize, and manage AI-powered chatbots (or copilots) adapted to specific business needs. It is the evolution of Power Virtual Agents and it has some Generative AI capabilities powered by Azure OpenAI, which allows the agents to maintain conversations using natural language.
As a component from the Power Platform, Copilot Studio is a low-code tool, where the users can design the conversational flows with a drag and drop experience and without any programming knowledge. It also connects very easily to Microsoft Dataverse, Microsoft SharePoint and with any other platforms, since it can be integrated with Power Automate.
What is an Agent?
In simple terms, Agents are individual chatbots created in Copilot Studio. These Agents support the design of individual topics, where they will handle specific tasks based on your instructions. The Agents can also be deployed to multiple channels, such as Microsoft Teams, Facebook, Slack and others.
The Agents can also be integrated into your organization processes, where they will not necessarily work as a chatbot, but as an autonomous tool for executing a few tasks that require more flexibility than a traditional automation approach.
Creating an Agent in Copilot Studio
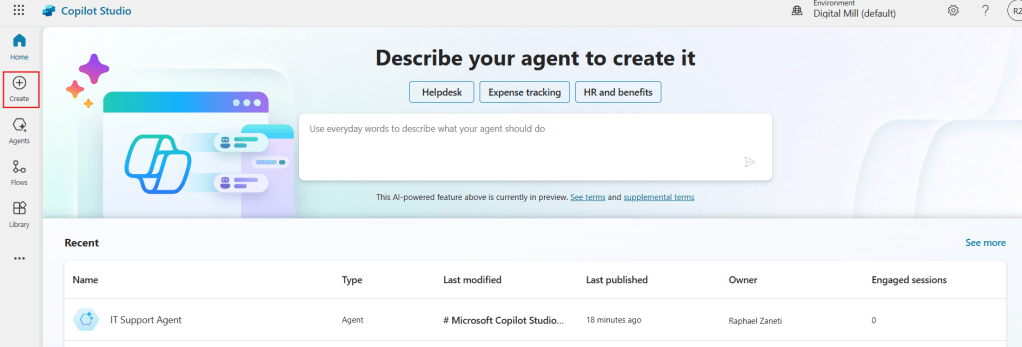
To create an Agent, start by navigating to the Copilot Studio home page and click Create on the left-side navigation menu (highlighted in red):
You can then select any built-in template or, if you prefer, start it from scratch, by clicking in New agent:

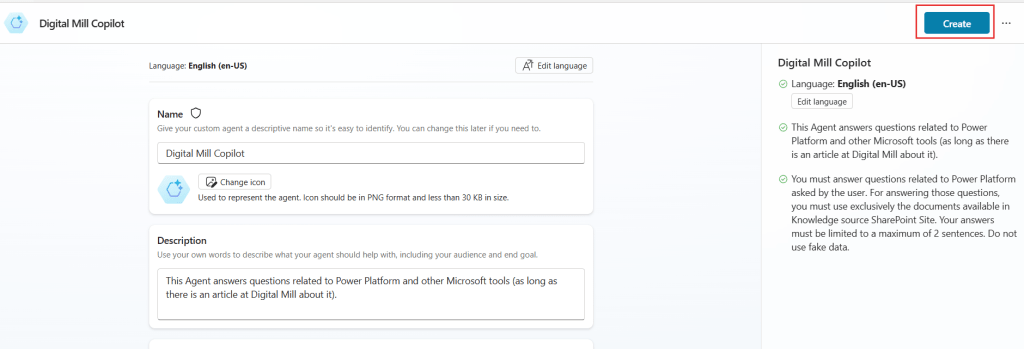
Next, you will need to configure some initial settings for the Agent, starting by providing a name and a description that will be visible to the users (highlighted in red). Another important field is the Instructions, where you need to define what its expected form the Agent, how it should behave and what it should avoid. As you can see below, we’re guiding the Agent to keep restricted to the provided sources in their responses and to offer consistent answers:

Scrolling down, you will find additional configuration options, such as Starter prompts, which are recommended prompts to the end-users and are only available so far for Teams and Microsoft 365 Copilot Chat, and the Knowledge sources, where we can connect the Agent to internal company data or external sources, such as specific websites or document libraries, to be used as by the Agent in their responses:
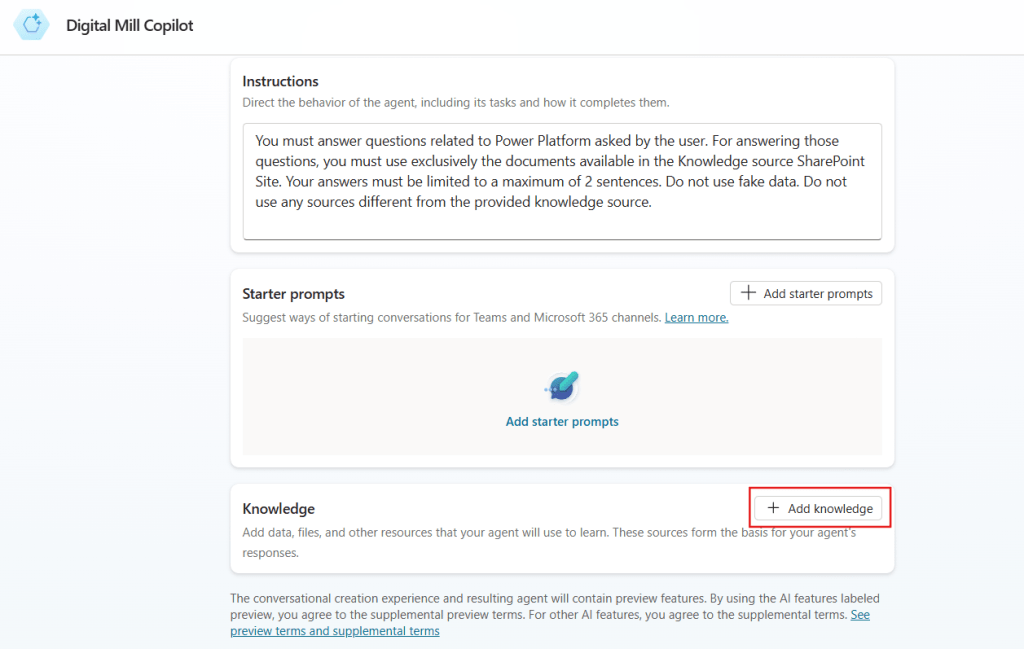
Although it is possible to include the knowledge sources to the Agent at this stage (highlighted in red above), the options are limited to only SharePoint and public websites. It is possible to add other sources, such as files located in OneDrive, Dataverse tables, or a connection to Salesforce, after the Agent has been created.
Adding Knowledge Source to Agent
Since our data lives in SharePoint, we can configure the knowledge source during the Agent creation process by clicking in the respective option (highlighted in blue):

Then you can either provide a link to the SharePoint Site to be used as a source (highlighted in blue) or select an individual subfolder from a Document Library by clicking Browse files (highlighted in red). In the example below, we selected a subfolder called Blog from Browse files, which added a new entry to our list of SharePoint knowledge sources (in orange). You can assign a name of each of these individual sources (which by default will use the folder or Site name), and describe what the source contains (highlighted in green):

For our use case, we’re simply describing the source as “Knowledge source for answering questions about Power Platform”. After configuring the SharePoint knowledge sources, you can simply click Add at the bottom of the screen to include them in your agent’s knowledge base:

There are a few limitations for using SharePoint as a knowledge source, such as the supported types of files (at this moment, it can be used only for PDFs, Word documents and PowerPoint presentations). You can find more details about these limitations in the official documentation.
After adding the knowledge source, you can finally click Create, at the top-right corner of the screen (highlighted in red):
Once you create the Agent, this is the main screen where you can customize it. It has a navigation pane (highlighted in red), where you can explore the different features of the Agent, such as the knowledge sources and the topics. There is also a test pane (in green), where you can simulate a conversation with the Agent. Lastly, there are two buttons on the top, one for publishing the Agent to internal and external channels (highlighted in blue) and to configure other settings related to the Agent (highlighted in orange):

At this point, you can already start interacting with your Agent by asking any questions related to the Knowledge source (highlighted in red). The Agent will respond based on the instructions provided during setup (highlighted in blue), and even reference the document from where they got this knowledge (in green):
Although we already have a functional Agent only with these simple steps, let’s explore a few other Copilot Studio features, specifically related to Topics.
Configuring Topics in Copilot Studio
A Topic defines the flow of the conversation around a specific subject. Similarly to Power Automate, Copilot Studio provides you with a “canvas” where you can drag and drop the different steps to shape the conversation, including sending messages to the user, asking questions, calling external connectors, directing the user to a different topic, and much more.
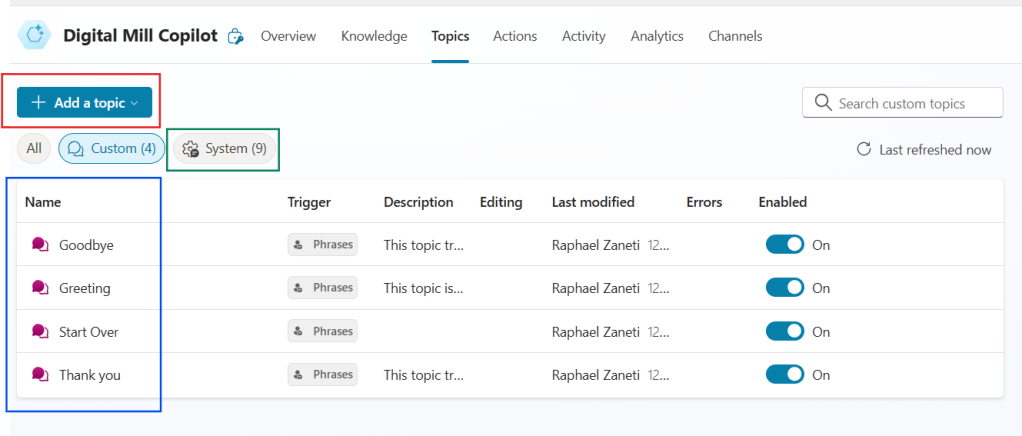
In the Topics tab, you will find a list of a few built-in topics that are created by default for every Agent, including common interactions like greetings and a thank-you messages (highlighted in blue). There are also a few system topics (highlighted in green) to manage some background processes, such as error handling, escalation and reset chats. Although you can customize all of these built-in topics, the system ones cannot be deleted. It is also possible to create your own topics by clicking Add a topic (highlighted in red):
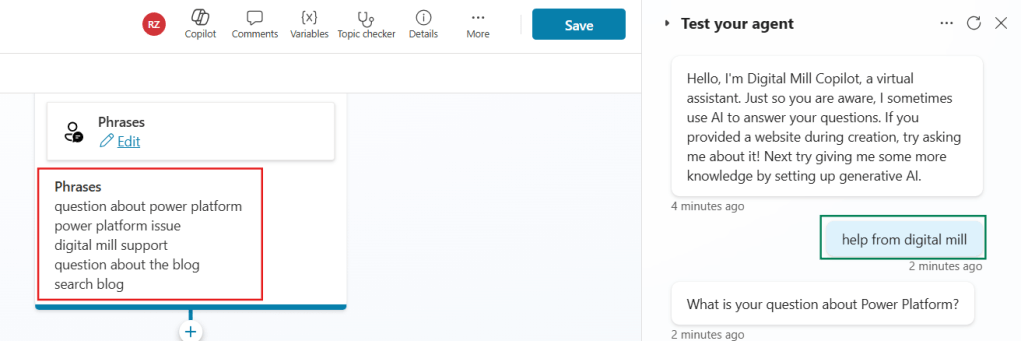
When creating a new topic, you will see a Trigger step (highlighted in red), which is automatically generated as the starting point. There you can configure the trigger phrases by clicking Edit (in yellow), which are the examples of natural language expressions that Copilot Studio will use to identify when to the user to this topic. You can type the trigger phrases on the Add phrases input (highlighted in blue), and a list of the sample phrases is displayed on the trigger step (highlighted in green):

Right after the trigger, there is a plus sign button, which can be used to add new steps (or nodes) to the topic (highlighted in orange above). Once you click the Add node button, a list of the possible steps will appear, including options like asking a question, adding a condition or managing variables. Select Ask a question (highlighted in red below):

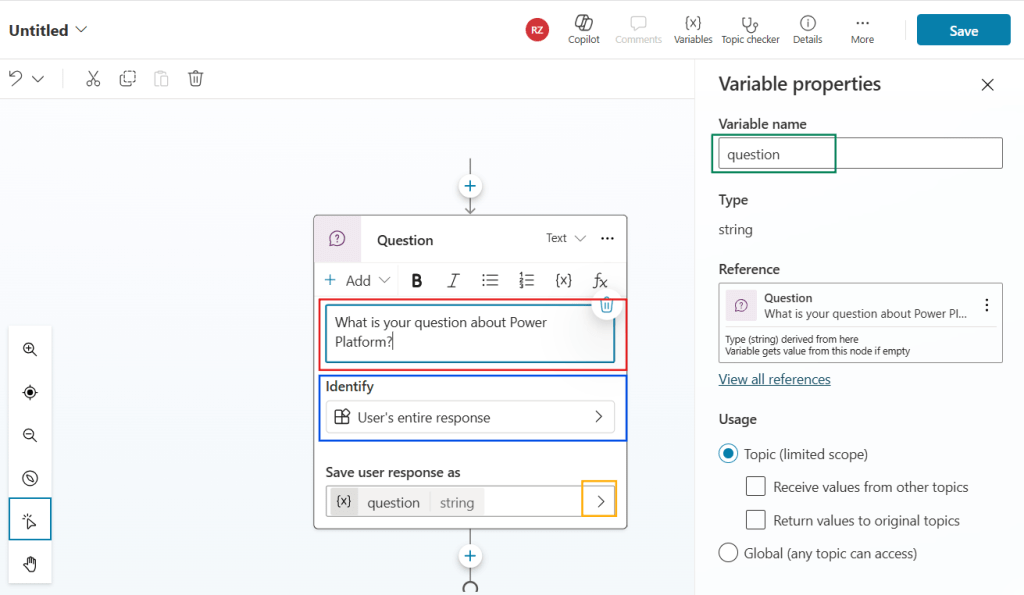
Next, you need to specify the question to be asked to the user (highlighted in red). The type of response can also be customized: the Agent can expect a multiple-choice question, an email address, a city, or simply the entire user’s response, which we will select (highlighted in blue). By default, the user’s answer will be assigned to a variable, and you can rename it by clicking in the arrow (highlighted in orange) and entering a new name under the Variable name input (highlighted in green):
After asking the question, insert a new step to process a Generative answer, which can be found under the Advanced menu (highlighted in red):

For the Generative answers step, start by referencing the question variable (in red) by clicking in the arrow under Input. Then, we will need to configure the Data sources by clicking Edit (highlighted in yellow). Next, we need to enable the Agent to access our SharePoint Site, turning on the Search only selected sources input (highlighted in green) and selecting the Blog source (in blue), while disabling the Allow the AI to use its own general knowledge option (in orange):
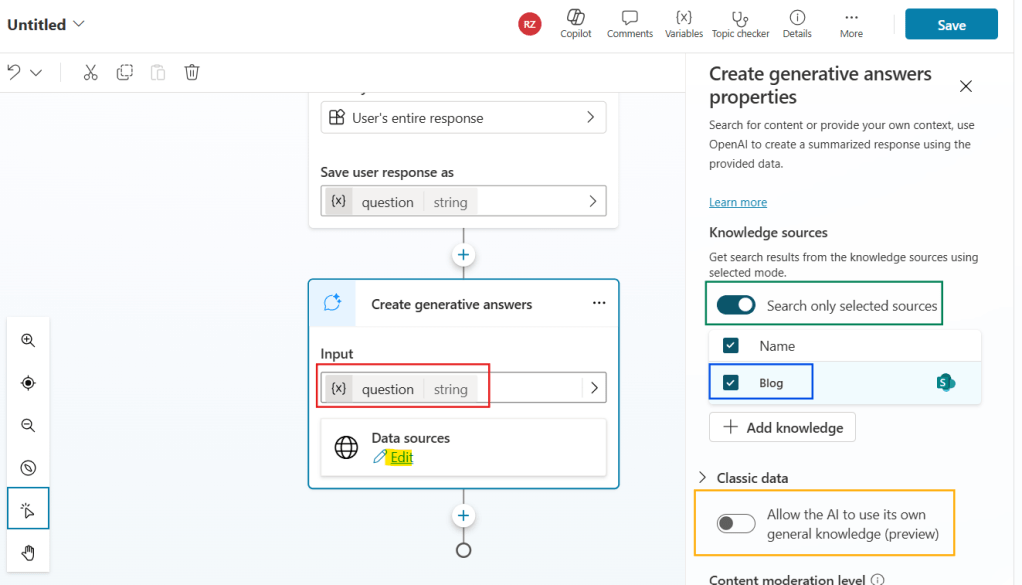
By implementing these customizations, we ensure that only the documents stored in the Blog data source are used to answer the user’s questions.
At this point, our Agent is already functional and capable of answering user’s questions. But we can add a few more features for improving usability.
Let’s add another question to ask if the problem was solved. This question will identify Multiple choice options (in red), which allows you to create a set of predefined answers. In our case, the options will be limited to Yes or No (highlighted in orange), but we could add more choices by clicking New option (in green). Finally, the answer to this question is stored in a variable named solved (in blue):

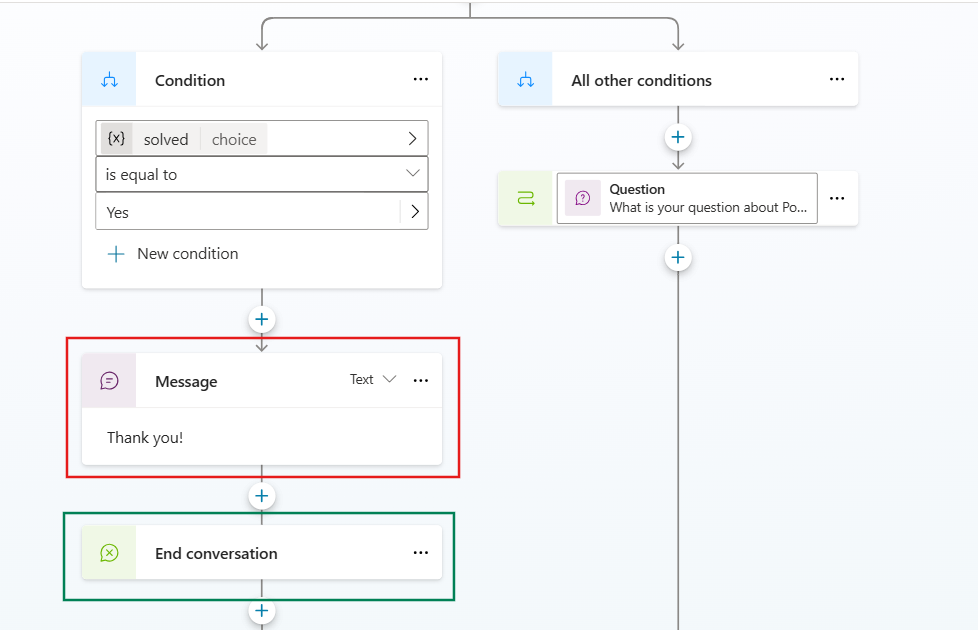
Once the user responds, we need to evaluate whether their problem was resolved. To achieve it, let’s add a Condition step, which will split the Topic in two branches. In the left-side branch, we will configure the condition by first selecting the variable to be evaluated, which in this case is the variable solved (highlighted in yellow). Then we set a comparison operator to determine how do we want to evaluate the variable; in this case, we’re using the is equal to (highlighted in red). For the third input, we need to specify the reference for this condition. Since we’re working with a variable of choice type, the only available values for this input are the predefined options, and in this case, we selected Yes (highlighted in green):

Although the New condition button (highlighted in blue above) may suggest the addition of new conditional branches to the Topic, it actually just creates additional evaluation criteria for this same condition.
If you want to add a different node for a given condition (for example, if solved is equal to “something else”), you can do so by clicking the Ellipsis (…) (highlighted in red) and then Insert new condition (highlighted in green):

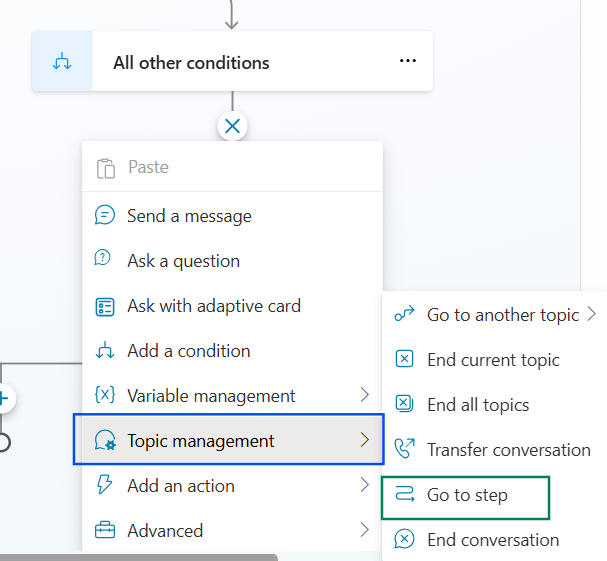
For our use case, however, we don’t need an additional branch since the solved variable has only two possible outcomes: Yes or No. Then for the No option, we can use the All other conditions node. Under this block, let’s add a new step to redirect the conversation to the beginning of the topic by selecting Topic management (highlighted in blue) and then Go to step (highlighted in green):
Next, you can select any step within this Topic as the destination to redirect the conversation. Until a step is selected, Copilot display a warning indicating that you must choose the destination (highlighted in red):

For our use case, let’s simply redirect the user back to the first question, where they can ask something related to Power Platform (highlighted in blue):

At this point, the user will be redirected to the question until they confirm that the issue is solved. As a final step, under the is equal to Yes branch, let’s add a Send a message step to thank the user (highlighted in red) followed by an End conversation step (highlighted in green), which can be found under Topic management, to finalize the chat:
Testing the Agent
Now we can finally change the Topic’s name (highlighted in red) and save it (highlighted in green):

Next, we can test the Agent. You can start by sending a message in natural language to redirect you to the custom topic (highlighted in green). You do not need to use one of the provided trigger phrases (highlighted in red), as they are only used by the Agent as examples to help manage the conversation flow:
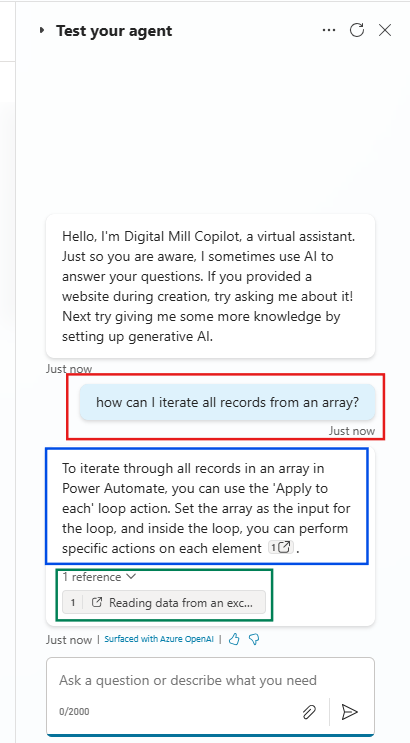
After we ask a question about Power Platform, the Agent will search through the available documents in the Knowledge source and craft a generative response. In this example, it correctly identified arrays as the data type to be used when you’re working with lists of records in Power Automate (highlighted in red below). The response also included a reference to a document, which is also accurate, but the response’s content is not explicitly mentioned in this file (you can find the blog used as reference by Copilot here). So the Agent was able to interpret the Word file content and build a response adapted to the question.
Right after the answer, the Agent asks if our query is solved, providing us two buttons for Yes and No (highlighted in yellow):

If we select No, the Agent will let us ask another question and follow the same process until we click Yes:

By clicking Yes, the Agent thanks us and finish the conversation:

At this point of the conversation, it would be possible to include other steps to improve the user experience, such as redirect them to a survey or give them the option to send a summary of the chat to their email.
Conclusion
This is how you get started with Agents in Copilot Studio! With a few steps, you can leverage the magic of low-code and create a fully functional Agent that can perform simple tasks in your organization. Let us know what do you think about this blog in the comment section, and don’t forget to check our website, our YouTube Channel or connect on LinkedIn!
