One of the most time-consuming tasks for many departments is to send multiple emails that follow a default template, changing only a few fields. This is a very common scenario for status updates, appointment reminders, follow-ups, and notifications in general. These tasks are not only repetitive and tedious, but when handled manually, there is an additional risk for human error in the process.
With Power Automate, you can streamline the process of sending these types of emails, needing only an Excel file and an email template. In this blog, you will learn how to send bulk emails from an Excel table with Power Automate.
You can also refer to this video in our YouTube Channel about the same topic:
Use case overview
For this article, let’s work with a scenario where a company needs to send order confirmation emails to customers. These orders are stored in an Excel table, where a Confirmed column indicates if the orders are already confirmed or not:

We need to send an individual email for each Excel records that don’t have a confirmation yet (Confirmed column set to false). The email should be sent to the address specified in the ClientEmail column, and follow a template that dynamically inserts order details. The email will be structured like this:

After sending the email, we also need to update the Confirmed column of the Excel record, setting it to true:

Get data from Excel table with Power Automate
The first step is to retrieve the records from the Excel table. To do this, you can use the List rows present in a table action. If you are new to Power Automate and are not familiar with this action, check out the steps described in this article, or watch this YouTube video for a detailed walkthrough.
Since we don’t want to retrieve all records from the table, but only those which are not confirmed, we can use a Filter query to limit the results fetched by Power Automate, returning only those which Confirmed column is equal to false. As highlighted in red, you can simply set Confirmed eq ‘False’ as filter query, and set the DateTime Format to ISO 8601:

Make sure to enclose the False between single quotes in the filter query, since Power Automate reads the Excel column as a string, and not as a Boolean value. For further guidance on how to work with filter queries in Power Automate, check this article or this YouTube video.
Send email for each table record with Power Automate
At this point, we already have a list of all orders that have not been confirmed. Now we need to access each individual record and send an email for each one To achieve this, we can add an Apply to each action, passing the dynamic content of the body/value property from List rows present in a table action as input:

Inside the Apply to each loop, add a Send an email or Send an email from a shared mailbox action. Then you can start to craft the email template for the order confirmations, which can combine both dynamic and static content, as you can see below:

Highlighted in red are the dynamic contents related to each of the properties from the Excel file. To learn more about dynamic contents in Power Automate, refer to this YouTube video. Additionally, We’re adding an expression to format the order date into a more user-friendly format, as highlighted in yellow: formatDateTime(item()?[‘OrderDate’], ‘MMM dd, yyyy’).
Another possible customization is to dynamically set the email recipient for the order confirmation. By clicking on Switch to Advanced Mode (in blue), we can pass expressions or dynamic contents to the To property. Let’s simply add the ClientEmail dynamic content (highlighted in red), so the message will be sent to the respective email address from the Excel table:

Update record status in Excel table
Finally, we need to update the Excel records, so the column Confirmed will be set to true. Still inside the loop, let’s add an Update a row action and populate the fields with the relevant data from the Excel file where the orders table is located.
After selecting the table, Power Automate will ask for a Key Column and a Key Value. The Key Column is the property that we want to use as identifier to individualize the record to be updated, which in this case is OrderID. We then can use the Key Value to specify the exact value that will identify the record to be updated, which in this case is the same OrderID used for populating the email template (the current loop iteration’s OderID). We can simply pass the dynamic content of the OrderID property as input, just like we did for the email body and subject line in the previous step:

Finally, we need to set the value of Confirmed to true (highlighted in blue). If you cannot visualize the Confirmed input field, expand the Advanced parameters dropdown and select it.
To learn more about how to insert or update data into Excel tables, refer to this article.
Testing the flow
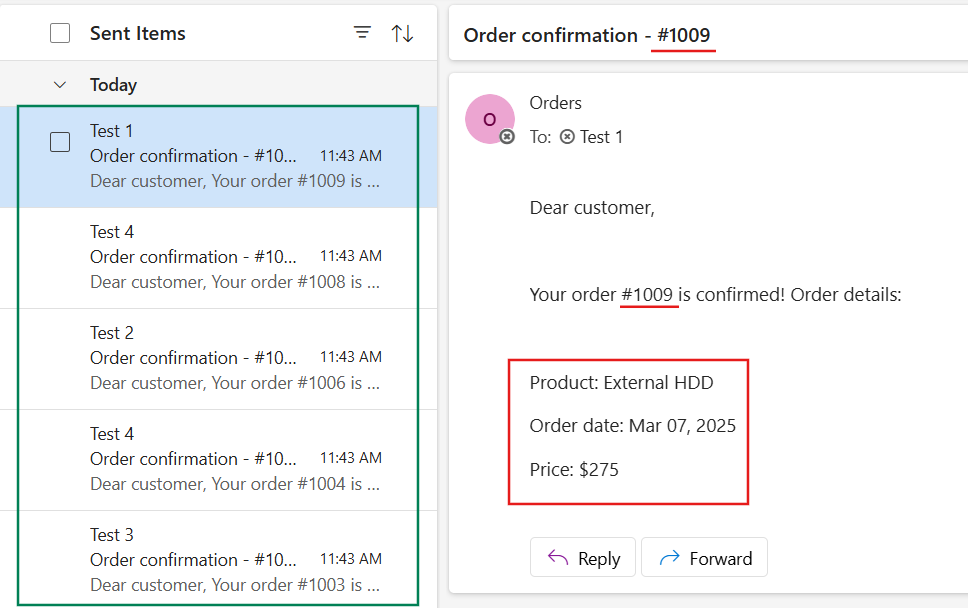
After running the flow, we can check the Sent folder from the shared mailbox and confirm that all 5 emails were sent simultaneously to the email addresses listed in the Excel table (highlighted in green). For each of these emails, the dynamic properties are populated with the data pulled from Excel, such as the order number, the product name, the formatted order date and the price (highlighted in red):
In the Excel table, all values corresponding to these newly confirmed orders have now the corresponding column updated:

Conclusion
As you can see, Power Automate can be very helpful to automate the send of bulk emails from an Excel file. Let us know what do you think about this blog in the comment section, and don’t forget to check our website, our YouTube Channel or connect on LinkedIn!
