When building flows in Power Automate, we often need to reference columns from SharePoint Lists or Dataverse tables. This is necessary for various tasks, such as filter queries, select queries, trigger conditions or when we simply want to access individual column data within expressions.
In most scenarios, however, the column names used by Power Automate differ from the display names visible to end users. Although dynamic contents can be helpful, it is not available for all scenarios, so understanding how to find the internal column names in SharePoint and logical column names in Dataverse is essential to take your Power Automate skills to the next level.
Logical name and internal name
One of the requirements of creating new columns in SharePoint Lists or Dataverse tables is to assign a display name. This is just a user-friendly label that is easily readable by humans, but it is not used by integration tools, such as Power Automate, when referencing the column. Because this display name is simply a label, you can change it at your convenience, but this flexibility is not available for the internal or logical names, which are the reference properties used by Power Automate to access column data.
In SharePoint, these properties are commonly referred to by the community as “column internal names” or “logical names”. In Dataverse, this characteristic is known as column logical name, and it’s officially labeled in the Official Documentation.
Finding internal column names in SharePoint Lists
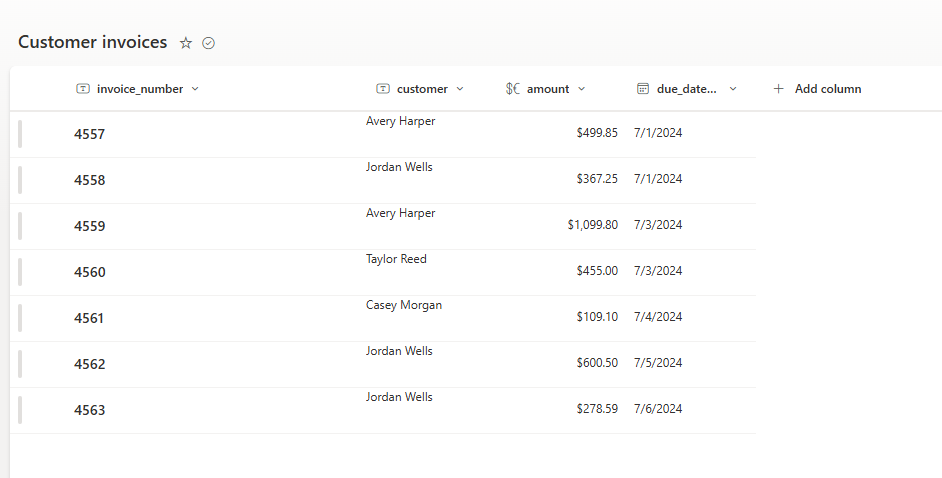
As mentioned earlier, you can assign display names of columns when creating them in SharePoint Lists. Let’s take the following List as example, which contains data about due invoices from an organization:
Next, we create a new column named paid, which tracks whether an invoice has been settled or not:

After creating the column, we can change its name and other properties by expanding the menu and navigating to Column settings > Edit:

As we will notice, even if we change the column’s display name (in red below), its internal name will remain the same. To find the internal name, navigate to List settings (in green), which can be accessed via Settings menu, found under the gear icon on the top-right corner of your screen (highlighted in orange):
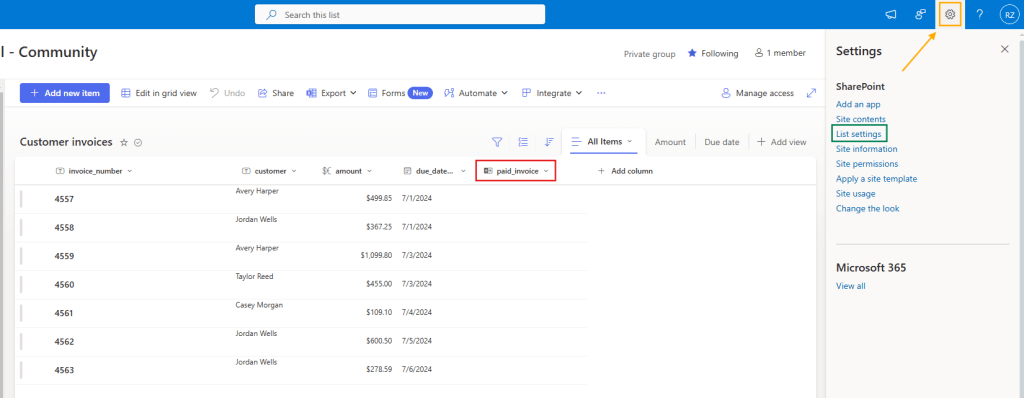
In the List Settings, you will find a Columns section (in red), where the display name of all columns is listed. As shown, our newly created column appears as paid_invoice (in blue), which makes sense, reflecting the name we assigned after its creation:
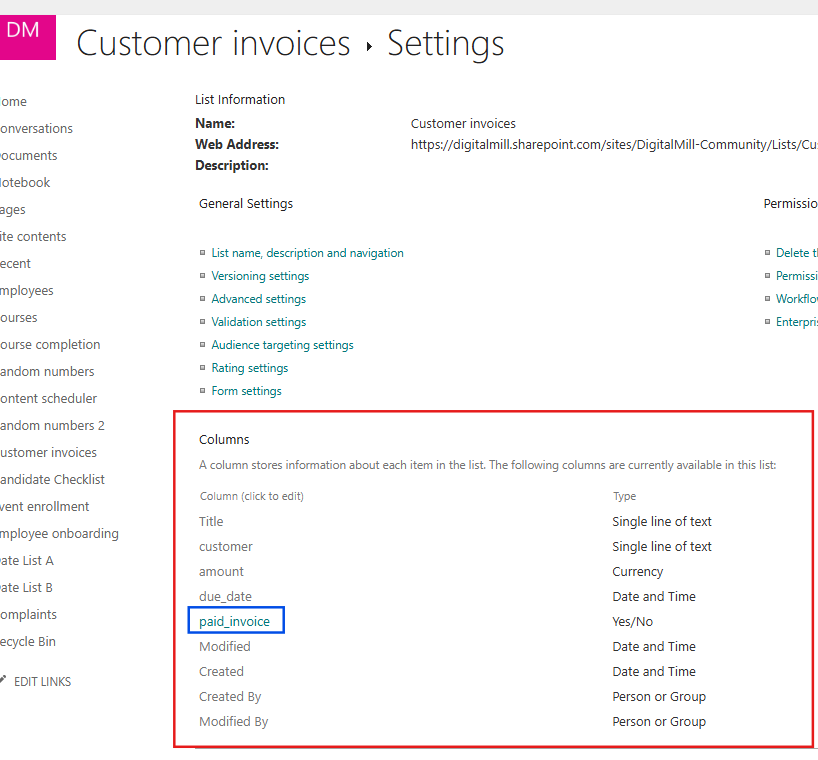
By clicking on the paid_invoice column, we will access its individual settings, which are pretty similar to those options available in the SharePoint List UI, when the column was renamed. This settings page contains the display name of the column (in red), but there is no direct field showing the column’s internal name. instead, you can find it in the Field parameter within the page URL (highlighted in blue):

As you can see, even though we set the column display name paid_invoice, its internal name remains paid, regardless of how many times we rename the column.
Now, if we access any record any from the List in Power Automate, we will see the paid_invoice column data referenced as paid, since this is its internal name:

In the example above, we are working with a very simple flow that retrieves all records from the SharePoint List, and we visualize their raw outputs. The paid column returns as false because it has a Yes/No data type, where any value not explicitly set to “Yes” is interpreted as “No”, which Power Automate reads as false.
By the way, you may also notice that the column invoice_number has Title as its internal name. This is because the column was originally named Title, which is a default column available to any List. Even after renaming its display name to invoice_number, the internal name remains Title.
Column logical names in Dataverse
Similar to SharePoint, Power Automate doesn’t use the display name for accessing data from Dataverse Table columns. Instead, it uses the logical name. Even if you change the display name of a Dataverse Table column multiple times, the logical name will remain unchanged, just like in SharePoint.
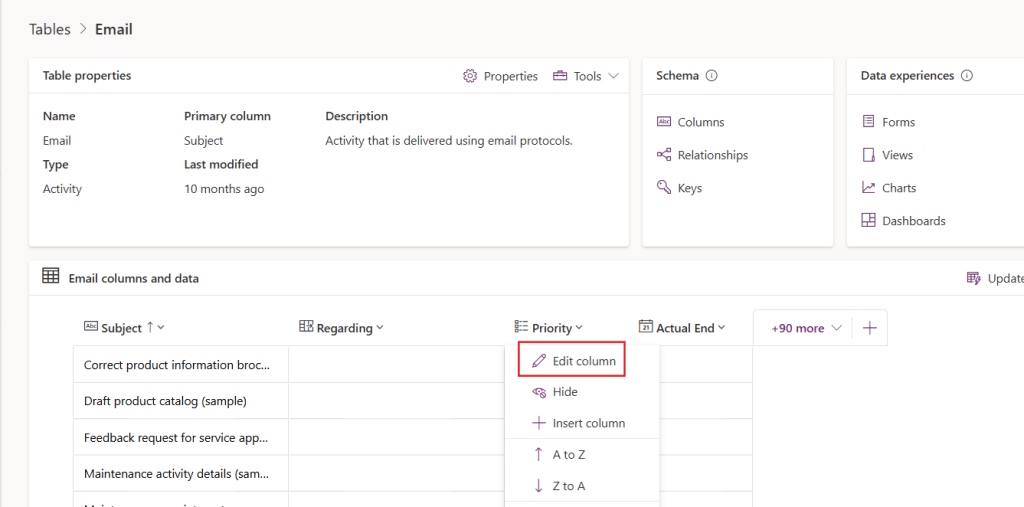
Finding the logical names of columns in Dataverse is much easier than finding the internal names in SharePoint Lists: you just have to navigate until the table, find the respective column name and click in Edit column, as highlighted below:
Next, you will see the column settings pane on the right side of the screen. Expand the Advanced options (highlighted in blue), and you will find the logical name to use in Power Automate (highlighted in red), which in this case is simply priorityCode:

Another option is to select Columns under the Schema section in your Dataverse table:

You will navigate to the Columns page, where you can visualize relevant details about all table columns, such as their data type, whether they are managed, whether they are required, and more. By clicking in the ellipsis next to a column (highlighted in blue), you can edit it access advanced options. You can then copy the column’s logical name by navigating through Advanced > Tools > Copy logical name, as highlighted in red:

Let’s now access the priority from the first email retrieved by Dataverse to Power Automate. We can achieve it by using a simple expression, such as outputs(‘List_rows’)?[‘body/value’][0][‘priorityCode’]. By using the zero, we are accessing the first element of an array retrieved by List rows action by its indez, and then retrieving the value of the priorityCode property, which corresponds to the Priority column in the table:

Side note: you may notice that we referenced the Email Messages table in the List rows action above, while working with a table called Email. This is happening because Email is simply the display name of the table, while Email Messages is its Plural name, which is used to list the available Dataverse tables in Power Automate. You can identify it by going to Properties (in blue), where you will find the Plural name input (in red):

After running the flow, our Compose will display 1:

This is the value (not the label) of the priority assigned to a given record in the Email table. Since this column is of the Choice type, Power Automate retrieves its underlying value, rather than the user-friendly label that we find in Dataverse:

For accessing the labels from Dataverse Lookup or Choice type columns with Power Automate, refer to this article.
Conclusion
Since the display names are simply visual labels, many users may think that you can simply replicate this same label into Power Automate to access the respective List or Table properties. Understanding the distinction between display names and internal/logical names in platforms like SharePoint and Dataverse can avoid issues when working with Power Automate, saving you a lot of time when building your flows.
