Power Automate is a great tool when it comes to manage both simple or complex approval processes, since it contains a default Microsoft connector supports different approval types. One of the most useful features is the Start and wait for an approval action, which issues an approval request and pauses the flow until it is answered by the designed approver.
However, all flows in Power Automate have a maximum runtime of 30 days, after which any pending actions will be timed out. It puts a limitation for many organizations that have longer and sometimes complex approval processes, since a pending request will be lost if it takes more than 30 to be answered.
The good news is that we can use a workaround and split our process in two separate Power Automate flows, where the approval request is created in the first and its status change is controlled by the second one.
Note: this solution uses a Premium connector, so it’s important to review your current licensing plan before implementing it.
Use case overview
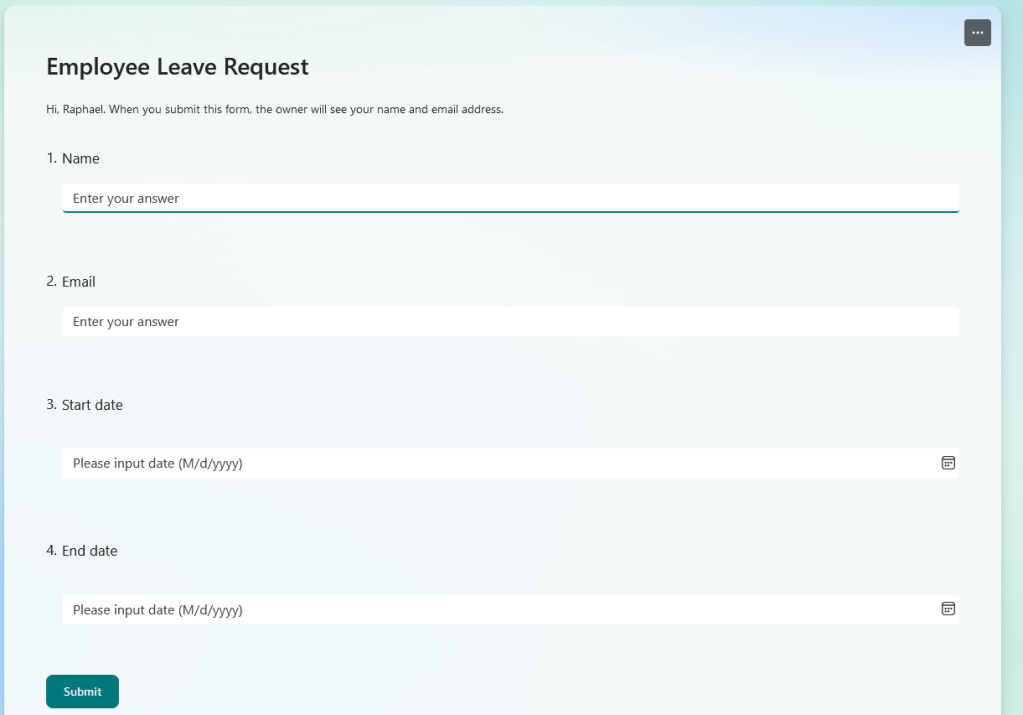
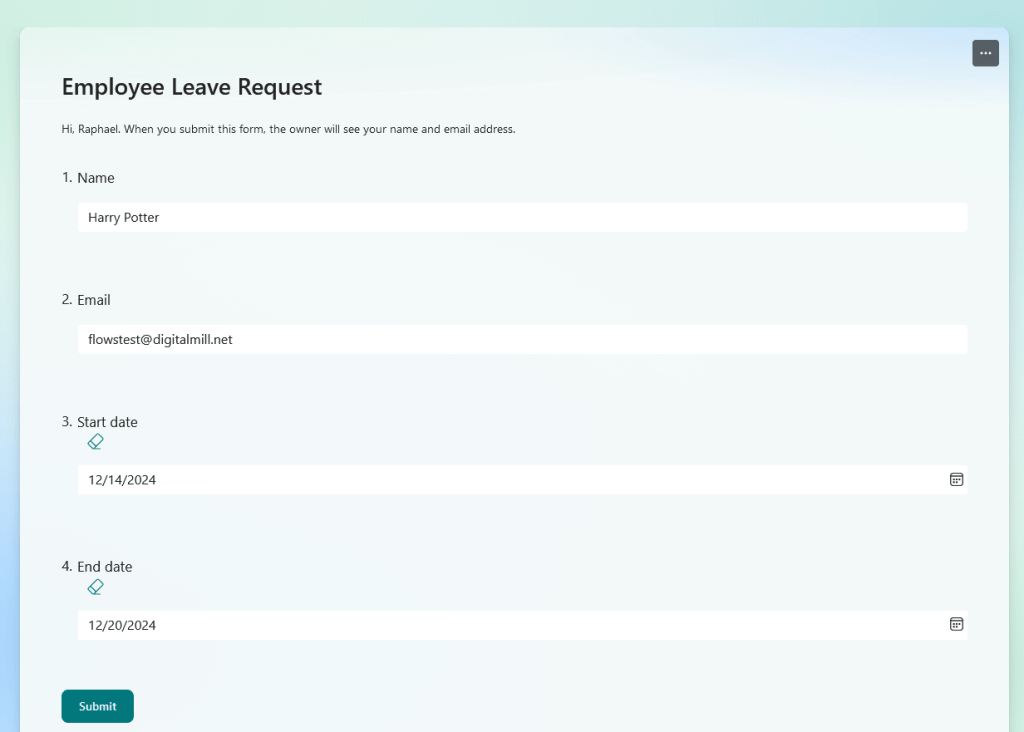
For this article, we will explore a common use case: a leave management system. The solution is pretty straightforward: an employee submits a leave request through a Microsoft Form, providing their name, email address and the start and end dates for the requested leave. The MS Form looks like this:
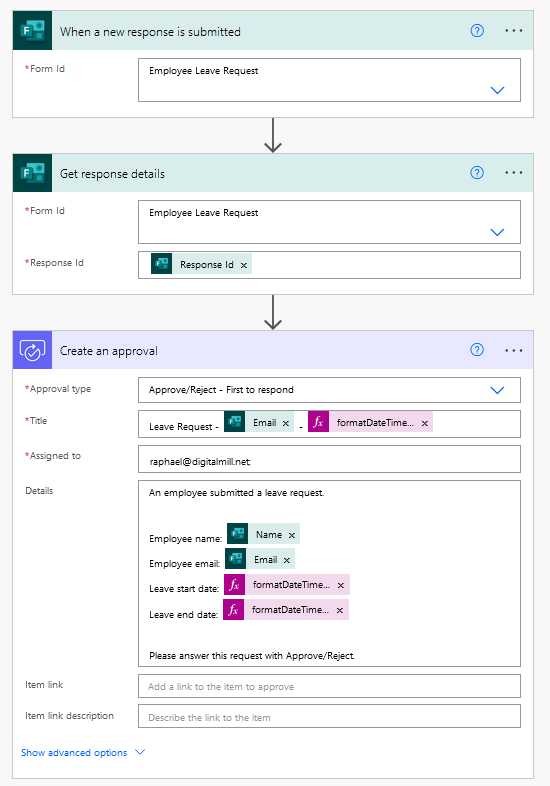
Once the form is submitted, the first Power Automate flow is triggered and an approval request is initiated. This flow has only three steps: the trigger, the MS Form data capture and the approval request creation:
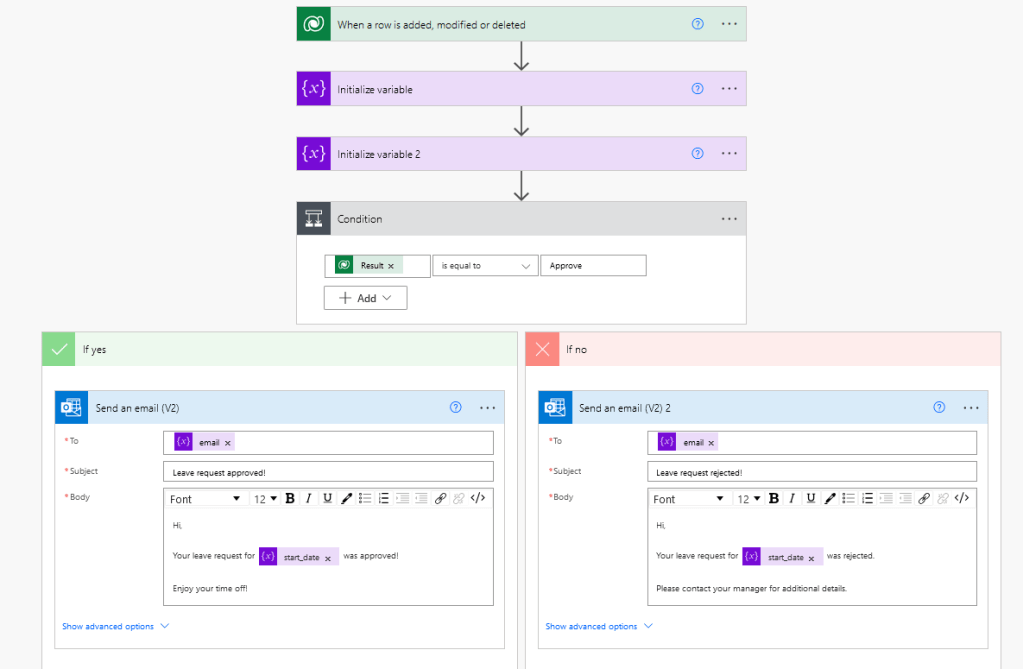
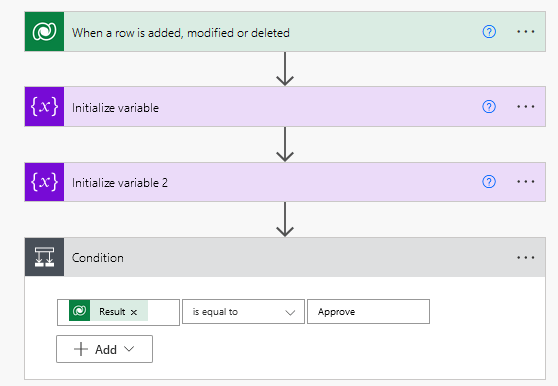
In the second flow, we monitor the Approvals Dataverse table, which tracks all approval request and their status. This flow is triggered when the status of an approval request changes, notifying the employee about the decision on the leave request. This flow is also pretty straightforward, containing only a trigger, two variables initialization and a condition to handle the email template to communicate the request outcome:
Finally, since a same organization can have multiple approvals from different processes, we will utilize the following naming convention for those related to leave requests: Leave Request – [employee_email] – [start_date].
Capturing Forms submissions with Power Automate
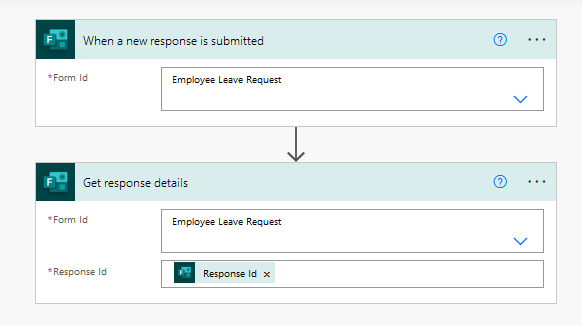
The first step is to initialize a new automated flow with a When a new response is submitted trigger, and select the Employee Leave Request form in the dropdown. This trigger captures the event of form submission but not the user’s input, so you may also add a Get response details action, selecting the same form in the dropdown and filling the Response Id with the dynamic content from trigger’s Response Id:
Creating an approval in Power Automate
When using Power Automate to create approvals, you may use one of the following actions: Create an approval or Start and wait for an approval. The Create an approval will simply initialize an approval request, while Start and wait for an approval sends the approval and pauses the flow until a response is received. This second approach is very helpful, however it can wait for a response only up to 30 days, after which the flow is automatically timed out, which is the problem that we are solving in this article.
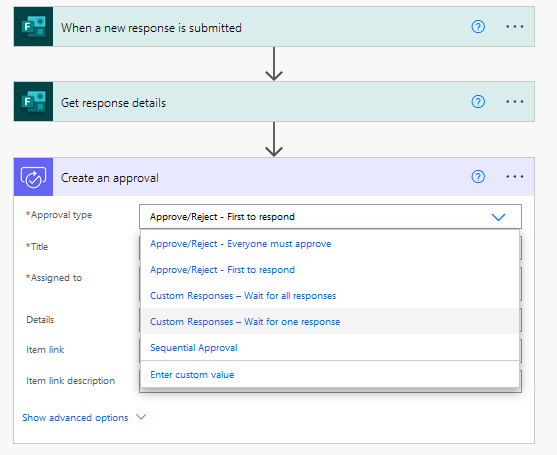
Since we want to prevent the 30 days limit, let’s add a Create an approval action to the flow. Select the appropriate, which varies depending on your process. For our use case, we have only one approver that must approve/reject the request, so we will take the Approve/Reject – First to respond:
Then we will craft the approval request title, typing “Leave Request –” at the beginning, and after inserting the dynamic content for the Email answer from Get response details. We then add another dash and use the formatDateTime() expression, which receives the dynamic content from Start date as first parameter and the format “MMM dd, yyyy” as second:

The expression is important to ensure that the Start date is represented in a user-friendly format, which in this case. For our use case, the provided date format string will result in a date representation containing month, day and year, similar to “Jan 01, 2025”.
To insert dynamic content into an expression, first type your function, which in this case is formatDateTime(), then place your cursor within the parentheses and as a first parameter (highlighted in blue below), go to the Dynamic content tab (highlighted in yellow) and finally select the desired property from Get response details action (highlighted in red):

You can also learn more about how to write expressions in Power Automate in this article.
By combining plain text, a dynamic content and an expression, we will get a custom output for each approval request, which may look similar to “Leave Request – Harry Potter – Dec 14, 2024”. For learning more on date formatting in Power Automate, refer to this blog post.
Now we can fill in the Assigned to field with the name or email of the user in your organization who will review the approval request, and the Details with any relevant information about it:

For this example, we are working with the following template for the Details input, where the values between square brackets must be replaced by the dynamic content and expressions as detailed below:
An employee submitted a leave request.
Employee name: [employee_name_dynamic_content]
Employee email: [employee_email_dynamic_content]
Leave start date: [startdate_dynamic_content_formatted]
Leave end date: [enddate_dynamic_content_formatted]
Please answer this request with Approve/Reject.
For formatting the dates, we are using the same pattern from the title: “MMM dd, yyyy”.
The first flow is now ready, and you can even make a first MS Form submission if you wish. Just make sure to not respond to the approval before we build the second flow.
Approval table in Dataverse
Before starting to create the second flow, let’s understand how the Approvals table work, and to do this we will fist submit a leave request:
Once you submit the form, the flow is triggered and the assigned approver receives a notification via email or MS Teams. By accessing the approval via email, you will find the approval title (highlighted in red), the approval details (highlighted in blue) and the buttons to approve/reject the request (highlighted in green), with the data extracted from the Form submission:

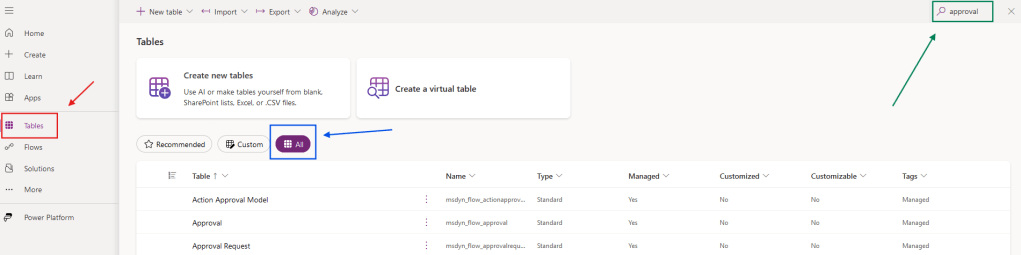
At this point, you can click in Tables in the left-side menu from your Power Automate environment, as highlighted in red (if you cannot see the icon, click in More). Then you will need to navigate to the All tab (highlighted in blue) and search for the Approval table (highlighted in green):
After, you can find a record for each of the approval requests created in your environment, including the just created by the Power Automate flow (highlighted in red):

In this table, we can control the current status of the approval request, and even change it if necessary (check this article to learn how to cancel approvals with Power Automate).
Capturing approval status changes from Dataverse table with Power Automate
Now we can start to build the second flow, which will handle the approval response. For that, you will need a When a row is added, modified or deleted trigger that must track the Modified change type (highlighted in blue), for the Approvals table (highlighted in green) and with the scope set to Organization (highlighted in yellow):
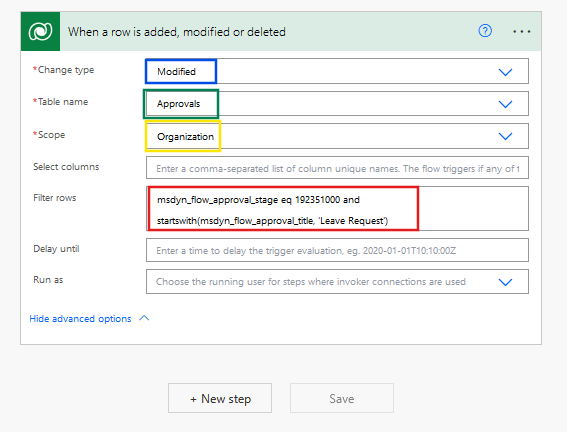
We will also need to set some conditions in the Filter rows input (highlighted above in red). Since we want to track only the completed approvals (ignoring any reassignments of the request to other users, for example) use the respective column logical name (msdyn_flow_approval_stage), the equality operator (eq) and the id of the stage to be tracked (192351000). We also need to capture only the approvals related to employees leave requests, and we can identify them by their title, as it always starts with “Leave Request”, so we can add a second filter condition after an and containing the startwith() operator, and set the title column logical name (msdyn_flow_approval_title) and the desired value surrounded by single quotes (‘Leave Request’) between the parentheses.
The final filter query will look like this: msdyn_flow_approval_stage eq 192351000 and startswith(msdyn_flow_approval_title, ‘Leave Request’). If you want to learn more on how to work with filter queries in Power Automate, refer to this article.
Sending emails with Power Automate
Now let’s extract the requester’s email address and the requested start date: both data can be found in different parts of the approval request title and accessed by combining some expressions. In these expressions, we are using the dashes and blank spaces in the text as separators, so we can capture the whole text between the first dash with spaces (“ – ”) and the next blank space (“ ”) to access the email address and all text after the last dash to extract the start date. We are also assigning the values to individual variables of type string:
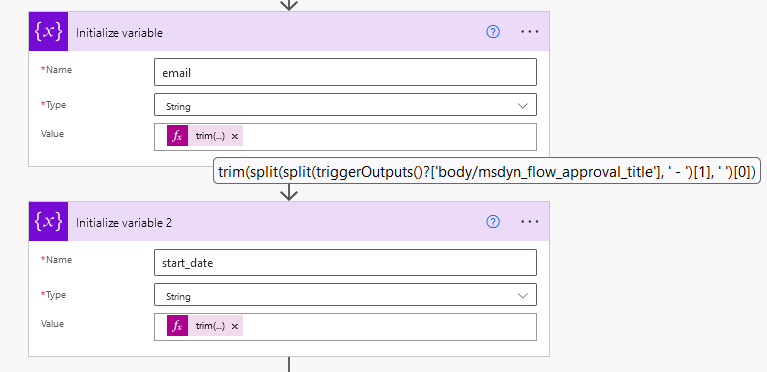
The expression used for the email variable is trim(split(split(triggerOutputs()?[‘body/msdyn_flow_approval_title’], ‘ – ‘)[1], ‘ ‘)[0]), and for the start_date variable is trim(last(split(triggerOutputs()?[‘body/msdyn_flow_approval_title’], ‘-‘))). If you want to learn more on how to work with text expressions in Power Automate, refer to this article.
After defining the variables, we need to identify if the request was approved or rejected. This information is stored in the Result column of the Dataverse table, and we should allocate it within a Condition to test if the outcome is equal to “Approve”:
Within each side of the condition, add two Send an email (V2) actions to manage communication for both approval outcomes. The templates for each action are very similar and contain a custom message based on the approver’s response. For both cases, the email variable is used in the To input:

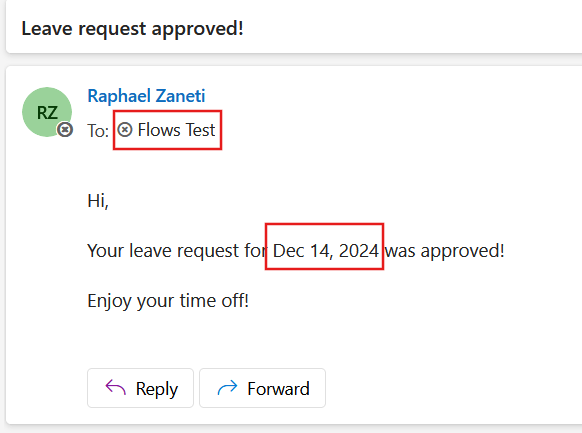
Here is the email body for the approved scenario:
Hi,
Your leave request for [start_date] was approved!
Enjoy your time off!
And this is the email body for the rejected scenario:
Hi,
Your leave request for [start_date] was rejected.
Please contact your manager for additional details.
Make sure to replace the [start_date] for the dynamic content of the respective variable.
Testing the approval response
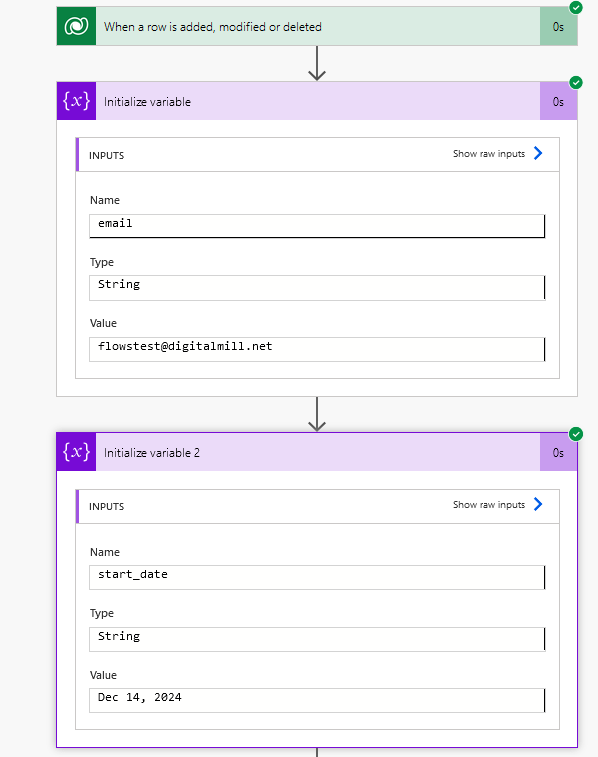
After approving the leave request, the respective record in the Dataverse Approvals table is updated, triggering the second flow. The variables are populated with the requester email address and the date extracted via expressions crafted in the previous section:
And the email is sent to designed address:
If we make a new form submission with the same email address and reject the approval request, Power Automate captures the result and sends the “reject” email template to the submitter:

Conclusion
In this post you learnt how to overcome the 30-day timeout limitation for approval processes in Power Automate, by simply splitting your process in two different flows. The first flow generates the approval request using the Create an approval action (instead of Start and wait for approval), while the second flow monitors the Dataverse Approvals table to capture status changes.
