How many processes there are in your organization where a customer or an employee must fill out a form or a document, with data then transferred into an Excel table, SharePoint list, or database? This is a common scenario, and many companies still handle it manually, risking errors in the data entry process and dedicating employee time to perform this boring, repetitive and time-consuming task.
The good news is that you can easily automate this process by combining Microsoft Forms, Power Automate, and your preferred data platform, such as a PostegreSQL database or a Dataverse table. By using text expressions and conditions, you can handle multiple scenarios and transform the data from Microsoft Form to match the destination platform’s format.
In this article, you will learn how to automatically populate an Excel table whenever a form response is submitted.
Use case overview
For this article, we will work with a scenario where a company is planning its year-end and needs to gather employee’s preferences on event dates, themes, and dietary restrictions. To collect this data, the company will use a very straightforward Microsoft Forms, which looks like this:

The form includes the following required questions: First Name and Last Name (text), Preferred date for the event in December (date picker), and Preferred theme (single selection choice). The final question, Dietary restrictions (multiple selection choice), is optional, allowing employees to specify any relevant dietary needs.
For each form submission, the collected data must be loaded into the following Excel table:

In this article, we are exploring how to use Power Automate with Excel tables, but we could also write data to Excel ranges with Power Automate by using Office Scripts.
Since this is a straightforward scenario, let’s introduce some complexity by incorporating additional requirements:
- The “employee” column must store the full name of the employee.
- Only one submission per employee must be accepted, using its name as primary key.
- Any submissions with preferred date before December 1st or after December 31st must be ignored.
Capturing data from Microsoft Form answers
Let’s start by creating a new automated flow, selecting the When a new response is submitted trigger, from Microsoft Forms connector. Select your form from the dropdown, and then add a Get response details action, again from Microsoft Forms connector, setting the same form in the dropdown and using the trigger’s Response Id dynamic content as input for Response Id. While the trigger captures the form submission, the Get response details accesses the data from the just submitted response:

Loading data to Excel table with Power Automate
Now let’s add the form responses to the Excel table using the Add a row into a table action (for more details on how to insert or update data to Excel tables, refer to this post). After populating the details about your Excel file and table, the action will automatically generate input fields for each of the table columns. You can then populate these inputs by using the dynamic contents from the Get response details action to each respective table columns:

To fulfill our first requirement, we combine the First name and other for Last name dynamic contents into the “employee” column input field. By placing both dynamic contents in the same field and adding a space between them, we will have the employee’s full name as output in the Excel table, just like our first requirement states.
With these three steps, we are already able to collect the answers as soon as a form is submitted and load it automatically to Excel table. We can test it by filing in and submitting the form:

And after a few seconds, the Excel table will be populated with the form data:

As you can see in the image above, while the data entered is accurate, the formatting for “diretary_restrictions” column can be improved, since it’s capturing the default array string format retrieved by MS Forms for multi-selection questions.
Formatting MS Forms multi selection answers in a single text with Power Automate
To format the outputs from Microsoft Forms into a single text before loading it into Excel, without the square brackets and quotes typical from arrays, we can use some text expressions in Power Automate.
To begin, let’s create a variable using the Initialize variable action and name it “dietary_restrictions”, defining its data type as String:

For the value of the variable, you must input an expression (if you don’t know how to work with expressions in Power Automate, check this post):

We are using the following expression: if(empty(outputs(‘Get_response_details’)?[‘bodyr47474874a63745269830101c0a1e8e10’]), ”, join(json(outputs(‘Get_response_details’)?[‘body/r47474874a63745269830101c0a1e8e10’]), ‘, ‘)). This expression checks if there is any value in the “dietary restrictions” question and, if yes, it converts the array response into a single text string, with each element concatenated and separated by commas.
Let’s break down the expression into its key components:
- outputs(‘Get_response_details’)?[‘body/r47474874a63745269830101c0a1e8e10’]: accesses the response for “dietary restrictions” from MS Forms, which is an array string or an empty string. The alphanumeric ID following is unique to each form, and you don’t need to type it manually: you can simply use the dynamic content for the “dietary restrictions” answer.
- empty(outputs(‘Get_response_details’)?[‘body/r47474874a63745269830101c0a1e8e10’]): the empty() expression checks whether there are any values present within the array string. This check is important for handling the cases where users do not select any dietary restrictions. In a later step within this breakdown, the empty() expression will be used as a condition to an if().
- json(outputs(‘Get_response_details’)?[‘body/r47474874a63745269830101c0a1e8e10’]): the form returns the dietary restrictions as an array formatted as string, but we need to transform it into an actual array, so we can concatenate its elements (the restrictions) by commas. The json() expression performs this transformation.
- join(json(outputs(‘Get_response_details’)?[‘body/r47474874a63745269830101c0a1e8e10’]), ‘, ‘): now we take the array generated by the json() expression (first parameter) and join all elements by comma (second parameter, which must be surrounded by single quotes). If we have a single element, then the comma won’t be included. This expression will be executed only if the if(), which we will explore in the next expression step (5), returns false, meaning the dietary restriction answer is not empty (step 2).
- if(empty(outputs(‘Get_response_details’)?[‘bodyr47474874a63745269830101c0a1e8e10’]), ”, join(json(outputs(‘Get_response_details’)?[‘body/r47474874a63745269830101c0a1e8e10’]), ‘, ‘)): finally, we enclose everything within an if() expression, which takes the empty() expression as first parameter (step 2), an empty string surrounded by single quotes as second and the join() expression (step 4) as third. With this setup, we are testing if the Microsoft Form answer is empty, and if yes, populate the dietary_restrictions variable with an empty string. If it has at least one element, then the join() expression is executed, populating the variable with a list of dietary restrictions separated by comma.
After you can go back to the Excel action and simply update the dietary_restrictions input to include the just created variable:

Now we can re-submit the form with the same information, and this will be the final result in the Excel table (the second submission is highlighted in red, and don’t’ include the quotes and square brackets):

Preventing duplicate submissions
Let’s now work in the logic for handling duplicate submissions. Currently, our flow allows the same employee (considering their name as individual identifier) to have multiple entries in the Excel table. To prevent duplicate entries, we need to first read the data from the Excel table, filtering it for the employee’s name. If we find any records where the name match the current form submitter, the flow must be immediately terminated, and no data must be inserted to the table. Let’s start by adding a List rows present in a table action, from Excel connector, and populate it with the file and table details.
Make sure to position it before the Add a row into a table action, since we don’t want to add a new record to the table before verifying if the employee is already there:

At this point, your action will retrieve all records from the table, but we need only those where the “employee” column matches the submitter’s full name. To add this filter condition, click in Show advanced options (highlighted in yellow above) and you will see some additional inputs, including the Filter Query, as highlighted in red below. The filter query follows ODATA syntax, requiring a property, a logical operator and a value. In our case, we are using the table column name (property), an equality operator (eq), since we want to filter the records by any entries that are equal the provided value, and the dynamic contents from First name and Last name, extracted from the Get response details action (value):
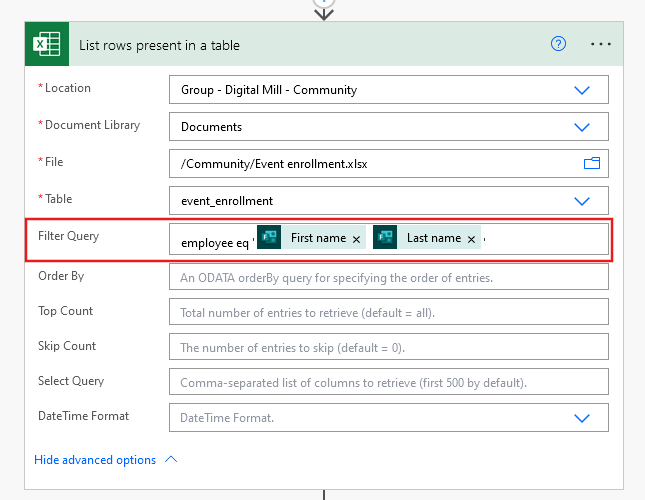
Ensure to surround the dynamic contents between single quotes, as we are dealing with string values. To learn more about how to use filter queries in Power Automate, refer to this article.
After adding the filter query, you need to verify if the List rows present in a table action retrieves at least one record. If it does, the flow should terminate immediately to comply with the requirement of maintaining only one entry per employee. To achieve it, you can add a Condition action, which is used as a “decision control” to direct the flow to different paths depending on specific criteria. You can learn more about conditions in Power Automate here.
In Condition action’s left-side input, add the length() expression and use the dynamic content for the value property from List rows present in a table action inside the parentheses (highlighted in red). This expression counts the quantity of elements from an array, and since the value property is an array of objects representing each record from the table, we can leverage it for identifying if there is an existing table entry for the current submitter:

After entering the expression, set the central dropdown to is greater than (highlighted in blue) and input 0 in the right-side box (highlighted in green). With this setup, the condition will be true only if the quantity of filtered records retrieved by List rows present in a table is greater than zero.
Now you can insert a Terminate action within the If yes block of the Condition, and set its status to Succeed. It will finish the flow whenever a duplicate submission is found. You can keep the If no block empty, as the flow must follow normally if the condition is false (case when the quantity of filtered records retrieved from the table is equal to zero):

Let’s save the flow and resubmit the Homer Simpson’s form one more time, and now you may notice that all actions until the Terminate were executed successfully (highlighted in red below), but the subsequent ones were skipped (highlighted in blue):

This means that our flow is working as expected: as we have more than zero records in our table with employee column matching to Homer Simpon (we actually have two records, due to our previous tests), the Condition returned as true, and executed the Terminate action, which finishes the flow immediately. You may notice that the Condition box contains the “Cancelled” message: this is an inaccurate behavior from Power Automate as the Condition was executed, otherwise we would not have a successful execution for the Terminate action.
If we now do a new form submission, at this time naming the employee Bart Simpson, the Condition output will be false (highlighted in yellow) and the following actions will be executed (highlighted in red below):

As also expected, Bart’s record will be inserted to the Excel table:

Preventing submissions out of the date range
To fulfill the final requirement of ignoring submissions with a preferred date outside December 2024, add another Condition action to the flow, setting the date question dynamic content as left-side input, and comparing it as less than 2024-12-01 (it’s important to keep this year-month-day format), and greater than 2024-12-31:
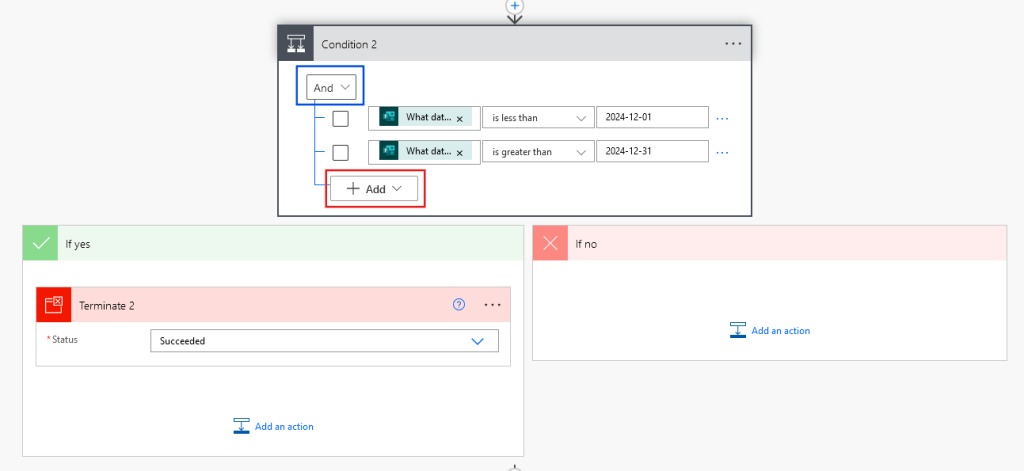
For adding logical tests to the Condition, click on Add (highlighted in red). Make sure to keep the logical operator set to And (highlighted in blue), as we want to execute the If yes block only if both logical tests are true.
Testing the flow
Let’s now test the flow. We start by clearing all records from the event enrollment table:

We now will make 6 form submissions, with the following entries, where entries 2 and 4 must be ignored as they represent respectively a date out of the range and a duplicated entry:
| First name | Last name | Date | Theme | Restrictions | |
| 1 | Homer | Simpson | 2024-12-05 | Formal dinner | Gluten-Free, Other-Seafood |
| 2 | Bart | Simpson | 2024-11-30 | Virtual gathering | Vegetarian |
| 3 | Marge | Simpson | 2024-12-02 | Outdoor adventure | Other-Lactose-free |
| 4 | Marge | Simpson | 2024-12-08 | Formal dinner | — |
| 5 | Lisa | Simpson | 2024-12-05 | Casual Picnic | Vegan |
| 6 | Bart | Simpson | 2024-12-15 | Outdoor adventure | — |
After running the flow, this is the output in the Excel table:

Now the flow is fully operational and you can start to receive actual Form submissions!
Conclusion
In this article, we saw how to automate the data collection from MS Forms to Excel tables by using Power Automate. By implementing checks for duplicate entries and validating date selections, we ensured data integrity: this is a common pain point for starters, since the real-world data is usually dirty and don’t match to the formats in the destination data platform.
