Have you ever found trouble to generate custom reports from a data source using Power Automate? In general, sending simple reports that replicate all records from a SharePoint List or an Excel spreadsheet is straightforward, but it becomes a complex task when you want to apply filters or aggregate data.
In this article, we will explore a common reporting use case with Power Automate: grouping SharePoint List records by a specific column. This solution uses only free connectors, so there is no need for a Power Automate Premium license or rely on third-party providers to implement it!
Although this tutorial uses a SharePoint List as data source, the same logic can be used for other applications, such as Excel tables, Dataverse or SQL databases.
Use case overview
For the purposes of this article, we will work with the following SharePoint List, which represents a company’s invoices, including the invoice number, customer name, the total invoice amount and due date:

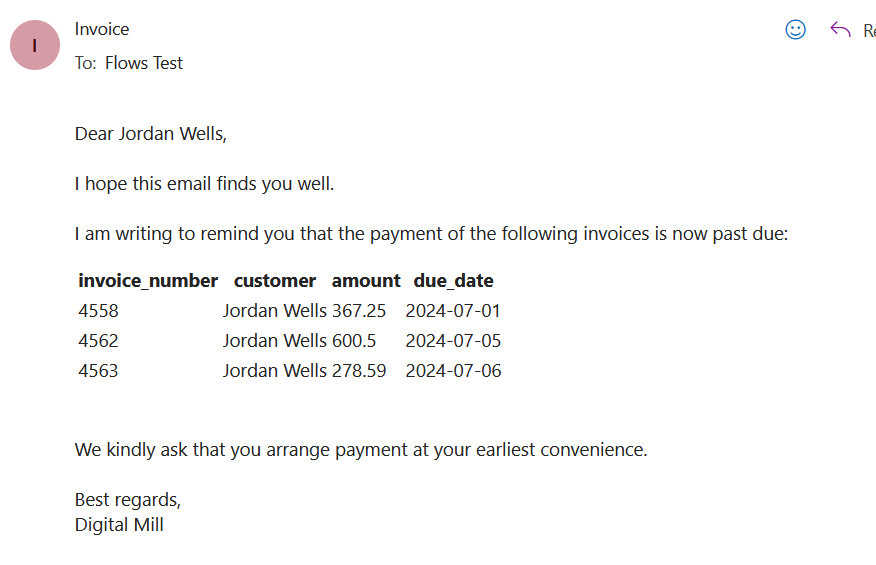
Our goal is to generate individual reports in a table format listing each customer’s existing invoices, with the invoice amounts due dates. The report will be embedded directly into the body of an email, which should look like this:

Initialize variable and read data from SharePoint List
Let’s begin by creating a manually triggered flow and adding a variable of array data type. We will name this variable unique_customers, since it will store the names of all customers found in the SharePoint List. There is no need to assign any value to the variable, as we will populate it in a later step:

Next, let’s read the data from the SharePoint List. To do this, you can use a Get items action and fill in the Site Address and List Name inputs:

List unique values from SharePoint Column
Now it’s time to extract the unique values from the customer column in our SharePoint List. We can do this by inserting an Apply to each loop, using the value property from Get items action as input (to learn more on how to work with loops in Power Automate, check this article):

The Apply to each will access each record from the SharePoint List, and for each entry, we want to check whether the customer’s name is already included in the unique_customers variable. If it’s not, we will add it. This can be achieved by inserting a condition within the Apply to each block:
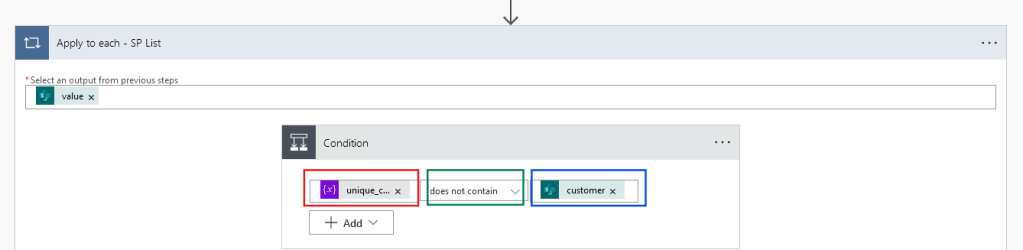
In the Condition action, add the dynamic content from the unique_customers variable to the left-side input (highlighted in red above). Set the dropdown to does not contain (highlighted in green above), and use the dynamic content from customer property from Get items in the right-side input (highlighted in blue above).
Next, add an Append to array variable action within the If yes block of the condition, passing the dynamic content from customer column as input. You can leave the If no block empty:

By implementing this conditional structure, the If yes block will execute only if the customer’s name from the current iteration of the SharePoint List is not present in the unique_customers array. Once a customer’s name is found inside the array during a future iteration, the flow will execute the If no block and do nothing, jumping to the next record in the list to repeat the process.
In practice, the customer’s name will be added to the array only at the first time that it appears in the SharePoint List, preventing any duplicates. You can find more about removal of duplicates from arrays in this post.
Group records by customer in array
Now that our array variable contains the name of all customers from the SharePoint List, we need to loop through it to generate the invoice groups for each customer. Outside the previous loop, add a new Apply to each, using the unique_customers variable as input:

Within this second Apply to each, insert a Filter array action, using the value dynamic content from Get items as From input (highlighted in orange). For the filter condition, set the left-side input as the customer property from Get items (highlighted in red), set the dropdown to is equal to (highlighted in green), and assign the dynamic content from Current item related to the current Apply to each (highlighted in blue). Be sure to select the correct Apply to each in this step, since there are now two loops in your flow:

By using the Filter array, you are accessing all records from the SharePoint List and filtering out any entries where customer column doesn’t match the currently iterated customer’s name from the unique_customer array.
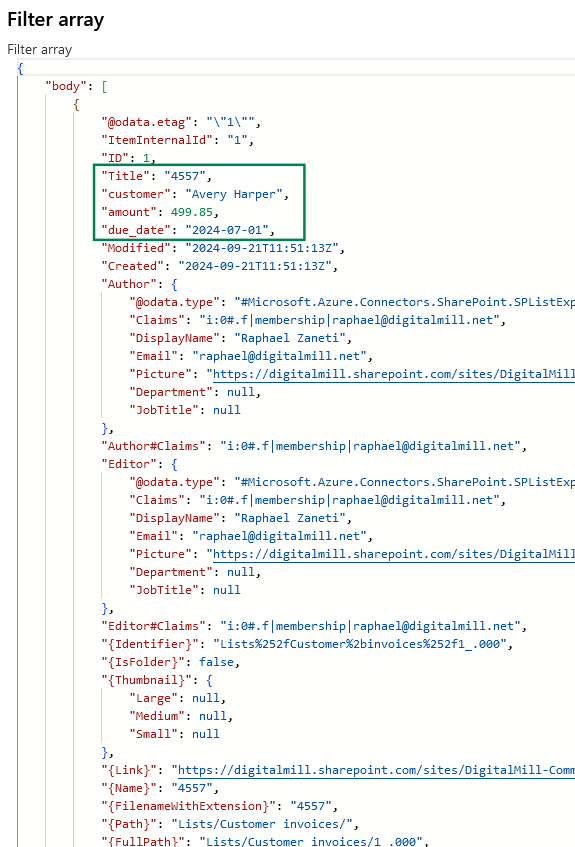
At this point, you already have the relevant records for generating the emails, but they include several irrelevant properties for our report. For example, if you access the raw outputs from Filter array, you will notice multiple metadata properties that don’t need to be included in our report, such as created data, ID, author and link. Actually, from all properties, we only want to include only the highlighted in green in our report:
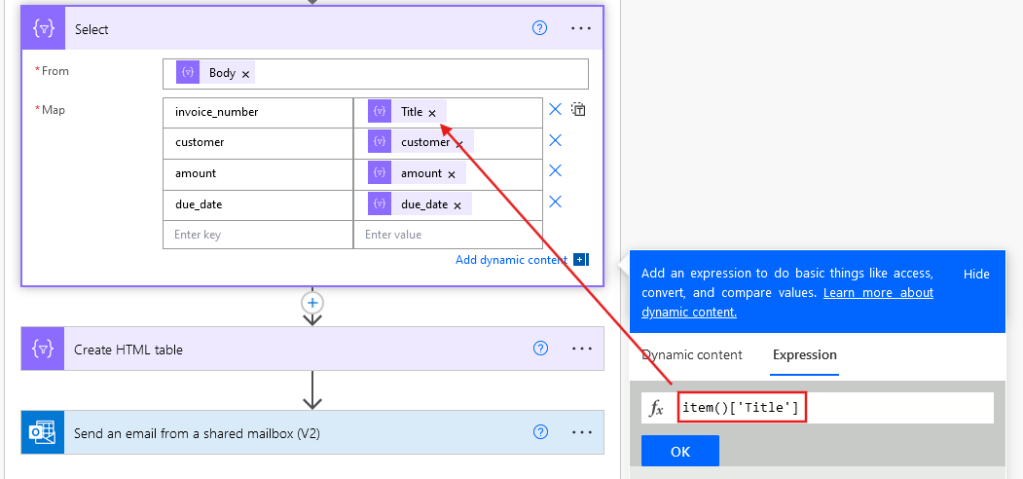
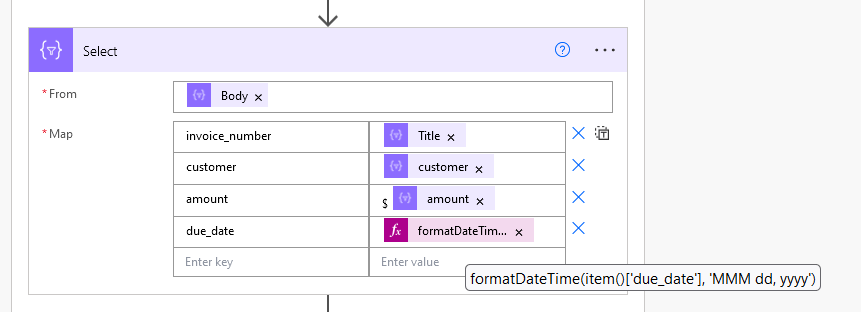
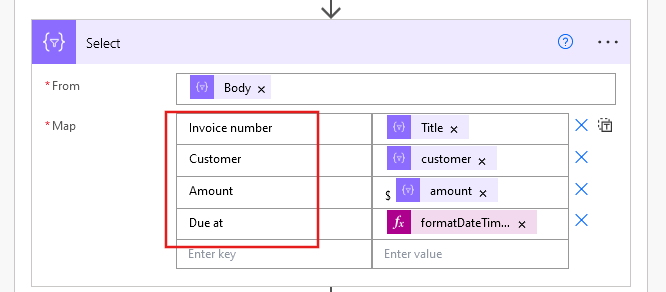
Since the Filter array outputs are organized as an array of objects, we can use the Select action to choose which properties to keep for each List record. Add a Select to the flow, using the Body dynamic content from Filter array as the From input (highlighted in red below). You will notice two columns in the action inputs: the left one for entering the new keys names (highlighted in blue below) and the right one for its respective values (highlighted in green below).

For the keys, you must set the desired property name, which will later be used to name the table columns in the email body. In this example, we are keeping the same name from SharePoint List, except for the invoice_number, which is renaming the property Title (although the column is displayed as invoice number in the SharePoint List, its logical name is Title, as you can see from the raw outputs).
For each value, we will set an expression to represent the corresponding property from the Filter array output. The expression is pretty simple: it’s just item()[PROPERTY_NAME], where PROPERTY_NAME should be replaced with the column’s logical name, which can be found in the Filter array raw outputs. For example, we will use the expression item()[‘Title’] for accessing the invoice number data, since Title is the column’s logical name:
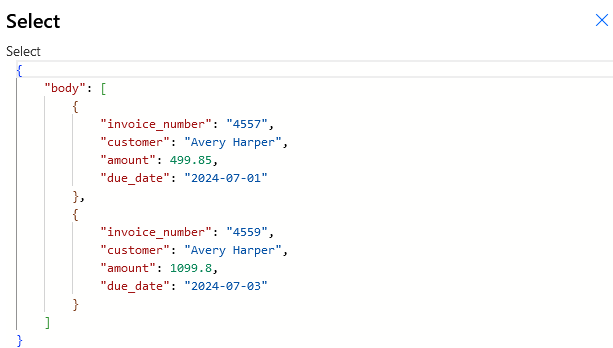
At this point, you have a set of records from the SharePoint List filtered by customer, and containing only the relevant columns for our custom report, as you can see from Select action raw outputs:
Organize HTML table and send email
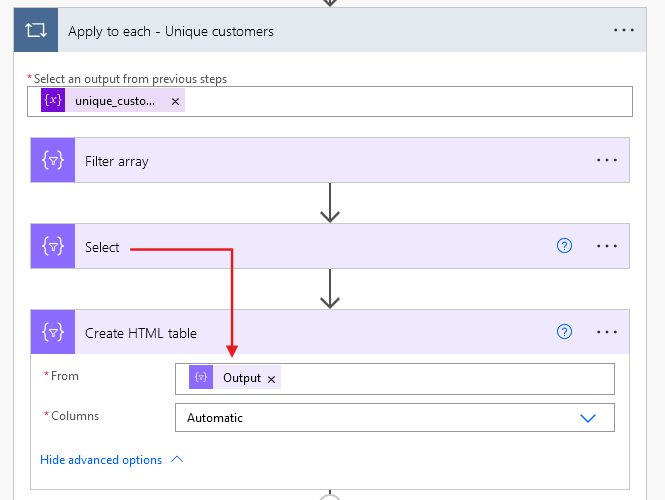
Since we already limited the relevant columns with Select action, you can simply use its outputs as input for the From property in a Create HTML table action, as highlighted in red, leaving the Columns dropdown set as Automatic:
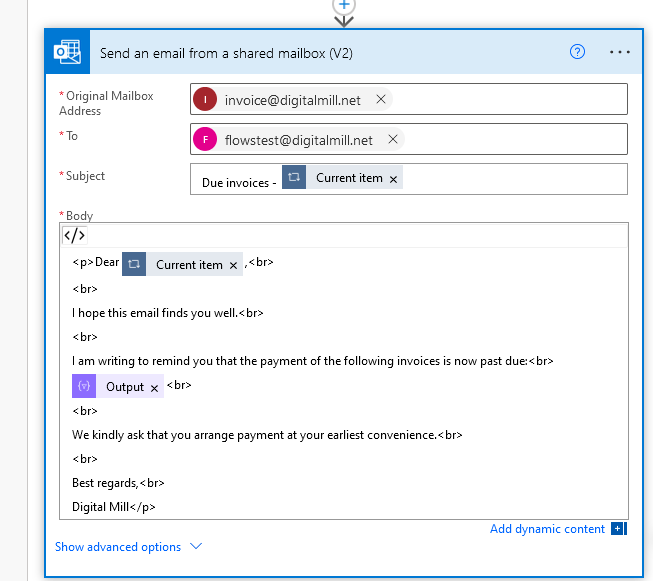
As the name suggests, this action transforms an array of objects into a HTML tabular format, which can be included in the body of an email message. To do this, add a Send an email or a Send an email from a shared mailbox action, type your message template and include the outputs from Create HTML table within the text, as highlighted in red. You can also use other dynamic content in any of the inputs for your Outlook action, just as we did with the Current item for the subject line and email body (highlighted in green), which will insert the respective customer name for each iteration of the loop:

Optional: adding style to HTML table
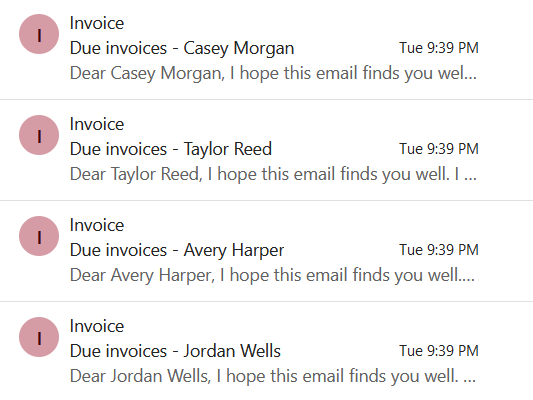
So far, the flow is ready for testing. Once you run it, an email will be sent for each of the individual customers included in the SharePoint List, with their name dynamically included in the subject line:
The email body, however, doesn’t look great, as the table is poorly styled, the column names could be more user-friendly, the amounts don’t include a dollar sign, and the dates are represented in a format that isn’t easily readable:
We can quickly modify our flow to fix these minor issues. To include a dollar sing in front of the amount value, simply add a “$” value input before the expression, as highlighted in red:

For editing the date format in the due_date column, we can simply change the expression in the value input to the following: formatDateTime(item()[‘due_date’], ‘MMM dd, yyyy’), where the default date representation is customized to be presented as “Month day, year”:
To learn more on how to customize date and time in Power Automate, refer to this article.
For changing the column headers in the email body, we can modify the keys input in the Select action to use more user-friendly names, as highlighted in red:
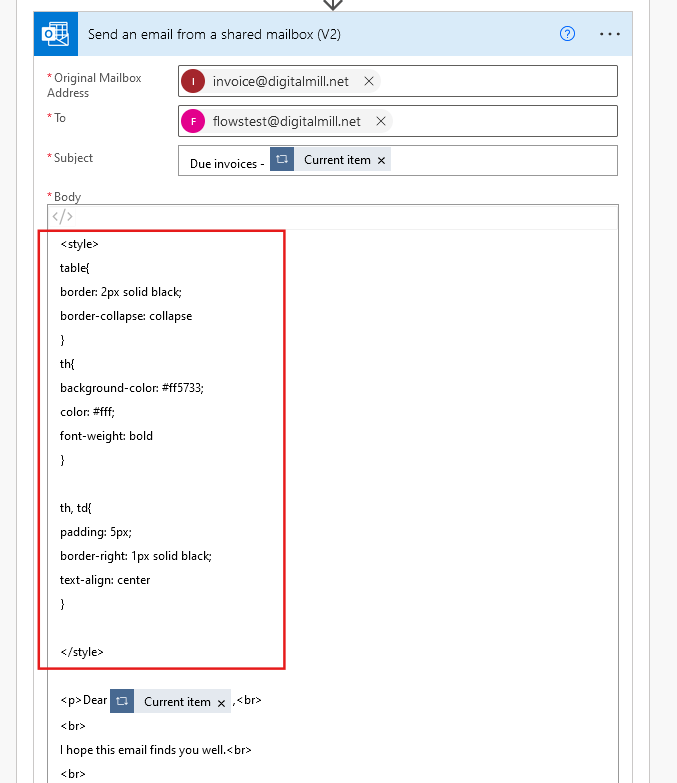
Finally, to add some style to the table, we will need to apply some CSS, which is a style sheet language used for controlling the visual presentation (layout, colors, fonts, etc.) of a web page or, in this case, the email body. To add CSS to your table, you will need to switch the action input to Code View by clicking in the rightmost icon in the rich text ribbon, as highlighted in red:

Once you click in the button, your input will now be represented as HTML, as you can notice by the presence of <p> and <br> tags:
Now you must add the following CSS code at the beginning of the Body input:
<style>
table{
border: 2px solid black;
border-collapse: collapse
}
th{
background-color: #ff5733;
color: #fff;
font-weight: bold
}

th, td{
padding: 5px;
border-right: 1px solid black;
text-align: center
}

</style>
The final version of your Body input will look like this, with the text highlighted in red representing the style rules for the table:
We won’t dig into the specifics of the CSS code provided in this example. If you want to learn more about styling HTML with CSS, refer to this comprehensive YouTube tutorial.
Testing the flow
After the small changes in Select action and the CSS styling to the email, we get to this result:
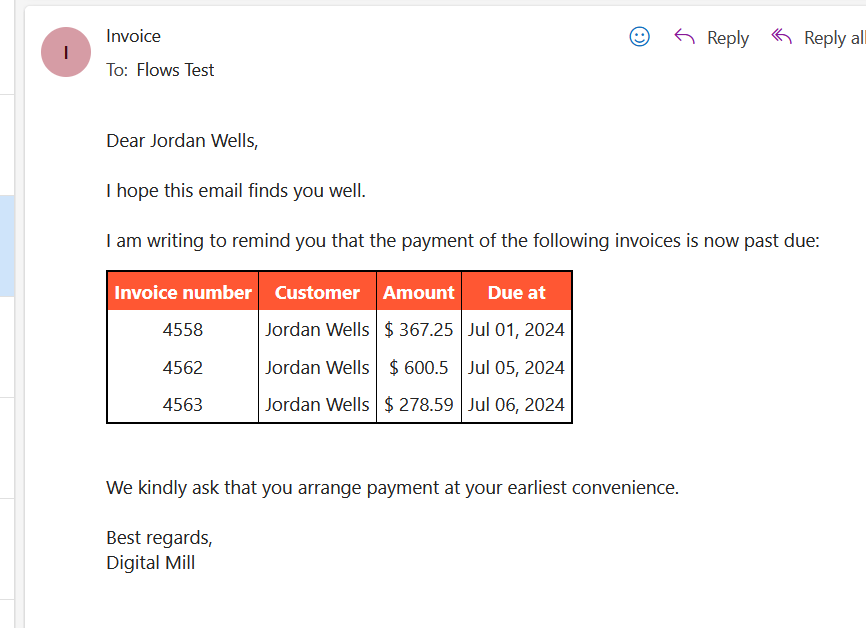
In this version, the column headers are highlighted and have user-friendly names, all text is centered, the amounts include a dollar sign and the dates are presented in a more readable format.
Conclusion
In this article, you saw a practical example of how to group items from and array of objects by a specific property. This strategy can be very useful when generating reports from any data sources, and allow you to work with filter and select of relevant properties.
