When reading data from structured datasets, Power Automate allows the user to filter the results using an ODATA filter query. This feature is available in actions such as “List rows present in a table” (Excel connector), “Get items” (SharePoint connector), “Get rows” (SQL Server), “List rows” (Dataverse), and many others.
Although ODATA provides a unified syntax for filtering data from different sources, getting started with this feature can be challenging. In this article, you will learn how to apply different filters with ODATA, enabling you to interact with most Power Automate actions that read data from other sources.
We also have a video related to this topic on our YouTube Channel:
What is ODATA filter query?
ODATA (Open Data Protocol) filter queries are used to perform efficient and flexible queries against data services. In Power Automate, ODATA allows users to request only the data they need and to filter the data on the source side, rather than retrieving a large dataset and then filtering it in later actions within the flow.
This can result in significant performance improvements, as your can save a lot of time when running some of your flow’s steps and avoid threshold limits for certain actions. For example, the “Get items” action from SharePoint connector has a limit of 5,000 records to be returned. By using an ODATA filter query, you can ensure that only the relevant data is returned, avoiding data loss for due to the connector limit.
Filter query syntax in Power Automate
Power Automate follows a single filter query syntax for most of its actions, which reduces complexity for users. However, it is important to keep in mind that some Power Automate connectors have restrictions on certain ODATA operators and functions. For example, the not logical operator is available for Dataverse actions, but not for SharePoint ones.
For this article, we will work with the following SharePoint List as an example, as this is one of the most popular and restrictive connectors. Keep in mind that the instructions and syntax related to the filter query will be the same for other connectors, such as Excel, Dataverse, SQL Server, PostgreSQL, Salesforce, and Google Sheets, although the list of available operators and functions may be slightly larger.
This is the sample SharePoint List that we will use in this article:

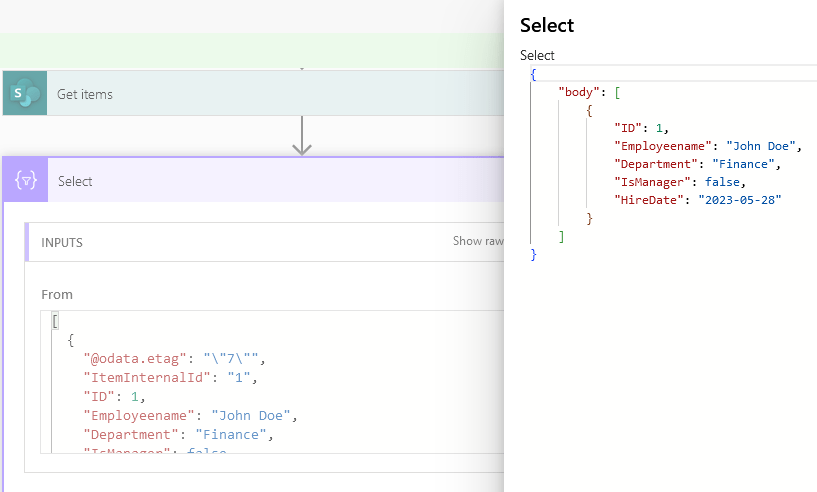
In Power Automate, we can return all List records as an array of objects by using the “Get items” action. However, if we want to return only the employee with an ID equal to 2, we can use the ODATA query ID eq 2:

The filter query follows a syntax of [column_name] [condition] [value]. Let’s analyze each of these elements in the query from the image above:
- ID: This is the column name that we want to use as a filter.
- eq: This is the condition to apply our filter. “eq” stands for “equal to” so we want to return only the records which that match exactly to the value passed after this condition.
- 2: This is the value to be used by Power Automate when evaluating the condition.
After running this flow, the output is an array of objects containing only one item which matches to the condition (ID equals to 2). For the purposes of this article, we are using the raw outputs from a “Select” action to demonstrate the results from “Get Items” thereby avoiding the metadata returned by SharePoint:

As we will see later in this article, it is also possible to combine more than one condition into the same query.
Conditional operators
In addition to eq operator, you can use several other operators in filter queries. Here is a list of all filter query operator, and their meanings:
- eq: Equal to
- ne: Not equal to
- gt: Greater than (valid for numbers and dates)
- ge: Greater than or equal to (valid for numbers and dates)
- lt: Less than (valid for numbers and dates)
- le: Less than or equal to (valid for numbers and dates)
For example, if we want to return the employees with ID greater than 1, we can use the filter query ID gt 1:

As a result, we will receive all records where the ID is greater than 1:

It is also possible to use the eq (equal to) and ne (not equal to) operators to compare values with data types other than numbers and dates, such as strings or boolean. When using strings, make sure to surround your value with single quotes:

SharePoint returns only the record whose name matches to “Harry Potter”:

ODATA functions
In addition to operators, there are also conditional functions available that can be used to filter data from strings when simple equality or inequality is not sufficient. Here is a list of available functions:
- startswith(): Checks if a string starts with a specified text
- endswith(): Checks if a string ends with a specified text
The query syntax for functions is a little different from the operators. It receives the function name followed by parentheses. Inside the parentheses, you provide the column name first, followed by the value to be tested, separated by a comma. An example of function is startswith(Employeename, ‘John’):

And this is the output:
When working with strings in filter queries, remember to enclose the string values in single quotes, like we did for ‘John’, but not the column names themselves.
Filtering dates
It is also possible to apply operators to filter records based on dates. To achieve this, you can write the date in a yyy-MM-dd format (check this article to learn more about the date formats in Power Automate) and surrounding it with single quotes in the filter query. For example, you can return all records that are different from May 28, 2023, by using the filter query HireDate ne ‘2023-05-28’:

As a result, all records but the 1st will be returned:

It is also possible to use the gt, ge, lt and le operators for dates. For example, using the filter query HireDate gt ‘2022-01-01’ will return all records which HireDate is later than January 1st, 2022:

This is the output:

Filtering with logical operators
In some scenarios, we need to combine more than one condition into the same filter query. To achieve this, we can use the and and or logical operators, placing them between the two conditions:

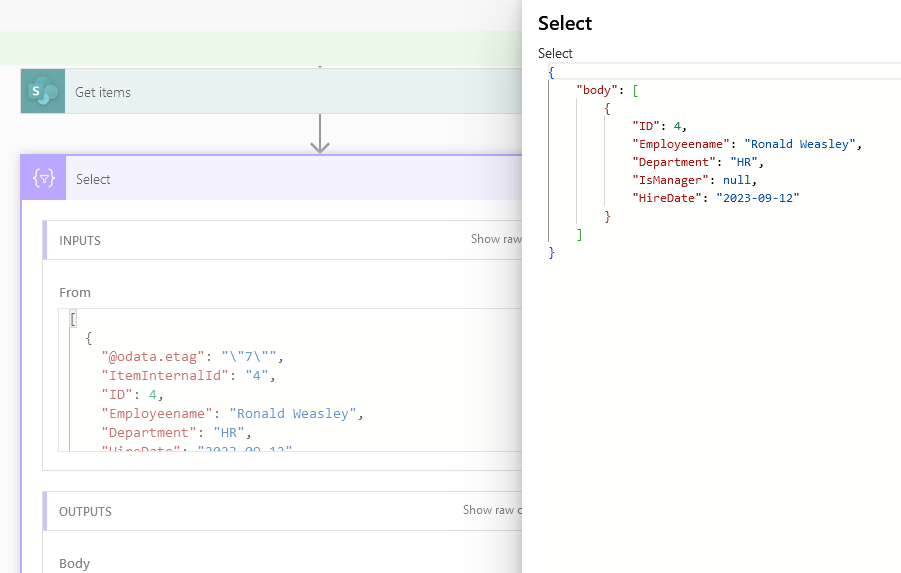
In the example below, we have two conditions: one where the department is HR (highlighted in yellow) and another where the name starts with “Ronald” (highlighted in blue). These conditions are combined using the and logical operator (highlighted in green). This filter query will limit the results to employees from the HR department whose names start with “Ronald”. This is the output:
You can also combine more than two conditions into the same query and work with sub-conditions. You can use as many and or or operators as you wish to combine multiple conditions. Additionally, you can create sub-conditions by encapsulating them within parentheses:

In the example above, SharePoint will return all users who are managers (first condition, highlighted in green) or those who both were hired after January 1st 2022 and are allocated in the HR department (second condition, highlighted in yellow). After running the flow, this is the output:

Conclusion
Filter queries in Power Automate provide powerful capabilities to retrieve specific data from various connectors like SharePoint, Excel, SQL Server, and others. By leveraging the operators and functions, users can efficiently filter and manipulate data directly at the data source.
This approach not only enhances performance by reducing unnecessary data retrieval but also enables complex filtering logic through nested conditions. Understanding and mastering these filter query capabilities empower users to build more effective workflows, ensuring they extract and process precisely the data they need from diverse datasets.
