Counting business days is essential for automating workflows and ensuring timely business operations. While Power Automate enables businesses to create automated workflows between various apps and services, it lacks a built-in action or expression to count business days between two dates.
In this article, you will learn how to count business days in Power Automate by combining actions and expressions, without the need of premium connectors. If you need instructions on calculating the total number of days between two dates in total days (not just the business ones), refer to this article.
Date format in Power Automate
Unlike Power BI or Dataverse, Power Automate doesn’t have a specific data type for date and time. Instead, all date/time values are represented by timestamps, which are strings that follow a specific syntax and can be formatted according to the user requirements.
Additionally, Power Automate offers various expressions to manipulate date/time, enabling the users to calculate date differences, determine future or past dates, count hours and more. To learn more about how to work with these date and time expressions in Power Automate, refer to this article.
Use case overview
For the purposes of this article, we will work with a simple flow without any external connections, where the number of business days will be calculated between two dates. Since different organizations have different strategies for counting business days, you will learn how to build a flow that counts business days by either including the first and excluding the last, or excluding the first but including the last.
The start date and the end date will be stored in individual string variables formatted as “year-month-day” (yyyy-MM-dd):

We are using May 10th 2024 as start date and May 25th 2024 as the end date. The flow should identify a difference of 15 total days or 10 business days between these variables. You can select any dates you wish, but make sure that the “final_date” variable is set to a later day than the “start_date”, otherwise the counting will not work.
Step 1: Getting quantity of days between two dates in Power Automate
Let’s start by capturing the total number of days between the two dates. Create a new variable of integer data type and add the expression int(split(dateDifference(variables(‘start_date’), variables(‘final_date’)), ‘.’)[0]):

To comprehend an expression, we should begin from the innermost function before moving to the external ones. Let’s understand the meaning of each of its components:
- dateDifference(variables(‘start_date’), variables(‘final_date’)): The dateDifference() function takes start_date and final_date as arguments and computes a timespan, represented as a string, that indicates the duration between the two dates. In our context, we provide the values stored in the variables start_date and final_date as inputs to this function. An example of a timespan string could be “15.03:00:00”, where 15 represents the quantity of days, 03 the number of hours, and the zeroes the amount of minutes and seconds.
- split(dateDifference(variables(‘start_date’), variables(‘final_date’)), ‘.’): The split function convers a string into an array by dividing it at specified separators. The first argument is the string to be divided, which in our case is the timespan. The second argument is the separator, which in our case is a dot. After the split function, as we used a dot as separator, the quantity of days is isolated in the first array element, while the amount of time is isolated in the second array element.
- split(dateDifference(variables(‘start_date’), variables(‘final_date’)), ‘.’)[0]: After applying the split() function, we use the “[0]” to access the first element of the resulting array. This element contains the quantity of days between the two dates in string format.
- int(split(dateDifference(variables(‘start_date’), variables(‘final_date’)), ‘.’)[0]): Finally, we just need to convert the string representing the quantity of days between the two dates into an integer data type, which can be achieved by using the int() function.
You can find a more detailed explanation of the steps to calculate the quantity of days between two dates in this article. It also includes examples of outputs from each of these functions to illustrate their usage.
For our use case, after running this expression with the start and the final dates, we will obtain the following result:

Since we are using May 10th 2024 as start date and May 25th 2024 as the end date, the correct total number of days is 15.
Step 2: Generating a calendar array in Power Automate
Now it’s time to generate an array containing all days between the start and the end dates. In a later step, we will use this array to identify which of these days are weekdays. To achieve this, we will use a “Select” action, which allows users to modify an array’s items with expressions. Insert a “Select” action, adding the expression to the “From” input range(0, variables(‘days_difference’)):
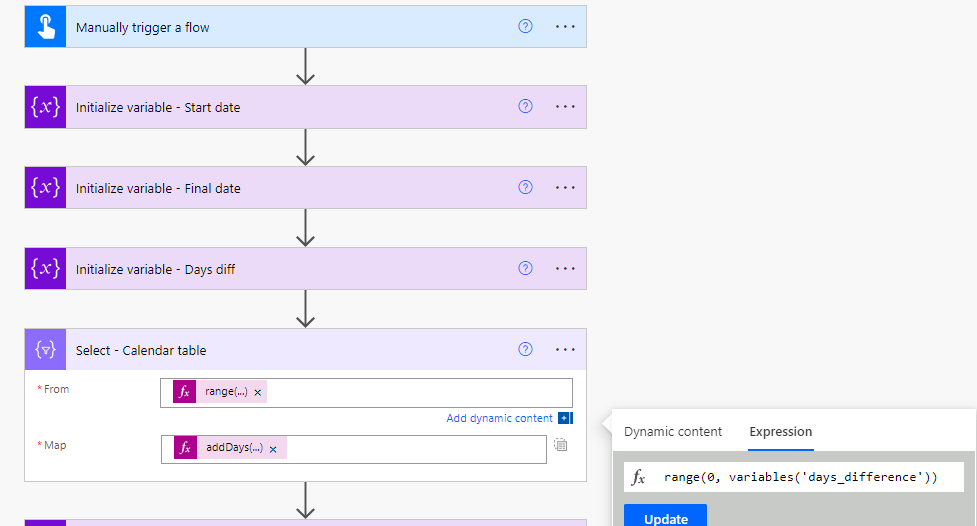
In this expression, we are using the range() formula to generate an array of numbers. This array will start at zero (first parameter) and ends at the total number of days between the two dates (second parameter). Later in this section, you will see an example of what this array looks like.
From this array, we will generate the list of dates by applying an expression to each of the numbers. To do this, click on the “Switch Map to text mode” button (highlighted in yellow):
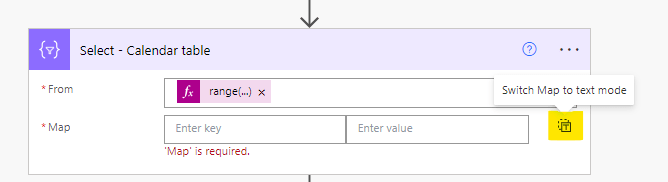
The two input fields will become a single one, where you must enter the expression addDays(variables(‘start_date’), item(), ‘yyyy-MM-dd’):
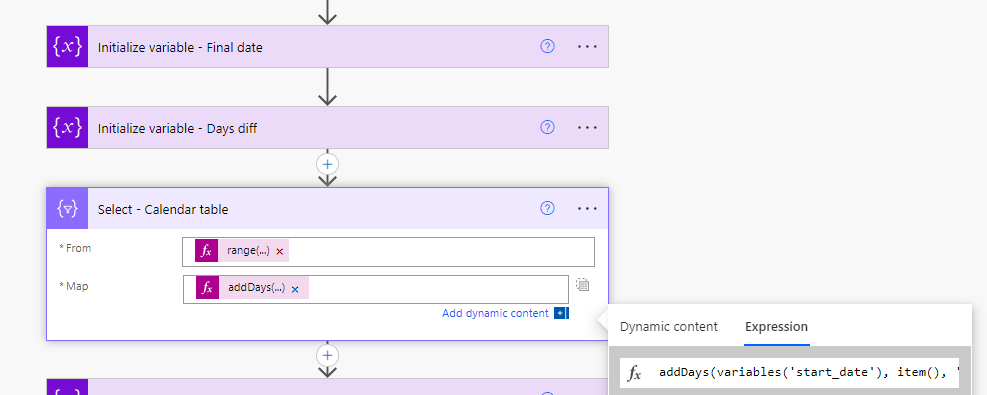
This is what the expression does:
- addDays() – method to return a date in the future or in the past. The method accepts two mandatory parameters, which are the base date for calculation and the number of days to be added or subtracted (it supports negative numbers). Additionally, it can accept a third optional parameter to specify the output format of the date.
- variables(‘start_date’) – first parameter of addDays() method, representing the variable “start_date”. This is the base date used for the calculation.
- item() – second parameter of the addDays() method, representing each of the values present in the array from the “From” input. In our case, this array contains numbers ranging from zero to the value of the “days_difference” variable.
- ‘yyyy-MM-dd’ –third parameter of the addDays() method, representing the desired format for the output of each date, which in this case will be “year-month-day”.
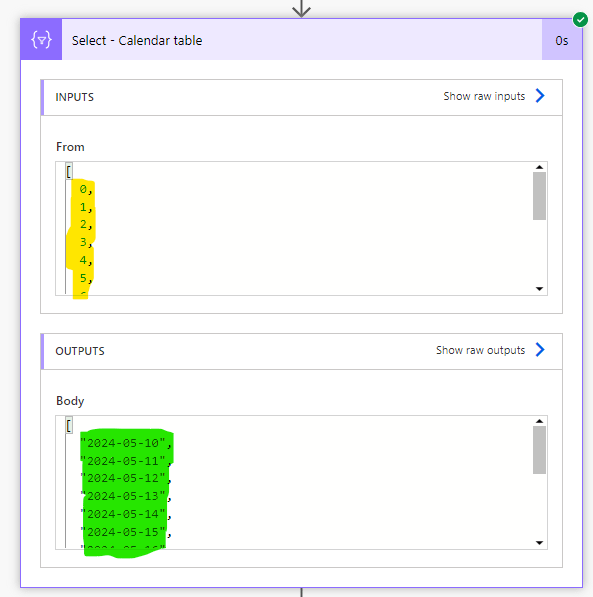
After running the flow, this is how the “Select” action looks: an array of numbers from 0 to 14 will be used as “From” input (highlighted in yellow), and as output we will have a list of dates in a “yyyy-MM-dd” format, starting from the date stored in the “start_date” variable (highlighted in green).
Step 3: Filtering business days only in Power Automate
After generating an array containing all days between start and final dates, we need to filter out all weekends. To do this, insert a “Filter array” action and use the dynamic content from output of the “Select” action as the parameter for “From” (highlighted in green):

The “Filter array” action receives an array as input and applies a condition to its items. Its output is another array containing only the items that match the condition. For our use case, we can identify the day of the week from a date using the dayOfWeek() method, which returns a number from 0 to 6 representing each day of a week. To filter out weekends, use the following expression in the left side input of the filter condition and(not(equals(dayOfWeek(item()), 0)), not(equals(dayOfWeek(item()), 6))), keep the dropdown as “is equal to” and set true in the right side input:
This expression is combining two conditions using the not and equals methods: not(equals(dayOfWeek(item()), 0)) and not(equals(dayOfWeek(item()), 6)). These conditions evaluate each date in the array to ensure it is neither a Saturday (dayOfWeek equals to 6) nor a Sunday (dayOfWeek equals to 0).
After running the flow, the outcome of the “Filter array” action will be an array of dates that excludes Saturdays and Sundays. You will notice the weekend dates highlighted in yellow in the input, which are not included in the output:
Step 4: Returning the business days count
Now that we have an array containing all business days between the variables “start_date” and “finish_date”, the last step is to count these days. We can achieve this by using the length() expression and passing the dynamic content from the output of the “Filter array” action as parameter:

We are assigning this value to a variable called “business_days_qty” and the full expression is length(body(‘Filter_array_-_Business_days’)).
After running the flow, this is the final output: 11 business days have passed between May 10th and May 25th, including the start day and excluding the final one from the counting:

Extra: excluding the day of start and including the end date in the counting
Business day counting methods can vary depending on the context. To ensure that the counting excludes the start day and includes the finish day, simply update the expression in the “Map” input of the “Select” action to addDays(addDays(variables(‘start_date’), 1), item(), ‘yyyy-MM-dd’):
This expression is adding one day to the start date in the calendar array, which will ensure that the “start_date” variable is excluded from the counting, while the “finish_date” is included. After running the flow with the same inputs, this is the final business day count:

The change in the method to count business days resulted in a different outcome, as now we are excluding the start date (which is a Friday) and including the end date (which is a Saturday).
Conclusion
In summary, counting business days in Power Automate is very helpful for automating workflows in certain scenarios. While Power Automate lacks built-in capabilities for directly counting business days, expressions and actions can achieve accurate results.
By understanding how to manipulate dates, users can streamline processes and ensure timely operations in various organizational contexts. This approach not only enhances workflow automation but also improves overall business productivity by focusing on critical operational timelines.
