Power Automate is a great tool for streamline workflows. To adapt to the types and complexity of the different processes across the organizations, Power Automate offers a set of flow types. In this article, we investigate how to integrate these flows into several types of processes, so you will be able to identify the best one to use in your company’s workflows.
What is Power Automate?
Power Automate is a cloud-based service by Microsoft that allows users to automate workflows and tasks across various applications and services without the need for software development skills. Users that don’t have a solid IT background will now be able to streamline entire organization’s processes, ensuring that the digital transformation becomes much more accessible to non professional developers.
With over a thousand connectors, Power Automate facilitates the integration across different services (from either Microsoft and third-part providers) and perform tasks in different systems.
Types of Flows available in Power Automate
Power Automate is operated by flows. A flow is a sequence of automated actions that define how tasks and processes should be executed across different applications and services. Every flow starts with a trigger, which is an event (manual or automated) defined by the user to run all of the subsequent steps.
The flow type is based on the trigger, and there are four types: instant cloud flows, scheduled cloud flows, automated cloud flows or desktop flows.
- Instant cloud flows are manually initiated by users, typically through actions like clicking a button. These flows are triggered at the user’s discretion and are not linked to predetermined automated events. Some examples of triggers for instant cloud flows are a button click in Power Apps or Power BI, a message selected on Teams, an API call, and many others.
- Scheduled cloud flows operate on a specific recurrence set by the flow’s creator, allowing for customization of the flow’s frequency. The creator can configure the flow to run at intervals such as every second, minute, hour, day, week, or month, providing flexibility in scheduling automated tasks.
- Automated cloud flows are called by a specific and predetermined event from the available connectors. It is probably the most powerful capacity from Power Automate, as it allows you to start flows from a very large quantity of events related both to Microsoft and Third part products, like when a new row added to Excel, a file is modified in SharePoint, a new email is received, a new task is created, and so on.
- Desktop flows are manually called from Power Automate Desktop and it will not allow you to execute cloud actions. By the other hand, Desktop flows contain a different set of available actions to compose your workflow, most of them related to local machine capabilities.
In Power Automate, once you select the “Create” option in the side menu (highlighted in yellow), you will be able to select the preferred type for developing your flow. Additionally, you can select an available template flow, which will provide you with a prebuilt design structure:

Triggers and actions in Power Automate
In Power Automate, triggers and actions are the flow components, and they work together to automate workflows efficiently. Triggers are the starting point for any Power Automate flow. A trigger can be a button click, an email arriving, the creation of a new file, the modification of data in a specified application, and many others.
On the other hand, actions are all subsequent steps in the automation process. Once a trigger initiates the flow, actions define what specific tasks or operations the automation should perform. Actions can include creating, updating, or deleting records in a database, sending emails, posting messages to Teams, or interacting with various applications and services.
In the image below, the trigger is highlighted in green (in this case, the flow is launched by a Microsoft Form submission) and the actions in blue. When clicking in an action, a details pane will extend, allowing you to fill its inputs with the dynamic content from the previous steps, as highlighted in yellow (check this article for more details about the dynamic contents in Power Automate):

Each flow action contributes to the overall sequence of tasks, transforming the workflow from a simple initiation point into a comprehensive and dynamic process that achieves specific business objectives. Actions provide the operational functionality that brings value to the automated workflow and allows the user to leverage the more than a thousand available connectors in Power Platform.
Automated cloud flows
In Power Automate, you can launch a process automatically from a predefined event, eliminating the need for manual intervention. A flow typically begins with a trigger, such as the creation of a new item in a database, an email arrival, or a form submission.
To create an automated flow, navigate to “Create” option in the side menu (highlighted in yellow) and then choose the “Automated cloud flow” option (highlighted in green):

It will display a modal containing a list of available automated triggers from both Microsoft and Third Part Providers:

Once you select the desired trigger, you will eventually need to set up a new connection, especially when the event must occur in a third part system. To do it, simply click in “Change connection” (highlighted in yellow) and proceed to authenticate with your credentials:
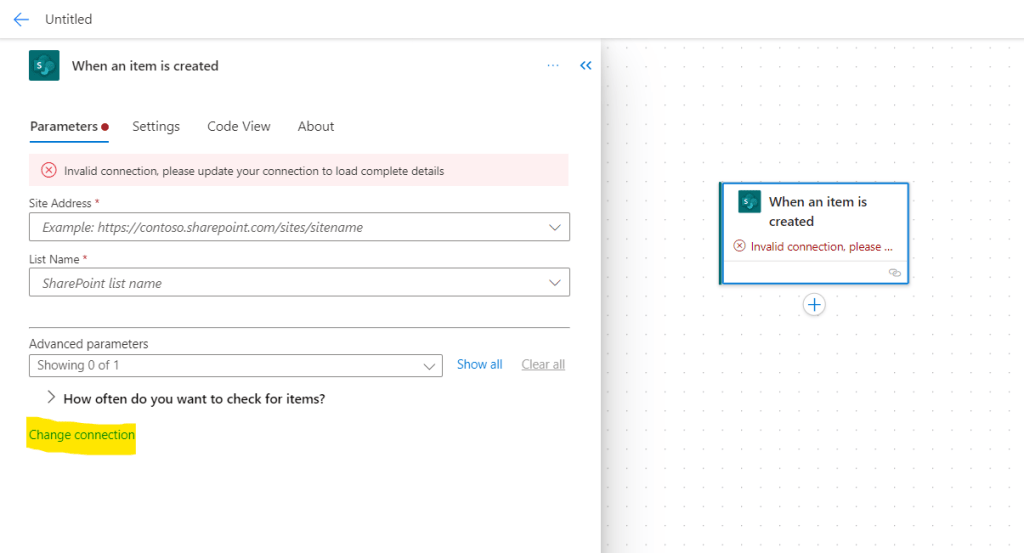
Certain triggers may require specific parameters, which can vary according to the monitored event. In the example provided below, as we are monitoring the new item creation event in a SharePoint List, monitoring the creation of a new item in a SharePoint List requires specifying the SharePoint Site and List name. In both cases, Power Automate simplifies this process by offering a dropdown menu with some of the available values:

Automated flows enhance efficiency by minimizing manual effort, ensuring consistency, and enabling a smooth execution of repetitive tasks across different platforms and systems.
Instant cloud flows
Instant cloud flows are initiated in response to a user’s request, triggered by actions such as a button click in a Power App, interaction within a Power BI Dashboard, an API request, or even manual execution directly from the Power Automate environment:

Depending on the chosen manual trigger type, you can configure input fields in the flow editor, enabling interaction with data throughout the flow actions. You can even predefine the data types for these inputs, preventing any errors during the data enter process:

After add the input fields in the flow editor, it will be displayed once the user runs the flow:

Instant cloud flows offer notable power by providing users with control over the flow run: sometimes, we want to restrict the access to the workflow triggering, like when we have a Power BI dashboard from where some specific users can issue a customized CSV report by clicking in a button.
Scheduled cloud flows
As the name suggests, the scheduled cloud flows are triggered in a predetermined recurrency: you can setup the flow to run every month, every week, every hour, or even every second:

When working with a weekly recurrency, there is an option to select the specific days of the week when the flow should run, which can be very helpful for configuring recurring notifications or addressing report-related issues systematically:

Desktop flows
Finally, the desktop flows are typically triggered directly through a button click in Power Automate for Desktop. The desktop flows have different actions, which are related to local stored applications and Robotic Process Automation (RPA):

Running a desktop flow from the cloud as a sub procedure is possible, and it allows triggers from manual, scheduled, or automated sources. However, it comes with licensing restrictions, as it is not included by default in Microsoft 365 Enterprise subscriptions and entails certain limitations for the Power Automate Premium license.
The Power Automate Desktop User Interface is very different from the Cloud, but the available features are pretty much the same. The main distinction is the lack of a trigger configuration in a Desktop Flow, as it is manually triggered by default (or, if your license permits the calling from an of an automated, manual or schedule trigger, any settings will be modified directly in the cloud).
As you can see below, there are a lot of different actions in the Power Automate Desktop, like the capability to manipulate UI elements through mouse clicks or keyboard inputs, execute scripts, interact with local files, and engage with Windows functionalities:

Power Automate Desktop is a great tool, particularly beneficial for streamlining processes on local machines. Even if your current license doesn’t include the connection between Power Automate Cloud and Desktop, experimenting with this tool can be advantageous for automating parts of processes and creating one-click solutions.
Conclusion
Different problems require different solutions, and the variety of flows available in Power Automate make this tool extremely helpful to streamline processes in general. Whether you seek more or less control over the events initiating an automated workflow, Power Automate serves as a versatile automation solution, offering the required level of interaction.
