
Many companies use Excel files to store data about orders, requests for quotations, trainings and much more. For example, some companies track product or service orders in an Excel spreadsheet which will contains columns for the customer’s name or code, requested item, price, delivery date, delivery status, delivery address, and so on.
Power Automate can be very helpful when automating the process of notifications related to these records. Let’s imagine that a company wants to send an order status update by email to its customers in a weekly basis: it can be easily achieved with less than actions in a Power Automate flow.
However, sometimes we need to concentrate several records into a single email, like when we have multiple orders related to the same customer. Power Automate still can help with this task, but the flow design to achieve it will be a little more complex. In this article, you will learn how to send notifications that contain lots of Excel information all in one message using Power Automate.
Case Overview
For this article’s purposes, let’s assume that we’re a company that offers online trainings courses. Whenever a student registers for one of the online trainings, a new entry is created in the “students_courses” table (below). Each record in this table keeps track of the student’s email address, the specific training they’ve chosen, and the month when that training is scheduled to take place. A single student can register for as many training sessions as they want:
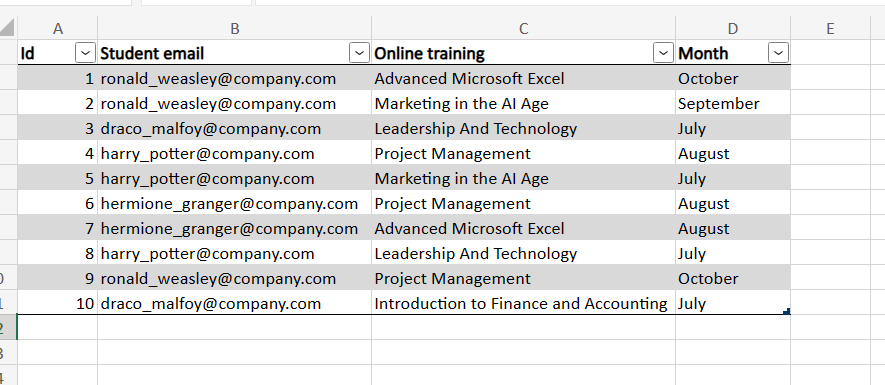
Our objective is to send email notifications to all students, containing a list of the registered online training sessions they’ve singed up and respective months when each training will be held. As we don’t want to flood our students’ inboxes, we need to send only one email per student, consolidating all enrolled trainings in the message.
To integrate Power Automate and Excel, it is important to format your data as table. It allows the flow to have an easier and faster access to the records.
First steps: pulling data from Excel with Power Automate
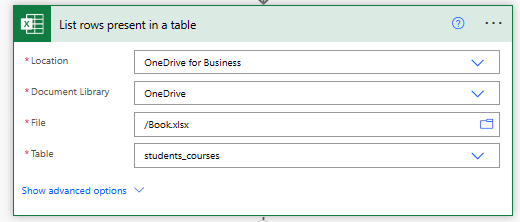
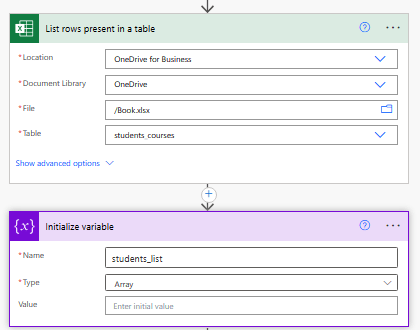
To get started, let’s retrieve the table data from Excel to Power Automate with ‘List rows present in a table’ action (for detailed instructions about how to read data from Excel, check this article):
Next, we’ll set up an array variable to hold our list of student email addresses. This variable will ensure that we only record unique email addresses, preventing our flow from sending duplicate emails to the same student:
For more details about how to work with variables, like arrays and objects, check this article.
Capturing all email addresses from table with Power Automate
Now it’s time to loop all Excel table records to capture the unique student email addresses. In simple terms, the flow will examine each row one by one and check if the student’s email address is already present in the ‘student_list’ variable. If it’s not found, the flow will then add that email address to the array. This way, we ensure that we’re only collecting distinct student email addresses.
To achieve it, start by adding an ‘Apply to each’ loop and use the ‘value’ dynamic content from ‘List rows present in a table’ as input (highlighted in yellow):

Within the ‘Apply to each’ block, add a ‘Condition’ and set the ‘student_list’ variable at the left side, change the dropdown to ‘does not contain’ (highlighted in yellow) and place the ‘Student email’ dynamic content from ‘List rows present in a table’ on the right side of the condition statement:
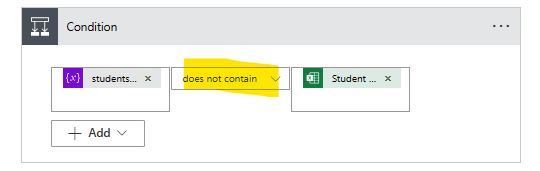
This condition verifies if the student email is already included in our array variable. Since we want to avoid sending multiple emails to the same student (which would occur if their email is duplicated), the flow will add the student’s email to the array variable only if it hasn’t already been included.
To make sure that we will include only new unique emails to the array variable, we place an ‘Append to array variable’ action inside the ‘If yes’ block of the ‘Condition’ (highlighted in yellow). The ‘If no’ block will stay empty, since no action will be taken if the email is already in the array. The ‘Append to array variable’ will receive the student email dynamic content as ‘Value’ (highlighted in blue):

This is enough for this first loop. To learn more about loops and array iterations with Power Automate, check this blog post.
Relating online courses to each student
Now it’s time to include a second ‘Apply to each’ loop (highlighted in yellow), immediately after and outside of the first one. This new loop will take the ‘students_list’ variable as input (highlighted in green), which at this point is already populated with all students email addresses:

Within the ‘Apply to each’ block, add a ‘Filter array’ action, using the ‘value’ dynamic content from ‘List rows present in a table’ action (highlighted in blue), and setting:
- For the left side, the student email dynamic content from ‘List rows present in a table’ action
- For the center, make sure that the dropdown is set to ‘is equal to’ (highlighted in green)
- For the right, the ‘Current item’ dynamic content, from the ‘Apply to each 2’ action.

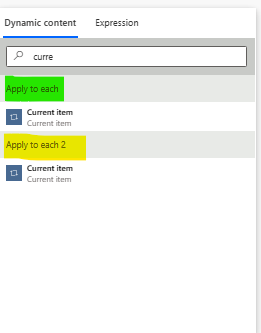
When selecting the dynamic content, if you search for ‘Current’, two options will be displayed: one related to the action ‘Apply to each’ (highlighted in green) and another to the action ‘Apply to each 2’ (highlighted in yellow). It happens because we have more than one loop action in our flow, so you need to be careful in selecting the correct one. As we want to use the ‘students_list’ item in the filter, we need to use the ‘Apply to each 2’ value (the yellow one).
Preparing the table with Power Automate
After the filter, we can start to build the table, capturing the relevant columns for the table that will be included in our email body. To do this, we will use the ‘Create HTML table’ action, which enables us to extract specific columns from an Excel table. In our case, we want to capture the ‘Online training’ and ‘Month’ columns to build our table.
Inside the loop block, add the ‘Create HTML table’ action and set the ‘Body’ dynamic content from ‘Filter array’ action at the ‘From’ input (highlighted in green). Then, set the column dropdown to ‘custom’ (highlighted in pink). It will display two columns, where in the left one you insert the display name of the columns that you want to generate (highlighted in yellow), and in the right side you set the values that will populate this new table (highlighted in blue).

In our specific case, the values in the right column of the ‘Create HTML table’ action will be populated with the respective columns from the filtered Excel table. To do this, you can simply use the item() expression, which accesses the records from the table specified in the ‘From’ input (in our case, it’s the ‘Body’ from the ‘Filter array’ action). This allows you to dynamically capture the data from each filtered record and populate it in the table.
Also, since item() expression returns the entire record (and not the individual column itself), it’s necessary to pass the column name between brackets. The final text for our expression to access the ‘Online training’ will be: item()[‘Online training’] (highlighted in yellow):

For the ‘Month’ column, the expression will follow a similar logic, but just changing the value between the brackets: item()[Month’].
If you don’t know how to work with expressions, there is a section in this blog post dedicated to it.
Using Power Automate to send emails
Now that the table is ready, we just need to prepare the email template and send it for each student. Within the loop block, proceed by adding a ‘Send email (V2)’ action. Configure it as follows:
- For the ‘To’ input, use the ‘Current item’ dynamic content from your ‘Apply to each’ loop (highlighted in yellow). Again, ensure that you select the dynamic content from the correct loop.
- Populate the ‘Subject’ and ‘Body’ fields as needed, and feel free to include dynamic content in these fields.
In the ‘Body’ section, insert the dynamic content from the outputs of your ‘Create HTML table’ action (highlighted in green). This will insert a table into the email body, containing only the online training details and respective months for the specific student receiving the email.

Flow result
After running the flow, Outlook will automatically send one email to each of the students, using the template you’ve created:

Each email will contain a personalized table listing the online training details and respective months for the specific student.

By default, the table generated in Power Automate may lack styling. However, Power Automate does provide the option to add formatting to the table using CSS, which requires some programming knowledge.
Conclusion
Finally, Power Automate can help you in automating repetitive processes, such as sending personalized email notifications to a multitude of students with diverse training registrations. By following the steps above, you will be able to develop a clear Power Automate flow to extract, filter, and format data from Excel tables, generating email messages for each recipient with their individual data.
