
Many companies routinely work with Excel files as part of their processes. Power Automate offers convenient actions for both reading and writing data to Excel tables. However, it’s important to note that Excel files not always will have data organized within tables. There are scenarios when vital information is dispersed across various cells throughout the spreadsheets.
To access these ranges, the solution is to use the Office Scripts. This functionality is similar to VBA, but based in JavaScript and accessible for Excel on Web. This article will guide you through the process to extract values from Excel ranges stored outside of tables with Power Automate, by using Office Scripts.
For real-world Office Scripts examples, you can also explore the templates available in the Office Scripts Gallery.
Use case: Excel File overview
For this blog post, let’s work with the spreadsheet below:

The assumptions and conclusions that we can extract from the image are:
- This is an “Work Order Summary” template that stores some details about a work to be executed
- All data is stored into ‘Sheet1’
- All cells with bold values are part of the template, so their value will be the same for all cases and they don’t need to be extracted in the Power Automate flow
- The cells D5, D6, D7 and D8 are filled by the user, and this is what we want to extract
Our goal here is to extract the data from range ‘D5:D8’ and populate a Teams message.
Office Scripts Code in Excel
The first step is to create an Office Script. If you don’t know how to create an Office Script in Excel, check the instructions form this article.
To begin, let’s create a variable to hold the ‘Sheet1’ worksheet object. While there might be just one worksheet in the file, this is a good practice as precaution against potential errors in case of someone creates an additional sheet by mistake. Inside the function main, insert the following code:
const ws = workbook.getWorksheet('Sheet1')
We are accessing the workbook (which is a built-in element from Office Scripts in Excel) and using the method getWorksheet(). This method requires only one parameter: the name or id of the worksheet that you want to access (in our case, we are using its name).
Then we will create four other variables to store the work order number, the service type, the team and the job site:
    const workOrder = ws.getRange('D5').getValue()
    const serviceType = ws.getRange('D6').getValue()
    const team = ws.getRange('D7').getValue()
    const jobSite = ws.getRange('D8').getValue()
The methods assigned to each of the four variables have the same structure, differing solely in the parameter provided to getRange(). This method requires the range address that you want to access as a single parameter (D5, D6….). As the method is being called from the ‘ws’ variable, representing the Sheet1 worksheet object, it guarantees access to this specific sheet. This becomes particularly significant if there were multiple worksheets at play.
By using the getRange() method, we access the range object, which will contain several properties/methods related to that specific cell (or range of cells), including its formatting, value, formula, link and so on. To extract the value contained within, we need to use the getValue() method, which does not require any parameter.
Finally, it is a good practice to store all these variables into a single object before send it to Power Automate. It can be achieved with this code:
const workOrderDetails = { work_order: workOrder, service_type: serviceType, team: team, job_site: jobSite } return workOrderDetails
Save your script. The final code may look like this:
function main(workbook: ExcelScript.Workbook) { const ws = workbook.getWorksheet('Sheet1') const workOrder = ws.getRange('D5').getValue() const serviceType = ws.getRange('D6').getValue() const team = ws.getRange('D7').getValue() const jobSite = ws.getRange('D8').getValue() const workOrderDetails = { work_order: workOrder, service_type: serviceType, team: team, job_site: jobSite } return workOrderDetails }
Running Office Scripts from Power Automate
Within Power Automate, select the ‘Run script’ action, from Excel connector, and populate it with the data about your work order summary file. In the ‘Script’ dropdown, select the script that you just created:

By running the flow with this single action, you will notice that its outputs already return all the data from the Excel file This data is systematically organized within the ‘result’ object (highlighted in yellow), subproperty of the ‘body’ outputs (highlighted in green):

It is important to understand this structure, because these values will need to be accessed via expressions. As Power Automate cannot easily identify the properties that will be returned by the Office Script from Excel, it usually doesn’t generate the dynamic values from this action, as you soon will see.
Accessing Office Scripts outputs with expressions
As we want to post this results in a Teams chat, let’s add a ‘Post message in a chat or channel’ action, from Microsoft Teams connector. Set ‘Flow bot’ as ‘Post as’ and ‘Chat with Flow bot’ as ‘Post in’. Select the recipient and start to write your message template:

If we try to include the work order number pulled from Excel in the message body as dynamic content, we may notice that Power Automate does not provide any dynamic output from the ‘Run script’ action:

However, due to the organized structure used in the Script, accessing these values will be easy. To retrieve the work order number, use the following expression (If you don’t know how to work with expressions, refer to this article):

Let’s understand what is happening with this expression: body(‘Run_script’)[‘result’][‘work_order’]
- body(‘Run_script’): is an expression to access the ‘body’ property from the output of an action. In our case, as the action is called ‘Run script’, we passed ‘Run_script’ as parameter. If your action has a different name, you may need to change the parameter name.
- [‘result’]: as mentioned before, there is a ‘result’ property inside the output ‘body’. As ‘body’ has an object data type, we can access ‘result’ by just passing its name into brackets.
- [‘work_order’]: the same logic applied to ‘result’ is repeated here. As ‘work_order’ is a property found inside the object ‘result’, we can access it by passing its name inside brackets. For the other property pulled from Excel, we will just change this last part of the expression, setting ‘service_type’, ‘team’ and ‘job_site’.
Now just repeat the same process for all other dynamic values (job type, team and job site):
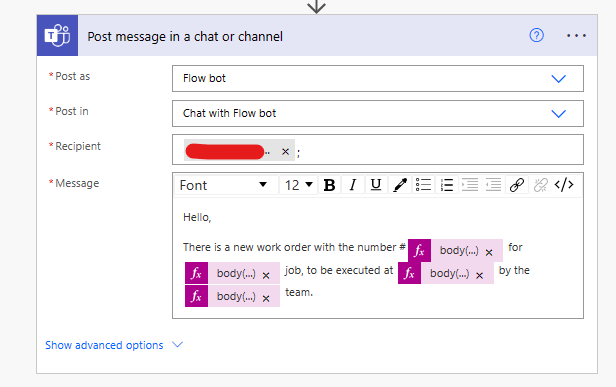
The expressions will look like this: body(‘Run_script’)[‘result’][service_type’], body(‘Run_script’)[‘result’][‘work_team’] and body(‘Run_script’)[‘result’][‘job_site’]
After run the flow, you will receive a Teams message with the template above, with the dynamic fields populated from the data pulled from Excel:

Conclusion
Access Excel cells allocated out of a table requires much more work than to access table records. While it’s advisable to structure records within a table when integrating Excel and Power Automate, there are instances where business requirements might prevent such organization. You now know how to handle these cases, returning data from Excel to Power Automate in any scenario!
