
A lot of users have trouble when working with Dates in Microsoft Excel. The system dates are often stored as serial numbers, where each date is assigned to a unique number following a sequence. For example, the serial ‘1’ matches to January 1st 1900, while the serial ‘43982’ matches to May 31st 2020.
When integrating Excel with Power Automate, it becomes a problem, as for any other connectors and actions (including the writing actions to Excel itself) the dates need to be provided as a text in the ISO 8601 format. In this article, you will learn how to configure Excel actions in Power Automate to return dates in the correct format.
Returning dates from Excel table to Power Automate
Let’s assume that we need to extract the data from this Excel table and insert it into a HTML table in Power Automate:

We have a date column following the format ‘MM/dd/yyyy’, and we expect to display the same format into the HTML table.
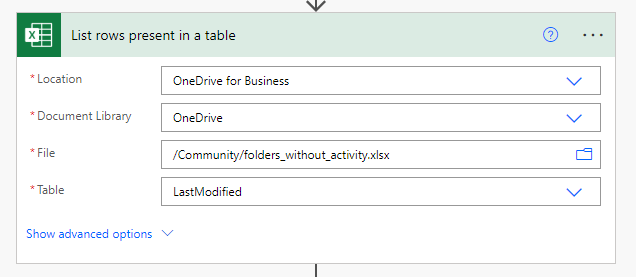
The first step to achieve it is to add a ‘List rows present in a table’ action, which will return all records from our table (if you want to learn more about how to extract data from Excel with Power Automate, refer to this article). Populate the action inputs with the details about the file and table.
The next action will be a ‘Create HTML table’, that will receive the ‘value’ dynamic content from ‘List rows present in a table’ in the ‘From’ input (highlighted in pink). For the columns, change it to ‘Custom’, which will open some new input fields to you select the columns that must be included in your table. In the left inputs (‘Header’), insert the names of the columns (Folder and LastModified, as highlighted in yellow) and in the right inputs (‘Value’) insert the dynamic content from ‘Folder’ and ‘Last modified’ columns (highlighted in blue):

If we chose by the ‘Automatic’ column format, it would generate some additional system columns that are not necessary for our use case (like item internal ID, for example).
After run the flow, a HTML table is generated, but the ‘Last modified’ column presents the values as the Excel serial number. In Power Automate, however, we cannot just format these values in order to transform them in something meaningful.

Converting Excel dates to ISO 8601 format in Power Automate
The good news is that the Excel reading actions in Power Automate have an option to output the dates in the ISO format. To find it, click in ‘Show advanced options’ (highlighted in yellow):

It will expand the input fields for this action, and one of the available options is the ‘DateTime Format’ (highlighted in green). Select ISO 8601 from the dropdown:

The result is much better, but it is not matching to our desired format (‘MM/dd/yyyy’):

Formatting dates pulled from Excel in Power Automate
To format the output from Excel ‘LastModified’ column, we will need to use the formatDateTime() expression (if you don’t know how to work with expressions, check this article). This expression receives two arguments: the date to be formatted and the format to be observed. In our case, we set the dynamic content from ‘LastModified’ column as date to be formatted and ‘MM/dd/yyyy’ as format:

The full expression is formatDateTime(item()[‘Last modified’], ‘MM/dd/yyyy’), where:
- item()[‘Last modified’] is the dynamic content from the ‘Last modified’ column. If you don’t find your column in the dynamic content list, you can manually set it between the brackets in the expression (just replace ‘LastModified’ for your column name)
- ‘MM/dd/yyyy’ is the date format that we chose. There is a large set of options of different formats for date and time (you can check these options here).
After including the formatDateTime() expression, the output finally looks like we expected:

Conclusion
In this article you saw how to properly extract dates from Excel with Power Automate. You can apply this same logic to other tasks that requires handling dates stored in Excel tables.
