
Moving forward with our series about how to work with Excel Tables in Power Automate, we investigate how to return data from Excel Tables into Power Automate. This reading operation can be used for all records from an Excel table, for a specific row or even for a set of rows by applying a filter.
There is also a video about this topic in our YouTube channel:
Other articles from this series
- Integrating Power Automate and Excel Tables
- Inserting and updating data into Excel Tables with Power Automate
Use case: Office List Table
For this post, we will be using the ‘Office_List’ Table, created in the first article of the series. The table contains 5 records (rows) about a company offices locations, in a total of 4 columns: an Id column, the office city, the office country and the quantity of employees at office:

Reading Data from Excel Table in Power Automate
The most commonly used action for reading data from an Excel Table is called ‘List rows in a table.’ This action retrieves all the records from the table and returns them as an array. Each record in the array is represented as an object, with keys that allow you to access the values in each column of a specific row. To process each record in the array individually in Power Automate, you can use a loop to apply a specific task to each element (if you don’t know how loop arrays in Power Automate, check this article).
To use the ‘List rows in a table’ action, you’ll need to provide the location of the Excel file, its path, and select the desired table from a dropdown list:

In the action raw outputs, the array mentioned earlier is called “values” and it is located within the “body” property. This array consists in a set of elements (one per row) with key-value pairs (highlighted below) that correspond to each column in the table. The highlighted keys include Office Id (pink), City (green), Country (blue), and Employees quantity (yellow):

Using data from Excel Table in Power Automate
While we can retrieve data from an Excel Table, simply viewing the raw outputs might not be enough for most scenarios. When creating flows in Power Automate, we often need to integrate these outputs with other actions and make the data useful.
In our case, we have information about company offices, such as city, country, and employee count. To organize this data effectively, let’s create a list (array) called ‘offices’ that will store text descriptions, detailing the characteristics of each office. To start, we need to initialize the array variable (check this article for more details about how to work with variables):

Since the ‘value’ property from our ‘List rows present in a table’ action is an array, we can iterate through it and access each item individually. To achieve this, we’ll utilize the ‘Apply to each’ loop action, where the ‘value’ will serve as the input (highlighted in yellow). Inside the loop, we’ll use the ‘Append to array variable’ action, and enter ‘offices’ as variable to be edited (highlighted in green). Within this action, we’ll populate a template text with dynamic content for the city, country, and employee quantity (highlighted in blue):

For more details on how to work with dynamic contents in Power Automate, refer to this article.
After all loop iterations, we expect to have a list of 5 items. Each item will contain the template text with the respective details of the cities, countries, and employee quantities for each office. To display the final result, we’ll utilize the ‘Compose’ action (highlighted in green) and provide the ‘offices’ variable as the input (highlighted in yellow):

Note 1: The ‘Compose’ action is solely used to display the final value of the ‘offices’ variable. It is not necessary for looping through arrays; we include it here to explicitly show that all texts were successfully added to the array.
Note 2: Ensure that you create the ‘Compose’ action outside of the ‘Apply to each’ block. It should be placed outside of the area marked in red. You can identify the ‘Apply to each’ block by the white background between its title and the ‘Add an action’ button within the red-marked area.
The output will look like this:

As we used a loop and dynamic values relative to each array item, the result will include the corresponding city (highlighted in yellow), country (highlighted in green) and employee quantity (highlighted in blue), for each record from our Excel Table.
Read a specific row from Excel table with Power Automate
If you need to access a specific record from an Excel table instead of retrieving all records, you can achieve this by utilizing the ‘Get a row’ action. This action requires a key column and its corresponding key value:

A key column is one where all values are unique, meaning no duplicates are allowed. In our example, all columns (excluding “employees”) could serve as the key column since they have unique values. However, the ideal candidate for a key column is a variable that remains unique even as the dataset grows. In our example, the ‘Office id’ column fulfills this requirement as it provides a single, non-duplicated value.
When using the ‘Get a row’ action on a column with duplicate values, the flow will only retrieve one of the results. This action is designed to return a single record and cannot provide an array or list of records.
Even if you don’t plan to use a Power Automate action that specifically accesses a particular record, it is still recommended to have a key column in your Excel tables. This practice helps individualize entries and maintain good data organization. In many cases, creating a unique identifier (“Id”) is not necessary. For instance, a table representing invoices can rely on the “Invoice No” as unique values, while a table representing users can utilize the email address as a unique identifier.
Adding a key column to Excel tables records
In situations where tables lack a native column with unique values to serve as keys or reserved for an “id column,” Power Automate offers a helpful solution. The ‘Add a key column to a table’ action allows users to insert a key column into Excel tables.
To utilize this action, simply specify the Excel file and table, and provide a desired name for the key column (highlighted in yellow):

Power Automate automatically assigns the name “Power AppsId” to this column by default, but you have the flexibility to rename it as desired, as long as there is no other column with the exact same name in the table. In our case, we will rename it to ‘Key’.
However, the ‘Add a key column to a table’ action does not automatically populate the column with unique values. It simply inserts a column and leaves it blank. Therefore, the user will need to take additional steps to populate the table with unique values, ensuring that each entry in the key column is distinct:

An additional action would be needed to run all records and populate the key column, which would increase the flow complexity.
Filtering Excel table records with Power Automate
In certain scenarios, we may only require specific records from an Excel table, rather than the entire list of rows. Although it is possible to use Office Scripts to perform this task, Power Automate offers a versatile filtering capability, the Filter Query, and you can find more details about it in this article.
For this article, let’s focus on a simple use case: retrieving all records that contain a specific value in a particular column. For instance, we want to retrieve all records corresponding to offices located in the USA. To accomplish this task, we utilize the ‘List rows present in a table’ action (the same action mentioned earlier in this post) and select “Show advanced options” (highlighted in yellow) to access the necessary filtering options:

Some new input fields will be displayed, and one of them is the ‘Filter Query’. The ‘Filter Query’ in Power Automate utilizes the ODATA notation, following a simple syntax: [property_name] [comparison_operator] [comparison_value].
In our case, the property name is Country, representing the Excel Table column. The comparison operator (equal, not equal, greater than, lower than…) will be eq, which represents equality. The comparison value will be USA. So our final query will be: Country eq ‘USA’ (with quotes, as it is a string value).
Also, to make sure that we will be returning all records containing USA as country, let’s add two other records to our Excel table:
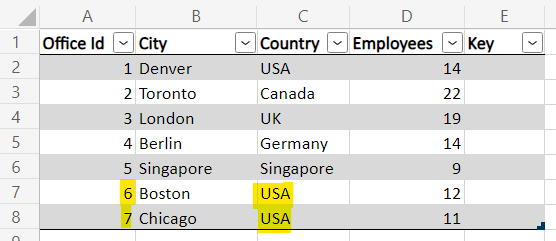
The ‘List rows present in a table’ action will look like this:

The flow will return only those records with country matching to “USA”.

From the advanced options of the ‘List rows present in a table’ action, the user will also be able to sort the records (by selecting which columns must be used in this process and if it is in ascending or descending order), limit the results for a “top N” of records or ignore the “top N” from it (skip), limit the columns that will be returned and define the date format on the values (check this article for more details on how to return formatted dates from Excel).
Conclusion
Power Automate offers Excel users a host of features, enabling seamless integration between spreadsheets and various tools. By utilizing reading actions, Excel tables can serve as relational databases for small projects, with some inherent limitations. This functionality opens up possibilities for populating documents, performing calculations, issuing warnings, and controlling user access based on permissions.
The integration of Power Automate and Excel Tables unlocks a world of productivity potential, where your imagination and creativity can flourish. With this powerful combination, you can streamline processes, automate tasks, and optimize workflows, ultimately enhancing overall efficiency and effectiveness in your technological endeavors.
