
Automation has become an indispensable aspect of modern business, enabling organizations to streamline workflows and maximize productivity. Microsoft Power Automate, a robust platform, offers several opportunities to simplify these processes.
Among its powerful features, the “Condition” action from Power Automate stands out as a game-changer. In this article, we will explore the incredible potential of the “Condition” action in Power Automate, uncovering its functionality and showcasing how it can improve your workflow automation.
Understanding the “Condition” Action in Power Automate
The “Condition” action in Microsoft Power Automate empowers users to create logical expressions within their workflows. It enables you to make decisions and execute different actions based on specific conditions being met. With this action, you can define the path your workflow should follow, depending on the values or outcomes of certain variables or data.
If works in a similar way from the “IF” Formula in Excel, or the “IF” functions from several programming languages: you test a condition and provides two different outputs depending on the result, which can be “true” or “false.
Building a Condition in Power Automate
To create a Condition action, the first step is to add an action by clicking in “New step” in your Power Automate flow:

A new action placeholder will be generated, and then you can search for “Condition”, which is an action from the “Control” connector. If your search do not find any result for the action name, you can use the connector name.

A new action placeholder will be generated, and then you can search for “Condition”, which is an action from the “Control” connector. If your search do not find any result for the action name, you can use the connector name.

Testing a condition in practice
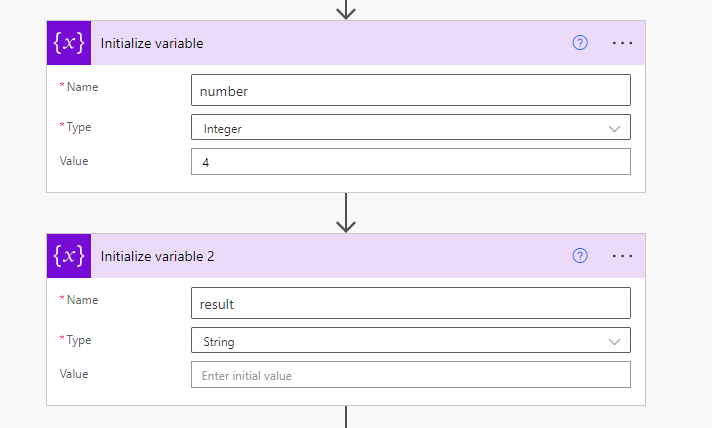
In order to demonstrate how conditions work, we will conduct some tests on a numeric data type variable called “number”. If the condition action is true, the flow will assign the value “passed” to the string variable “result”. Conversely, if the condition is false, the flow will l assign “not passed” to “result” (check this article for more details about the available data types in Power Automate). Let’s start by initializing the variables, setting the initial value of “number” to 4:
Now, within the conditional statement, we can choose from various logical operators available in the dropdown menu. For this example, we’ll use the “is greater than” operator:

Here’s the first test: we want to determine if the value of “number” is greater than 2. In the “Condition” action, you’ll enter the value to be tested on the left side and the condition to be evaluated on the right side, based on the selected operator. Depending on whether the condition is true or false, different actions will be taken. If the condition is true, the “result” variable will be assigned the value “passed”. If the condition is false, the “result” variable will be assigned the value “not passed”.

In this case, since the value of “number” is greater than 2, the “result” variable will be assigned as “passed”. Also, the flow will ignore the branch that is not satisfied by the condition. The flow run history will display a warning indicating that the tasks within that block were skipped.

Multiple conditions in Power Automate
It is also possible to set multiple conditions in the same action by clicking in “Add” button and “Add row”. After adding a new field, you must specify if you want the conditions to be both satisfied to the output be true (selecting “And”), or if you want that only one condition filling is enough (selecting “or”).

As our “number” variable is greater than 2 and lesser than 3, the output of the ‘Condition’ action will be true.
Nested conditions in Power Automate
We can enhance complexity by allowing “conditions inside conditions”. When clicking in “Add” and “Add group”, Power Automate generates a block of conditions that can be tested additionally to the outer conditions (by using the “And” operator) or alternatively to them (by using the “Or” operator). The internal block of conditions includes its own And/Or operator to validate its contained conditions:

In the example provided, the logical statement is as follows: “If the number is greater than 2 and less than 5, and either not equal to 4 or equal to 8, then the result is passed.” This statement leads to the following conditions:
- number must be greater than 2
- number must be lesser than 5
- number must not be equal 4, or be equal to 8
In our specific use case, the “number” variable satisfies the first two conditions but fails to meet the third condition since it is equal to 4. As a result, the outcome is classified as “not passed”:

Conclusion
Conditions are a very powerful feature from Power Automate, and you may use it a lot during your flows building. With its intuitive interface and support for multiple conditions, this action provides flexibility and control over automation flows, allowing businesses to customize behavior based on variable outcomes.
