Power Automate, as a low-code tool, provides a platform for users without a software development background to effectively create automation solutions. Some of the Power Automate features, however, incorporate programming concepts such as variables, loops, and conditions.
One of the most significant features in Power Automate is the Object data type, a data structure commonly found in JavaScript programming language. In this article, we will explore what is an object and how should you use it in Power Automate. We’ll demonstrate how this structure works, providing insights into building more effective flows and mitigating common issues.
Objects in Power Automate
For those with a software development background, it’s important to clarify a potential confusion: the objects in Power Automate diverge from the traditional Object-Oriented Programming definition. Instead, they align more closely with JavaScript objects, representing a complex data type that organizes data via a collection of key-value pairs (which are also sometimes called “properties”).
For individuals without programming experience, objects in Power Automate serve as data types that store information using keys and values. Typically, they consolidate various details or attributes about a single entity. As Power Automate organizes its data behind the scenes in a JSON (JavaScript Object Notation) format, nearly every action in Power Automate involves interacting with objects behind the scenes.
Typically, the users interact with the dynamic contents of the action’s output, but understanding the objects empowers them to access additional properties and manipulate data within expressions. For instance, the “List rows present in a table” action from the Excel connector return an array of objects (to understand how to read data from Excel in Power Automate, refer to this article), with each object representing an individual table row. Consider the following table as an example, comprising 3 columns and 6 records:

After running the “List rows present in a table” action, we get the following raw outputs (for details on accessing raw outputs in Power Automate, check this article), where the objects are defined between curly brackets (as marked in red). Each highlighted object corresponds to a row from the manager_employee Excel table, containing its columns (Employee, Manager and Manager Email) as keys and the respective table entries as values:

In the image above, all text that is bolded is a key, while the remaining text represents values. Additionally, everything before the “:” character signifies a key, while everything following it signifies a value. Each pair of keys and values is separated by a comma.
What can be stored in an object in Power Automate?
Values within an object can contain various data types as values, like strings, integer numbers, decimal numbers, arrays, and even other objects. However, it’s important to note that keys within an object will always be strings.
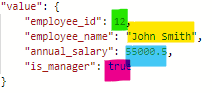
For instance, when storing employee data, a single object can accommodate multiple data types, as illustrated in the following example:
How can I create an object in Power Automate?
Custom objects can be created in Power Automate using the “Initialize variable” action, where “object” is set as type (to learn more about variables in Power Automate, refer to this article):

After that, it’s time to assign a value to the object. As previously mentioned, objects are encapsulated within curly brackets (highlighted in yellow), where you can input your keys (remembering they are always strings) and values. ensure to include commas at the end of each key/value pair (highlighted in green):

Another approach to creating objects in Power Automate is through the “Compose” action. While the process is quite similar, utilizing “Compose” restricts the ability to modify its value in the future, unlike variables.
After creating both a variable and a “Compose” with identical values, the output will be the same for both actions:

Accessing the object values with expressions in Power Automate
Through expressions, it is possible to access object values. The expression is pretty straight forward: simply reference the variable or action output (you can use dynamic contents for it), and include the key within square brackets and single quotes. Check this article to understand how to work with dynamic contents and expressions in Power Automate.
For instance, let’s initialize a variable called “name” to store the employee name from the employee object created in the previous step. This can be achieved using the expression variables(’employee’)[’employee_name’], as highlighted in yellow:

After executing the flow, the variable will indeed return only the employee’s name, as expected:

Handling missing object keys in Power Automate
Objects can be complex, capable of storing dozens of key/value pairs. In certain scenarios, the same action may return individual objects containing a specific key, while others may not.
The problem is that Power Automate will raise an error if you try to access a value that doesn’t exist in the object. For example, if we try to access the value from the key “department” in our “employee” object, our flow will fail:


The error message indicates that the property (in this case, the key) “department” doesn’t exist in the “employee” object, as expected. To prevent this error and return a property only if it exists, we can simply insert a question mark before the key reference in the expression (highlighted in blue):

In this scenario, our flow will run successfully, and no value will be assigned to the variable, as the “department” key does not exist in the object:

Accessing nested objects in Power Automate
To access objects within other objects, we follow the same logic. Let’s include a new key in our “employee” example, to store details about the department:

In this case, the “department” key is another object, and if we want to access the location of the department where the employee works, we would need to pass the key references inside the expression, which would look like this: variables(’employee’)?[‘department’]?[‘location’]. Let’s assign this expression to a variable and check its outputs:

After running the flow, we have access to the “location” property:

Have in mind that some objects will have several layers of nested objects, so it is not unusual to have large expressions to return the desired values. In some cases, you may also need to handle array references, accessing specific indexes of an array. To learn more about how to interact with arrays and access its individual elements, check this article.
Conclusion
Understanding how to work with objects in Power Automate is a great skill for building efficient and error-free workflows. By understand the concept of objects, users can effectively organize and manipulate data, identifying the possible causes of an error and the available workarounds.
