
Office Scripts automate repetitive tasks in Microsoft Office, enabling you to save valuable time, increase efficiency, and enhance overall productivity.
Office Scripts are designed to work seamlessly with popular Office applications such as Excel and Word, making them accessible to users across various departments. With Office Scripts, you can automate complex calculations, generate reports, format documents, and perform other routine actions with just a few clicks.
Because of this wide set of solutions that Office Scripts provide, the tool can be considered the New VBA. Also, one of the main advantages of this feature is its capacity to be connected to Power Automate (check this article for more details), which will allow an Excel file to be integrated with several other Microsoft and third-part services. In this post, we will investigate how to create Office Scripts in Excel Web.
Creating your first Office Script
Office Scripts work with Typescript, which is a programming language based in JavaScript. Even that the Typescript syntax is completely different from the VBA, you still can leverage the logical thinking needed to create solutions with both tools.
The Office Scripts are created in the Code Editor inside the Excel Web. To start the Code Editor, take the following steps.
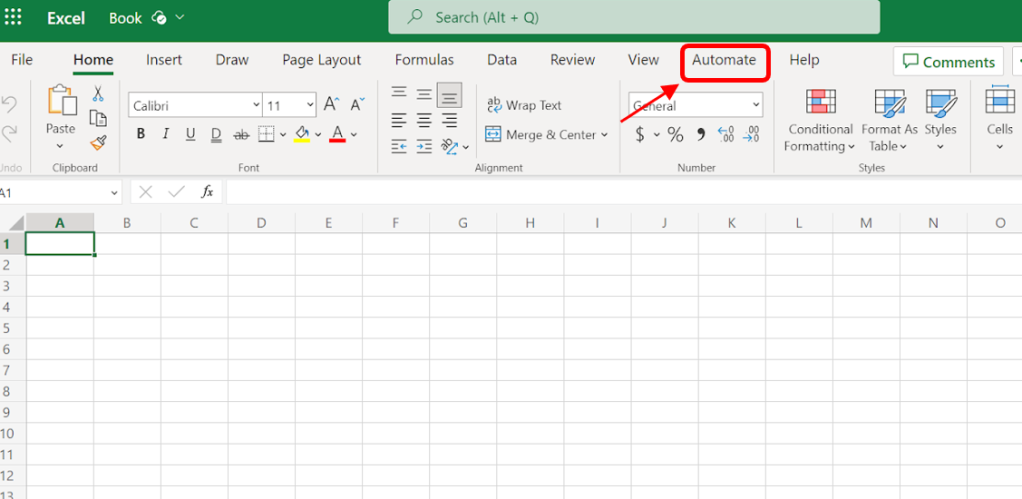
First, navigate to the “Automate” tab located in the toolbar at the top of the screen.
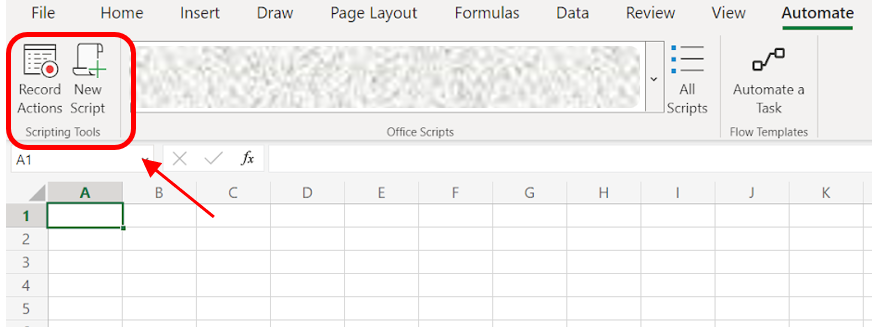
In the “Automate” tab, you will be able to see all the available Scripts (blanked in this image, to prevent any personal data exposition 😊). To create a new script, navigate to the “Scripting Tools” section and click on the “New Script” option.
A new side bar with the code editor may appear in your screen, with a space for entering your code. This is where you will create your Office Scripts!

What is the “function main”?
Every Office Script run inside the function main. A function in JavaScript (or in Typescript) is a reusable block of code that performs a specific task. It has a similar role to the functions/procedures in VBA: you can call it several times to execute a task.
The function is initialized with the reserved word “function” (you may see in all images that this word has a different color, as it is reserved), it’s name and the parameters, which are optional and are allocated inside parenthesis. In summary, a function syntax looks like this:
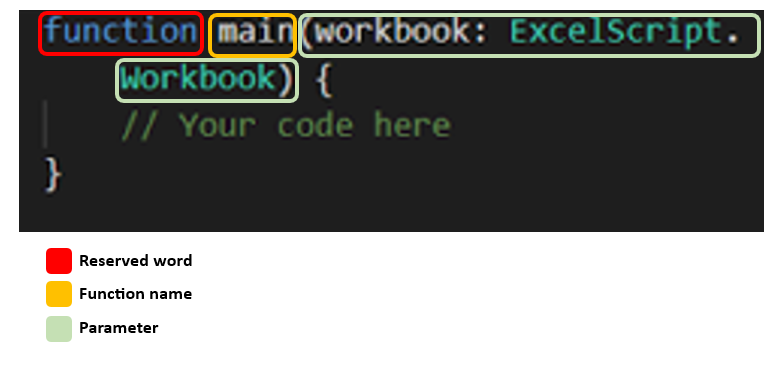
By default, the parameters are optional, so you can keep the parenthesis empty when creating it. However, the function main in the context of Office Scripts requires at least one parameter: the workbook.
The workbook is the main object that represents your Excel file and will be important to perform any iteration with the Office Script. Initially, for less complex Scripts, you can write all commands within the function main. However, it’s worth considering the option to create smaller, reusable functions for better script organization and efficiency.
Use case description
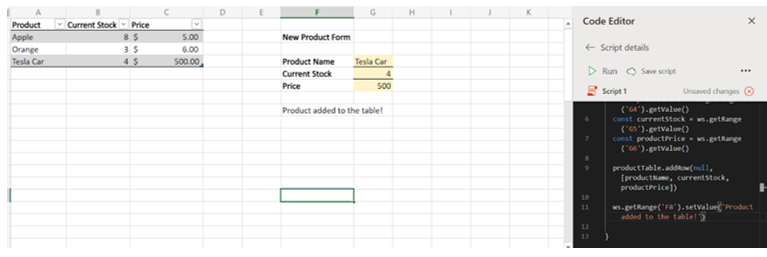
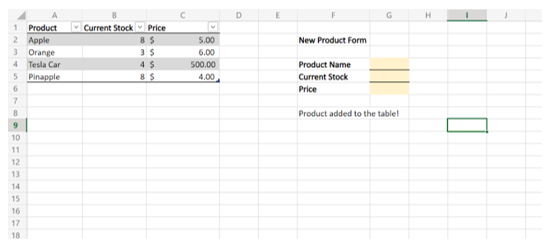
Our fake use case will use an Excel file to create a simple “form.” By entering data into this form, we can populate a table with product information. The table comprises three columns: product name, current stock, and product price. Once the form is filled, users can click a button to execute a script that extracts the data from the form and adds it to the product table.
To set up this system, we have a table named ‘Products’ in cells A1 to C3, along with a compact form in cells G4, G5, and G6 where users can input the necessary data.

First steps with the code: creating variables in Excel Scripts
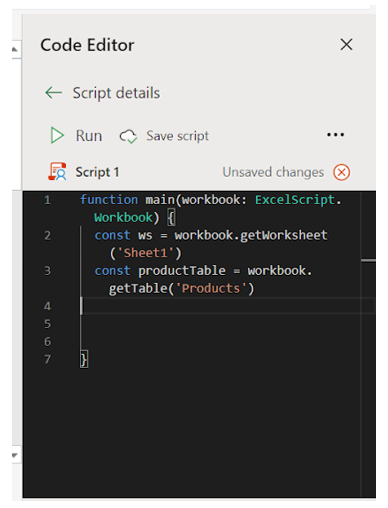
Once you start a new script (following the steps mentioned above), you will write your code inside the “main” function. To begin, declare two variables that will store the worksheet and the ‘Products’ table from your Excel file.
To create these variables, use the “const” keyword followed by the desired names. In our case, we’ll use “ws” and “productTable” (lines 2 and 3). Assign these variables using the “getWorksheet()” and “getTable()” methods provided by the workbook. The lines of code will be”:
const ws = workbook.getWorkSheet(‘Sheet1’)
const productTable = workbook.getTable(‘Products’)
Where:
- Const: This is the reserved word from JavaScript/TypeScript used to create a variable that cannot be changed.
- workbook: Reference to the current file. This is the element used by JavaScript to connect with our Excel file, and we may access it to interact with tables, worksheets, ranges…
- getWorkSheet(): Method from the workbook element to access a specific worksheet. You can pass as argument either the name of the worksheet (as we did) or it position.
- getTable(): Method from the workbook element to access a specific table inside the file. The table can be anywhere in the Excel document and you do not need to have the worksheet activated. You may pass the name of the table as argument inside the parenthesis.
Specify the name of the worksheet and table within the parentheses of each method. It’s important to ensure the names you provide correspond to existing elements; otherwise, your code may not work as expected. As we’ll be manipulating these elements in our script, we need to retrieve them from the workbook.
Reading data from the Excel file with Excel Scripts
To read the data from our “form” fields, we need to access specific ranges (G4, G5, G6). We can achieve this by utilizing the “ws” variable, representing our worksheet. Using the “getRange()” method and specifying the desired cell, we retrieve a Range object. To read the content of the range, we employ the “getValue()” method available in Office Scripts.
In summary, we access the worksheet using the “ws” variable, select the desired cell with the “getRange()” method, and retrieve the cell’s value using the “getValue()” method.
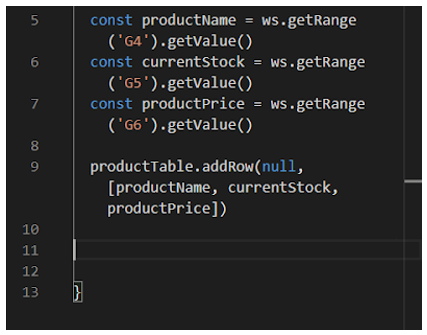
The complete code for accessing the value from the cell ‘G4’, which will receive the product name entry, is ws.getRange(‘G4’).getValue(). We will assign this value to a variable called productName (code line 5):

Then we will repeat the same process for the other two form fields (cells G5 and G6), assigning it to the variables currentStock and productPrice (code lines 6 and 7):


Adding a row into a table with Office Scripts
With the form values in hand, our next task is to insert them into the Products table. We do this by referencing the “productTable” variable, which holds our table of products, and using the “addRow” method.
The “addRow” method has 2 parameters:
- The table row where you want to insert the new record. In our case, to add the record to the end of the table, we can pass “null” as the parameter value. If you want to insert the record at a specific row, such as the 5th row in a table with 10 rows, you would provide the value 5 for this parameter.
- The values to be inserted into the table. Since our table has multiple columns, we can insert the record as an array.
In TypeScript, an array is a collection of elements represented by values enclosed in square brackets, separated by commas. When creating an array to insert data into the products table, we must keep the same order of the table’s columns.
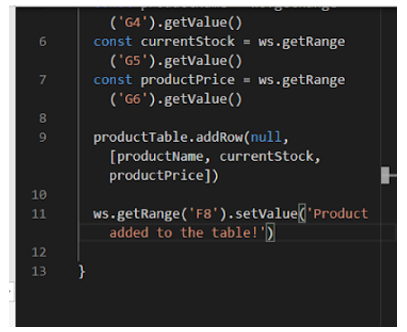
To add a new row to the table, we utilize the following line of code: productTable.addRow(null, [productName, currentStock, productPrice]). Let’s understand each component:
- productTable: Variable that stores the products table from our Excel file.
- addRow: Method called on the productTable variable to add a row to the table.
- null: As the first argument of the addRow method, we pass null to indicate that the new record should be inserted at the end of the table.
- [productName, currentStock, productPrice]: This array contains the variables extracted from the form, arranged in the same order as the columns in the products table.
This is the result:
As an additional step, we want to inform the user that the record has been successfully inserted into the products table. This notification will appear in cell “F8” with the message “Product added to the table!”. We can achieve this by using the following line of code: ws.getRange(‘F8’).setValue(‘Product added to the table!’). Let’s understand the code components:
- ws: Reference to the variable that we created to store the worksheet ‘Sheet1’.
- getRange: This method is called on the worksheet to access a specific range. We provide the desired range as an argument within the parentheses. In our case, we access the ‘F8’ range.
- setValue: Method to write a value in the range. Previously, we used the ‘getValue()’ method to read cell values, and now we use setValue to write. The value to be inserted into the cell is passed as argument to the method.
Running an Excel Script
With the script prepared, it’s time to test it. Click on the three dots symbol above the code editor and choose “Run” from the options.

Upon running the script, it carries out the following tasks:
- It reads the values entered in the form, which are located in the range G4:G6.
- It adds each value as a new row to the Products table, placing them at the end.
- It displays a success message in cell F8.
Clear content in Excel Scripts
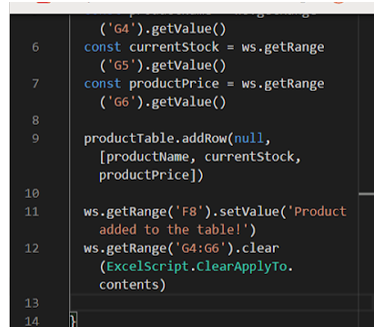
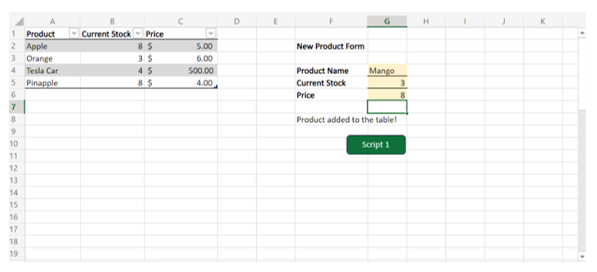
To enhance user experience, we can implement an additional feature in the script: clearing the values in the ‘New Product Form’ after execution, ensuring it is ready for future use.
To clear the range, we use the “clear()” method in conjunction with “getRange()”. By default, the “clear()” method removes both values and formatting. However, in our scenario, we only want to clear the values. To achieve this, we specify the argument “ExcelScript.ClearApplyTo.contents” (without quotes). This is a native element provided by Office Scripts. The complete code for this task is as follows: ws.getRange(‘G4:G6’).clear(ExcelScript.ClearApplyTo.contents).
And this is the result when we add a product “Pineapple”, with 8 units at the stock and a price of $4: the product is inserted into the table, but the form is clear.
Adding a button in Office Scripts
To make it more user-friendly, we can create a button within the Excel file, allowing users to run the script without accessing the code editor. This functionality is similar to what can be done in VBA. To achieve this, you need to click in the three dots above the code editor, scroll down on the options and find “Add button”.
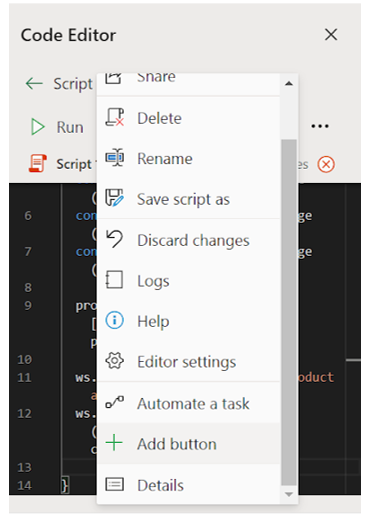
With the button in place, users can easily execute the script by clicking on it, without the need to navigate through the code editor.
Complete code
This is the complete code:
function main(workbook: ExcelScript.Workbook) {
  const ws = workbook.getWorksheet('Sheet1')
  const productTable = workbook.getTable('Products')

  const productName = ws.getRange('G4').getValue()
  const currentStock = ws.getRange('G5').getValue()
  const productPrice = ws.getRange('G6').getValue()

  productTable.addRow(null, [productName, currentStock, productPrice])

  ws.getRange('F8').setValue('Product added to the table!')
  ws.getRange('G4:G6').clear(ExcelScript.ClearApplyTo.contents)

}
In this blog post, we have covered the fundamental steps to create your first script using Excel Scripts. By leveraging this powerful tool, you can significantly improve your Excel experience and streamline your workflow. Excel Scripts enables you to automate repetitive tasks, validate data, and generate reports effortlessly.
Now equipped with the knowledge of how to create and execute a script, you have the opportunity to optimize your Excel processes and drive efficiency in your daily tasks!
